CloudLinux Advantage
Overview
CloudLinux Advantage for WHMCS automatically configures "Configurable options" that can be linked to the Product/Service.
When a client orders/upgrade a configurable option, a request will be sent to the server to change the CloudLinux features status.
Installation and Configuration
Installation and Update
- Your WHMCS must be properly configured to work with cron because sending requests to the server is sent by cron. How to setting up the cron.
- Plesk requires the installation of an additional extension.
- Download archive https://repo.cloudlinux.com/plugins/whmcs-cl-advantage-plugin-latest.zip
wget -q https://repo.cloudlinux.com/plugins/whmcs-cl-advantage-plugin-latest.zip
- Unzip the archive to
<whmcs_root>/modules/addonsfolder
unzip whmcs-cl-advantage-plugin-latest.zip -d <whmcs_root>/modules/addons
- If your hosting requires specific files permissions, change them accordingly in the folder:
<whmcs_root>/modules/addons/cloudlinux_advantage - Go to the admin panel page "WHMCS/System Settings/Addon Modules", activate "CloudLinuxAdvantage"
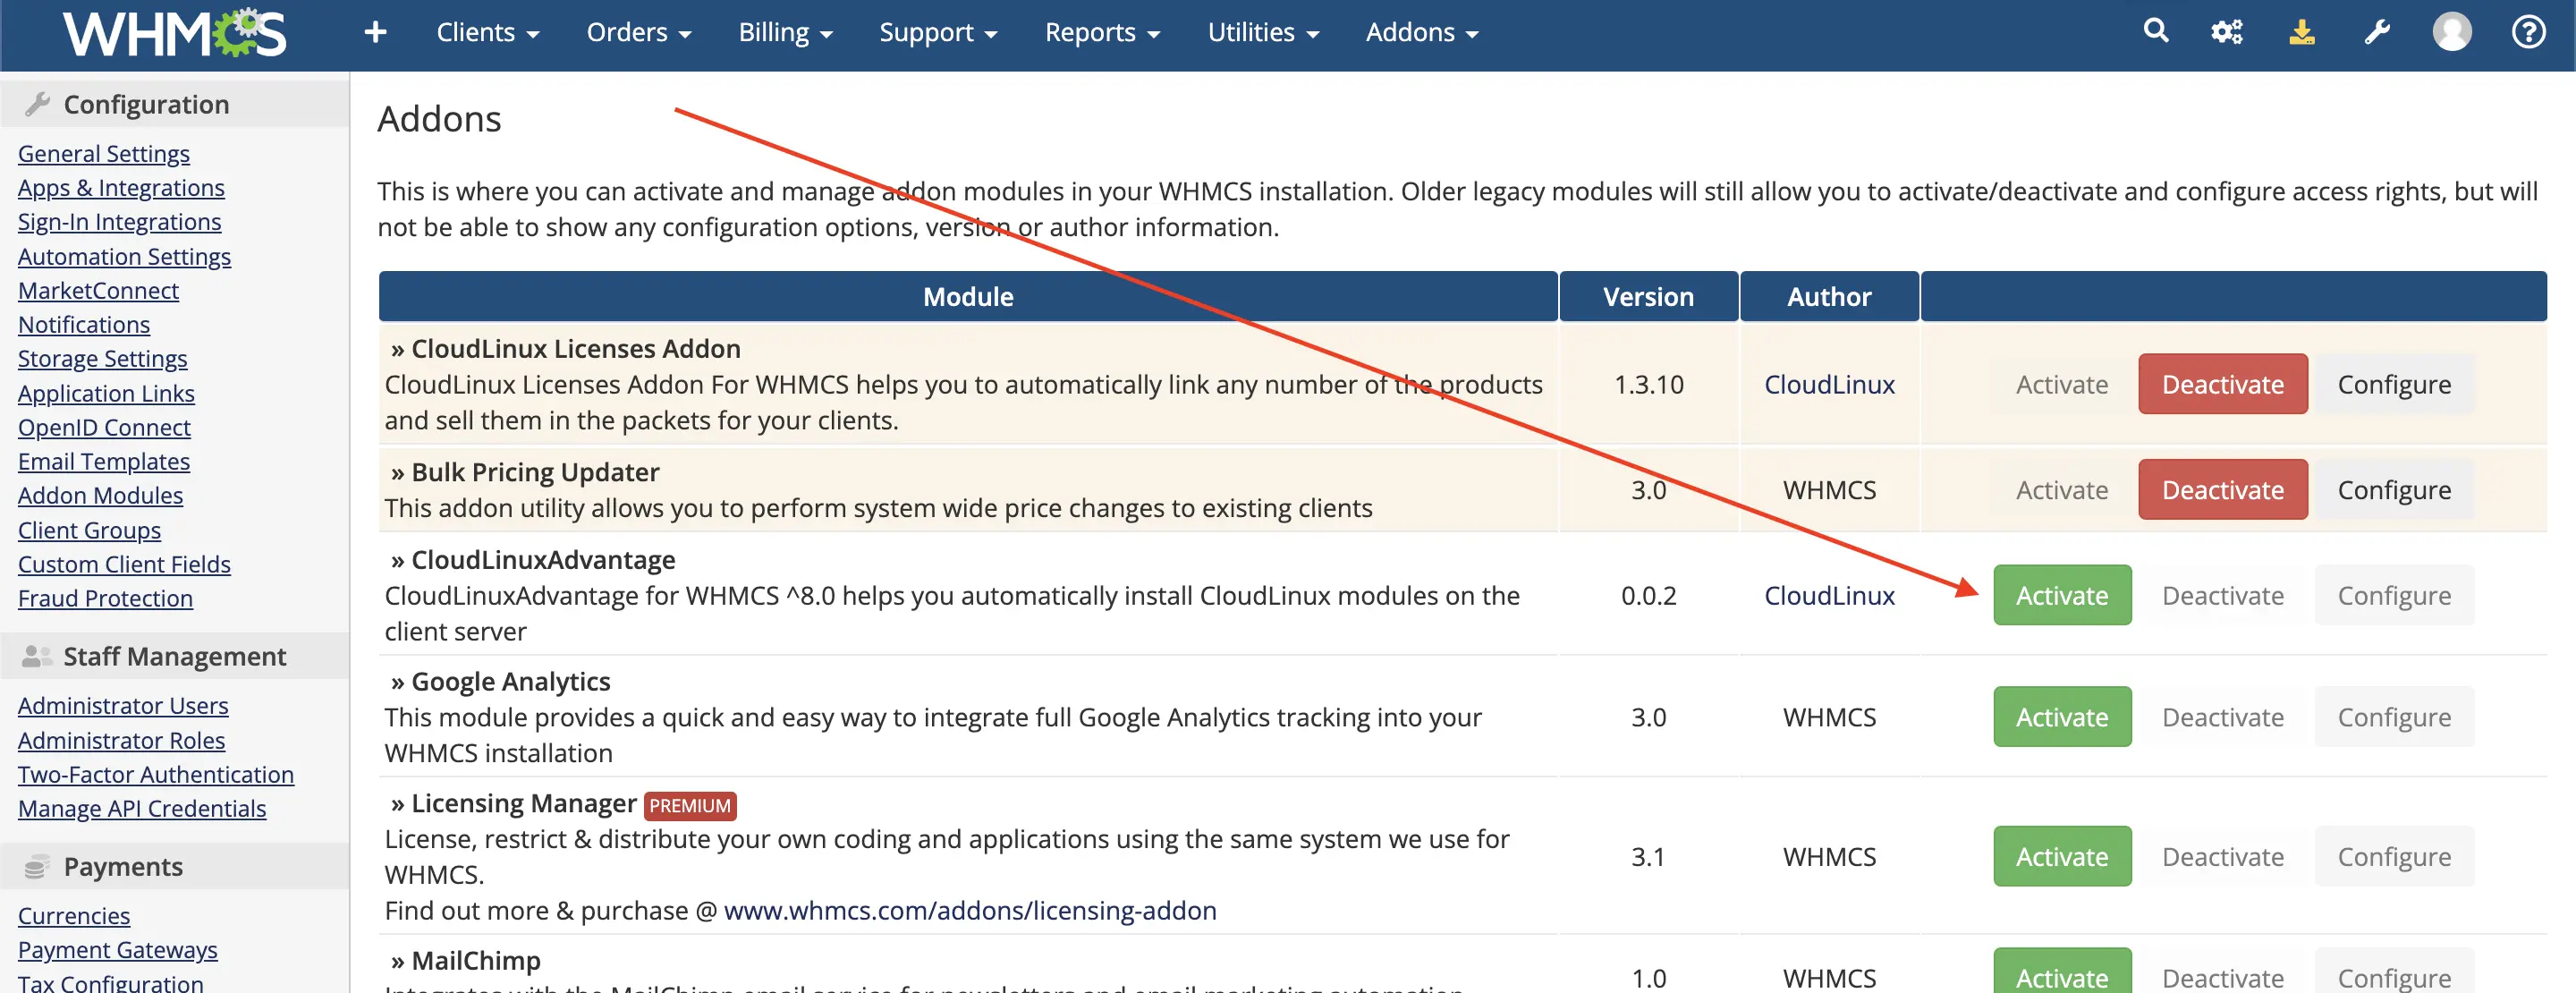
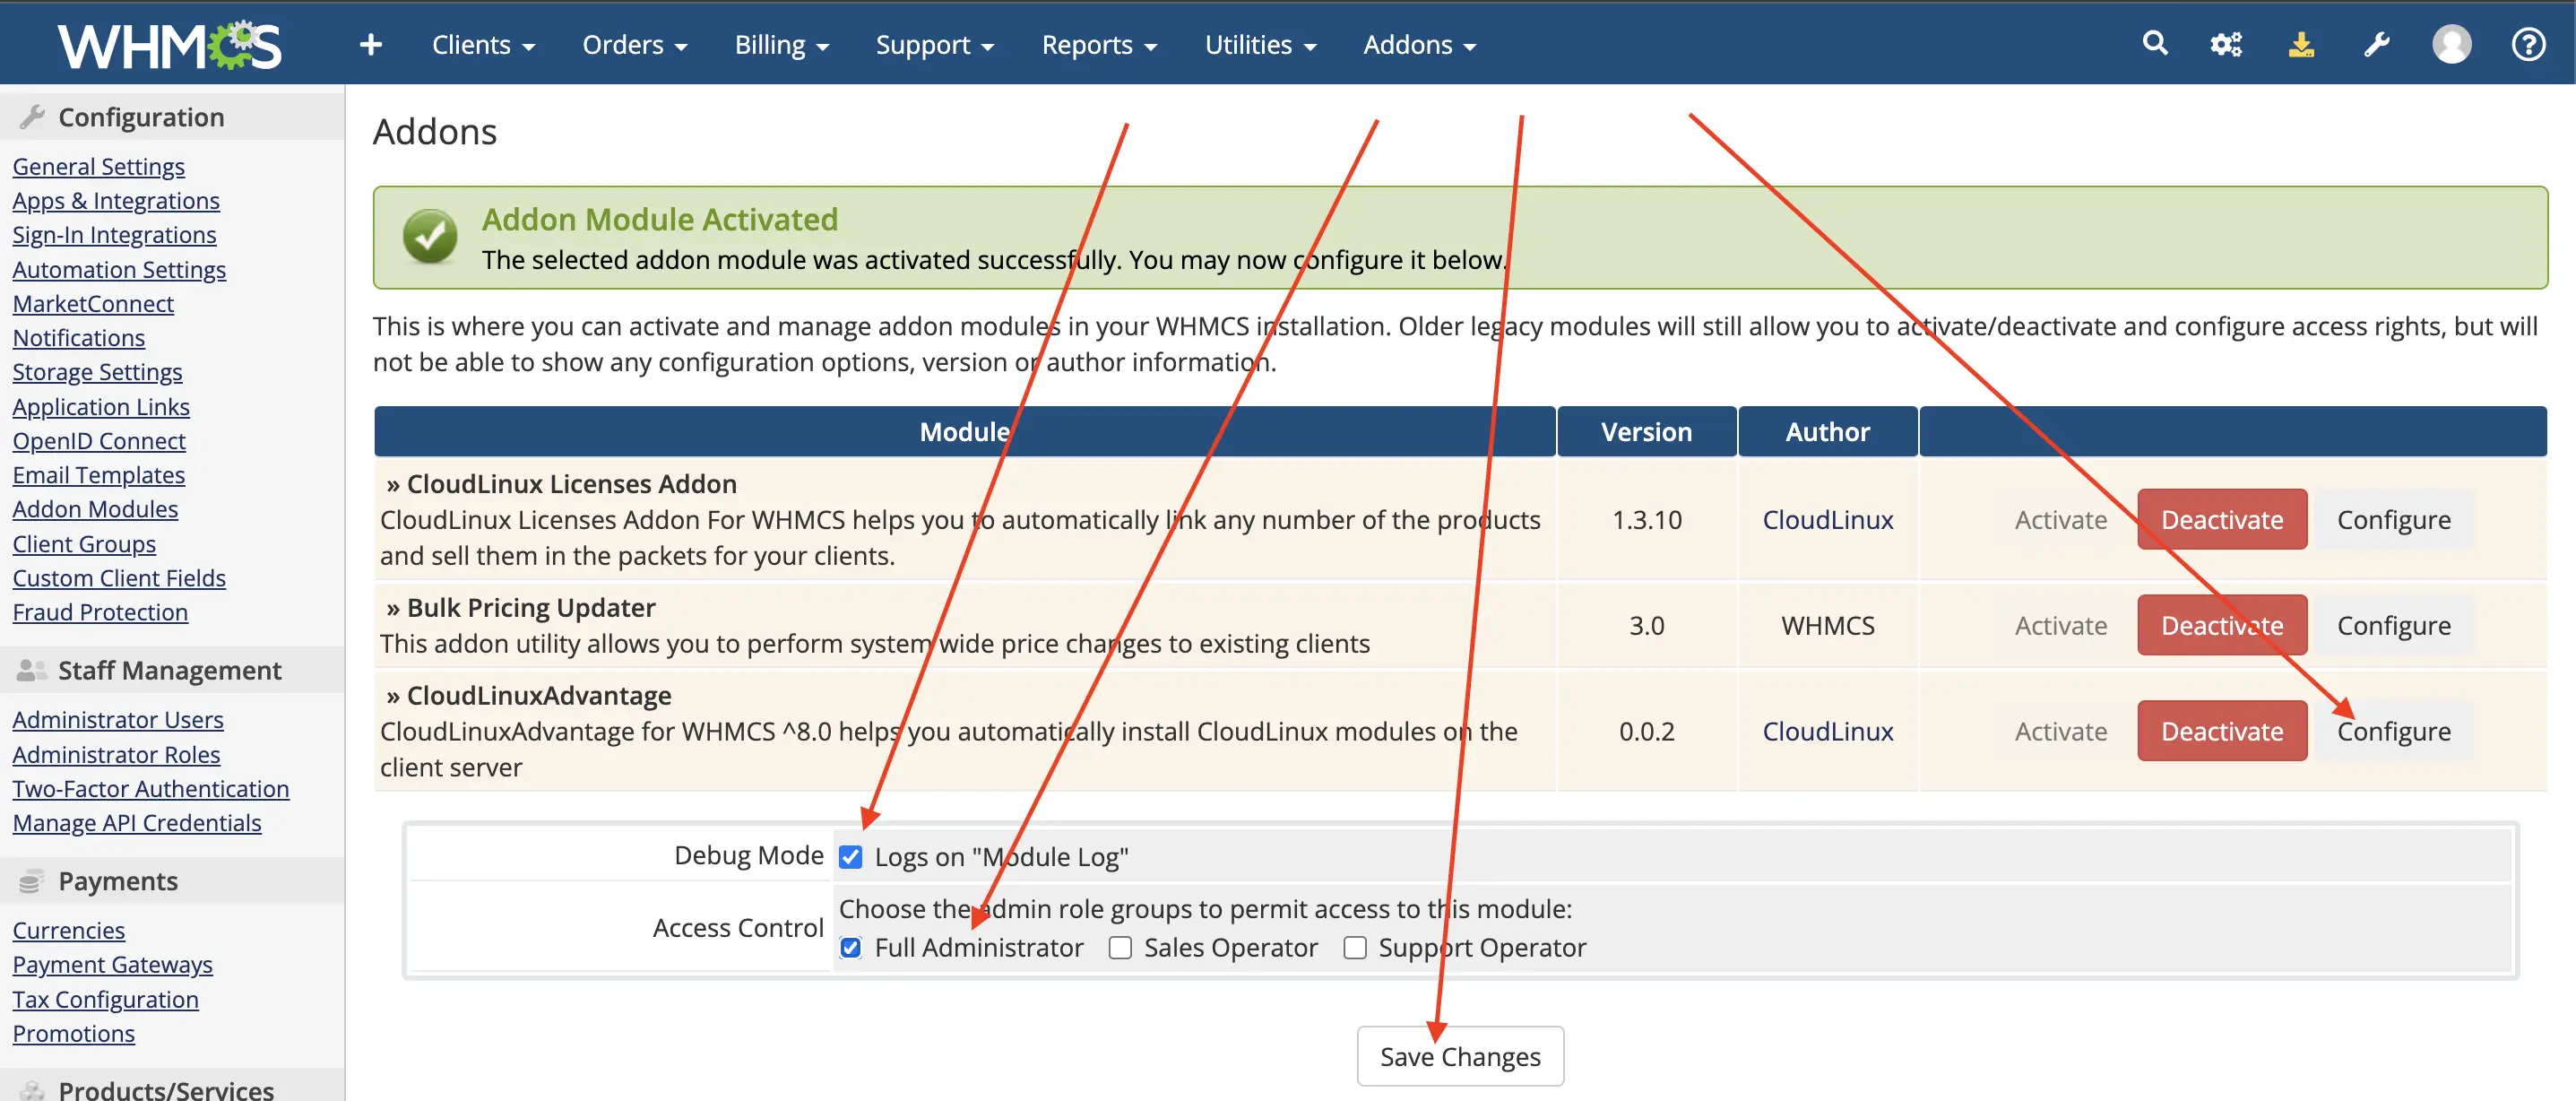
- Configure addon:
- Enable debug mode if necessary. Logs are stored in the "System Module Debug Log"
- Allow administrator access to the addon page to view information about the status of the servers
Notes
When upgrading to a new version, be sure to open the "WHMCS/System Settings/Addon Modules" page to apply the module changes.
Setting prices for "Configurable options"
During addon activation, "Configurable options" AccelerateWP are created automatically (System settings/Configurable Option/Group name "AccelerateWP")
Notes
Don't change the name of the group, options and sub-options!
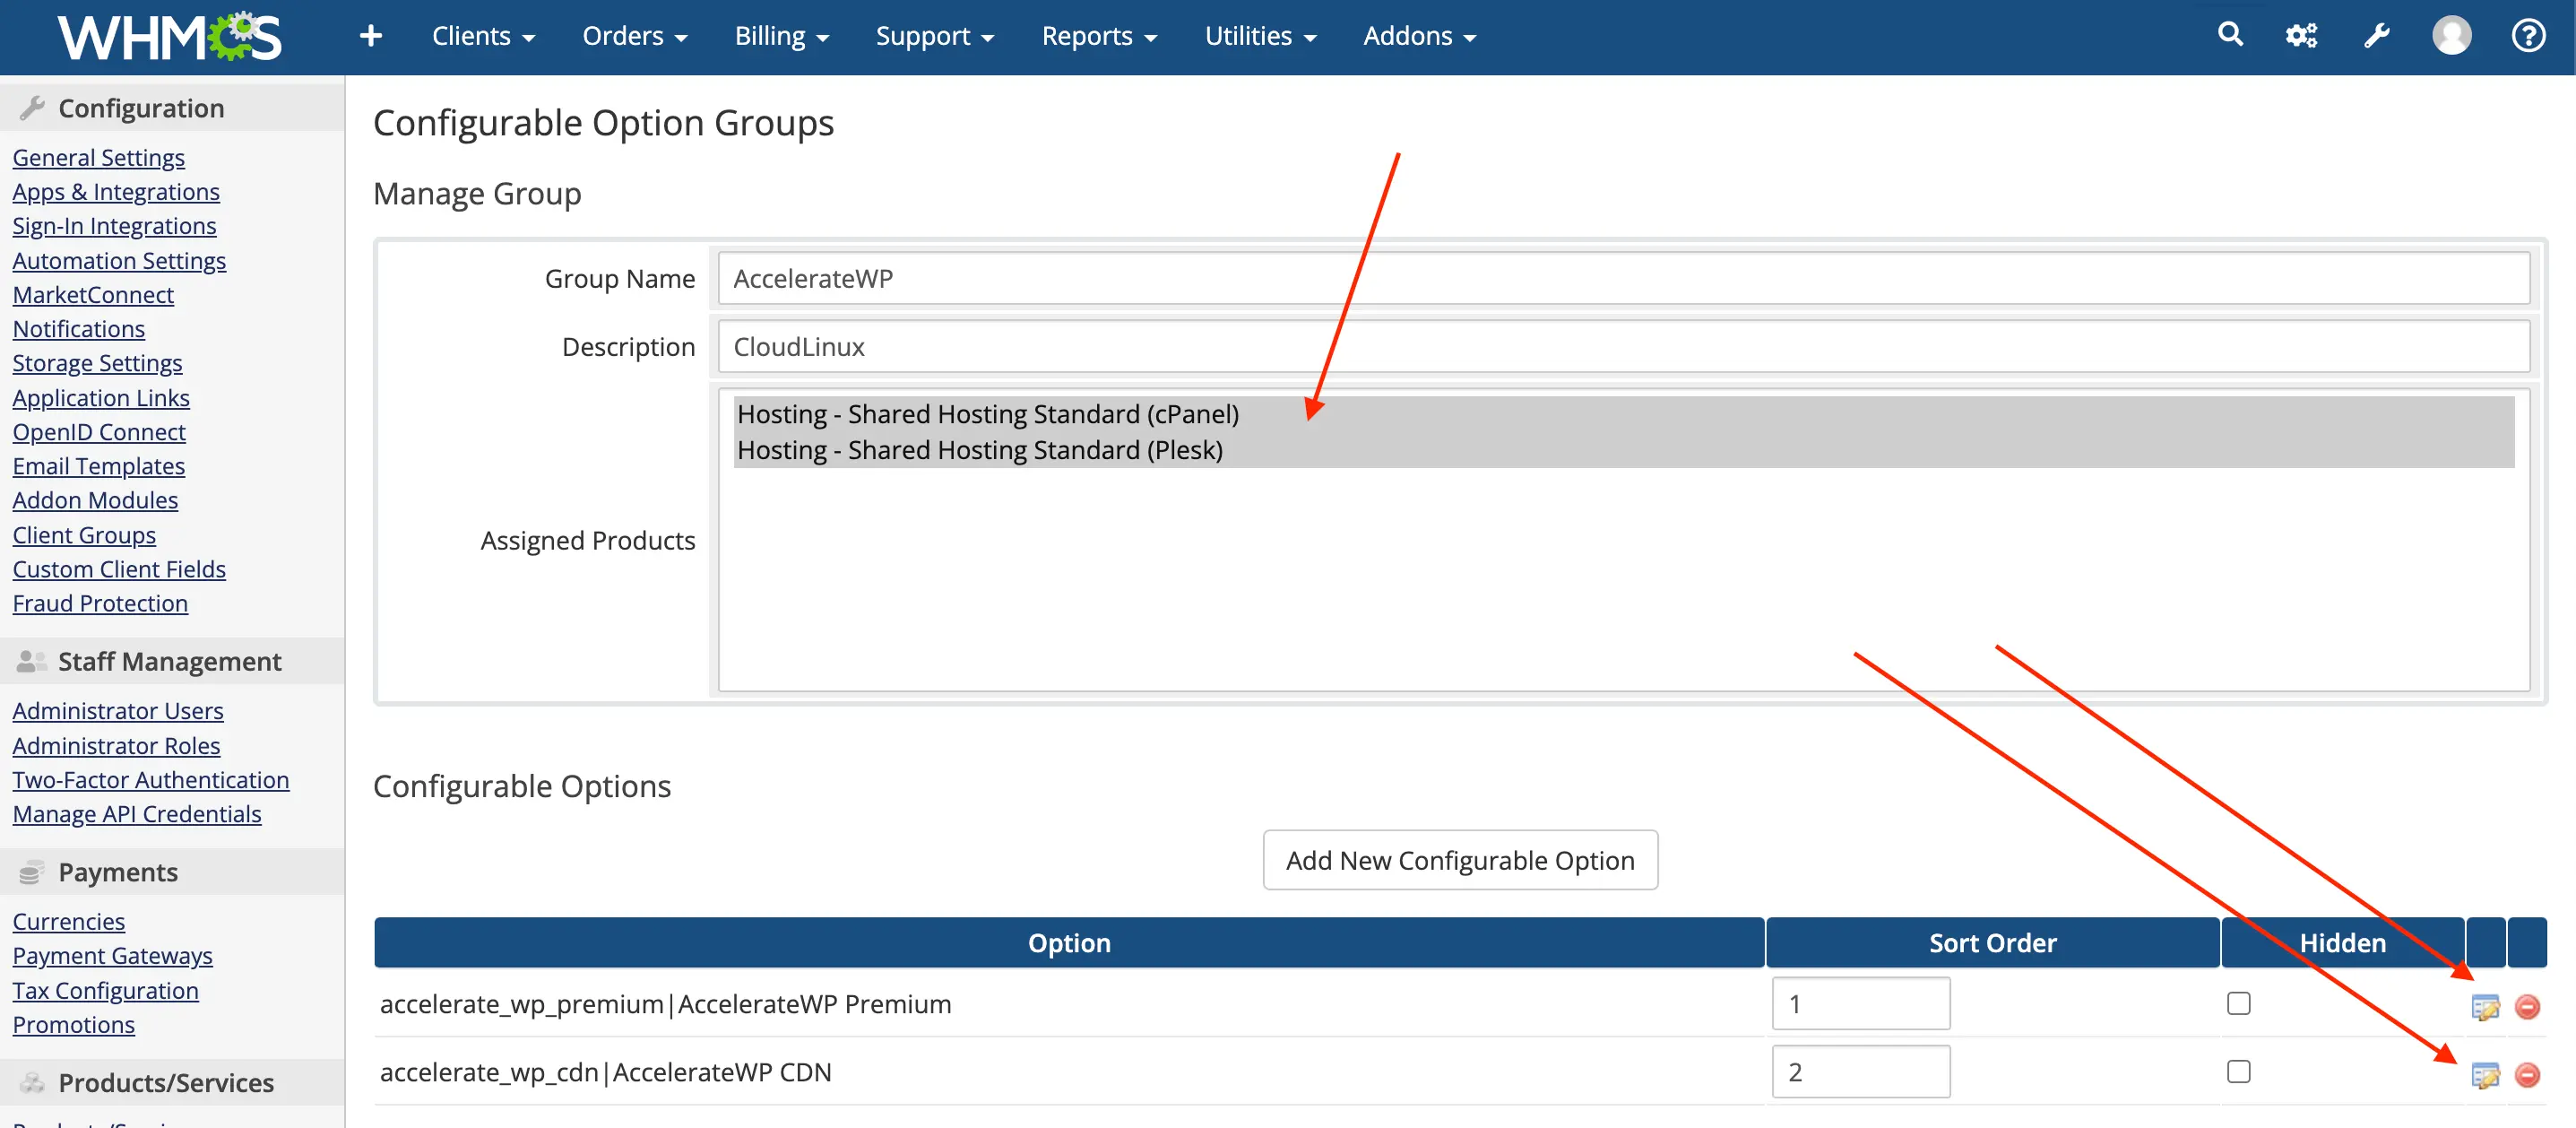
In the AccelerateWP group settings, you need to configure:
- Choose for which products (cPanel/Plesk/DirectAdmin) you can additionally order the service.
- For the "accelerate_wp_premium|AccelerateWP Premium" option, set the cost.
- In the option price settings, there are two options, On and Off. Adjust prices as you see fit.
- For the "accelerate_wp_cdn|AccelerateWP CDN" option, set the cost.
- In the option price settings, there are options: Off, 50 GB, 100 GB etc. Adjust prices as you see fit. You can hide unwanted tariffs using the "Hide" checkbox.
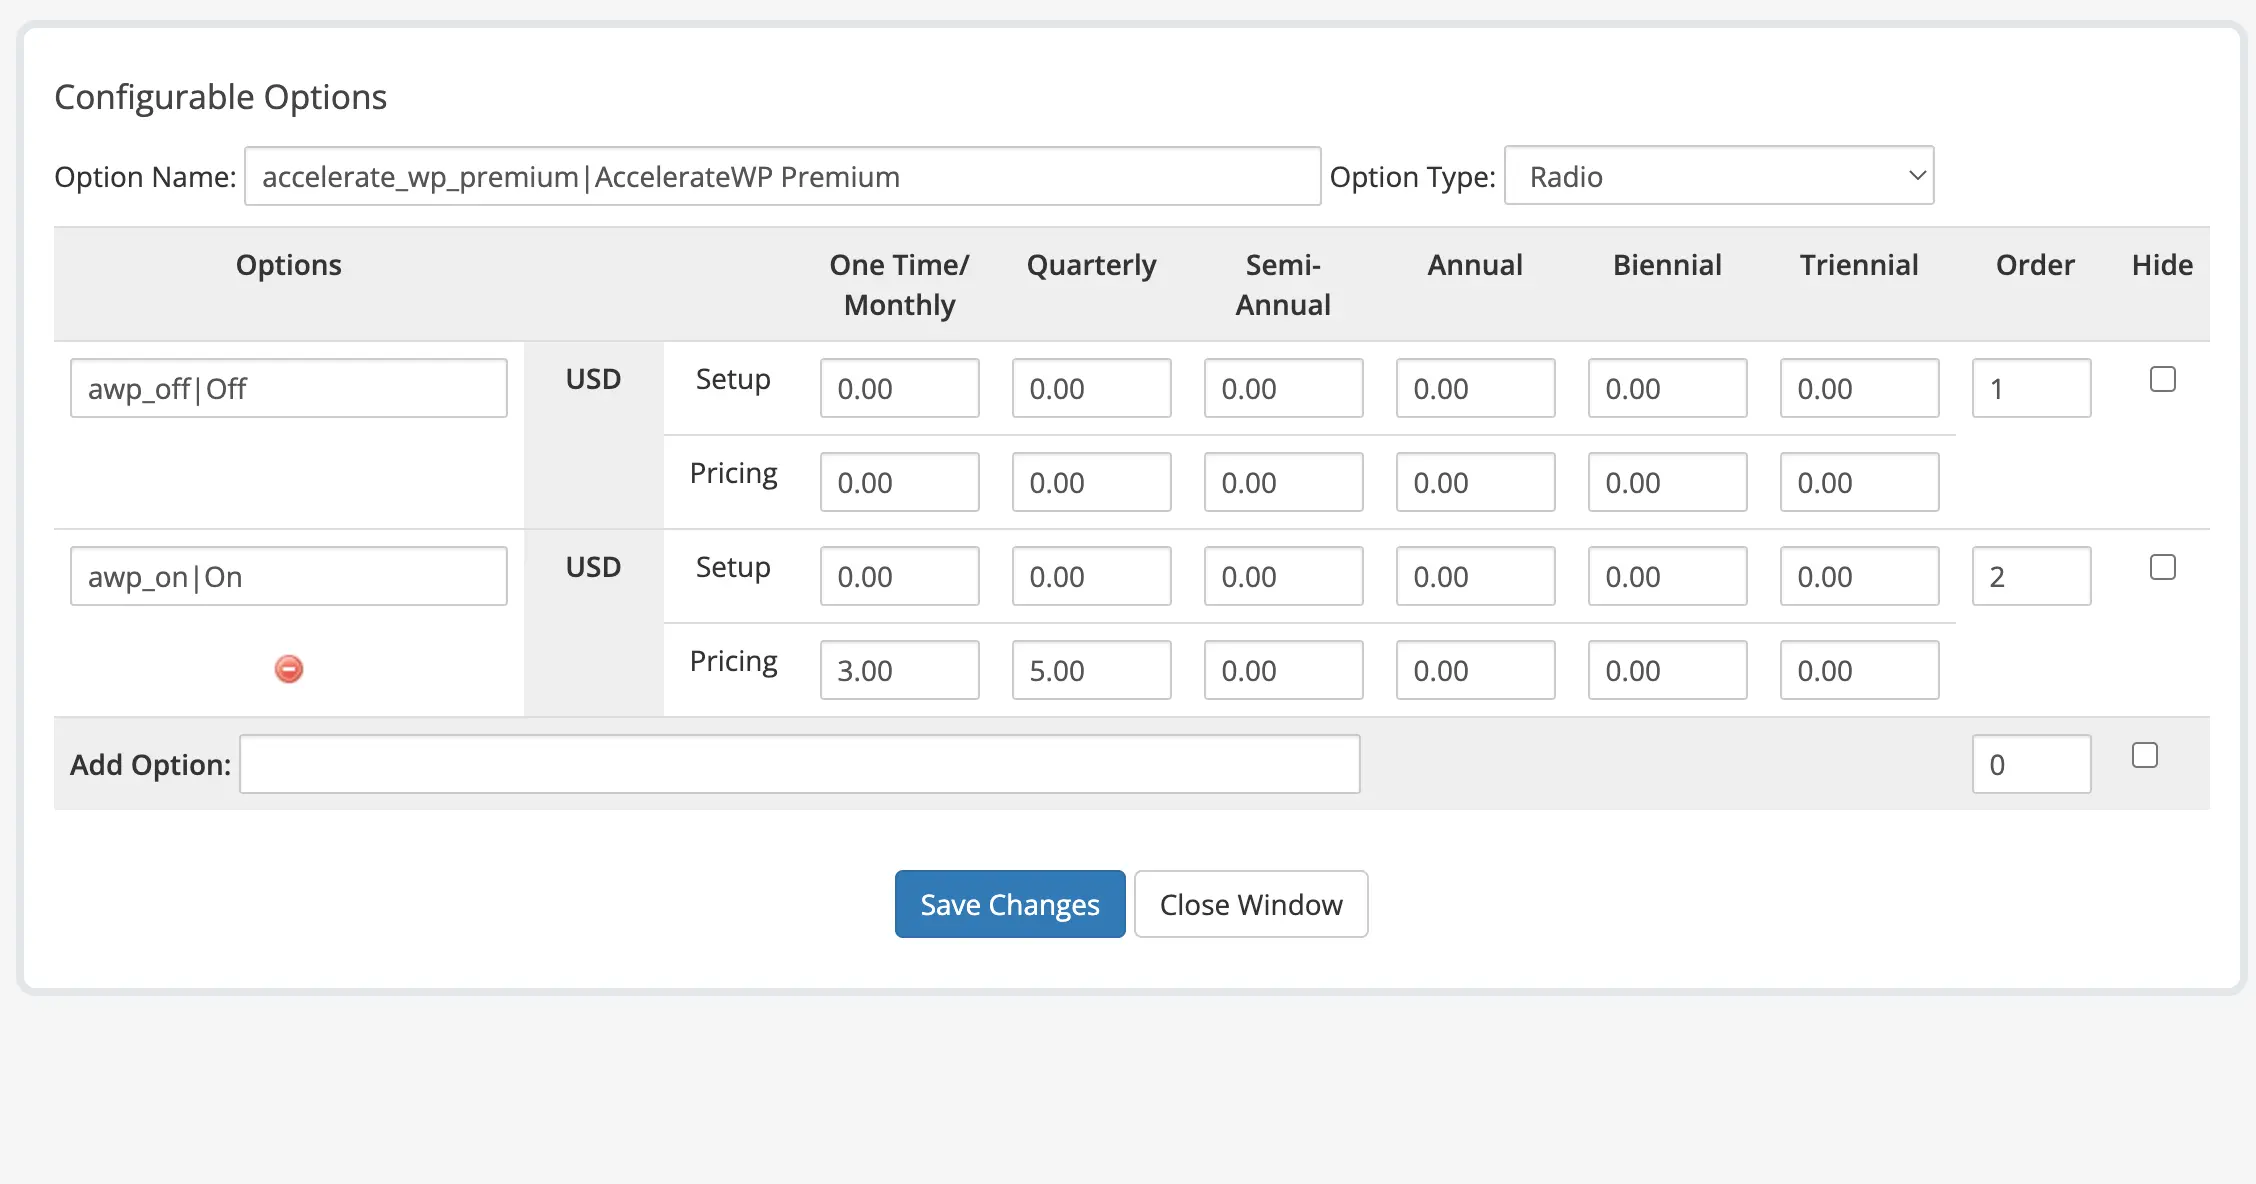
Product/Service setup
Set up your service to work with "Configurable options" in the "System settings/Products/Services".
- Choose the payment type, One time or Recurrent.
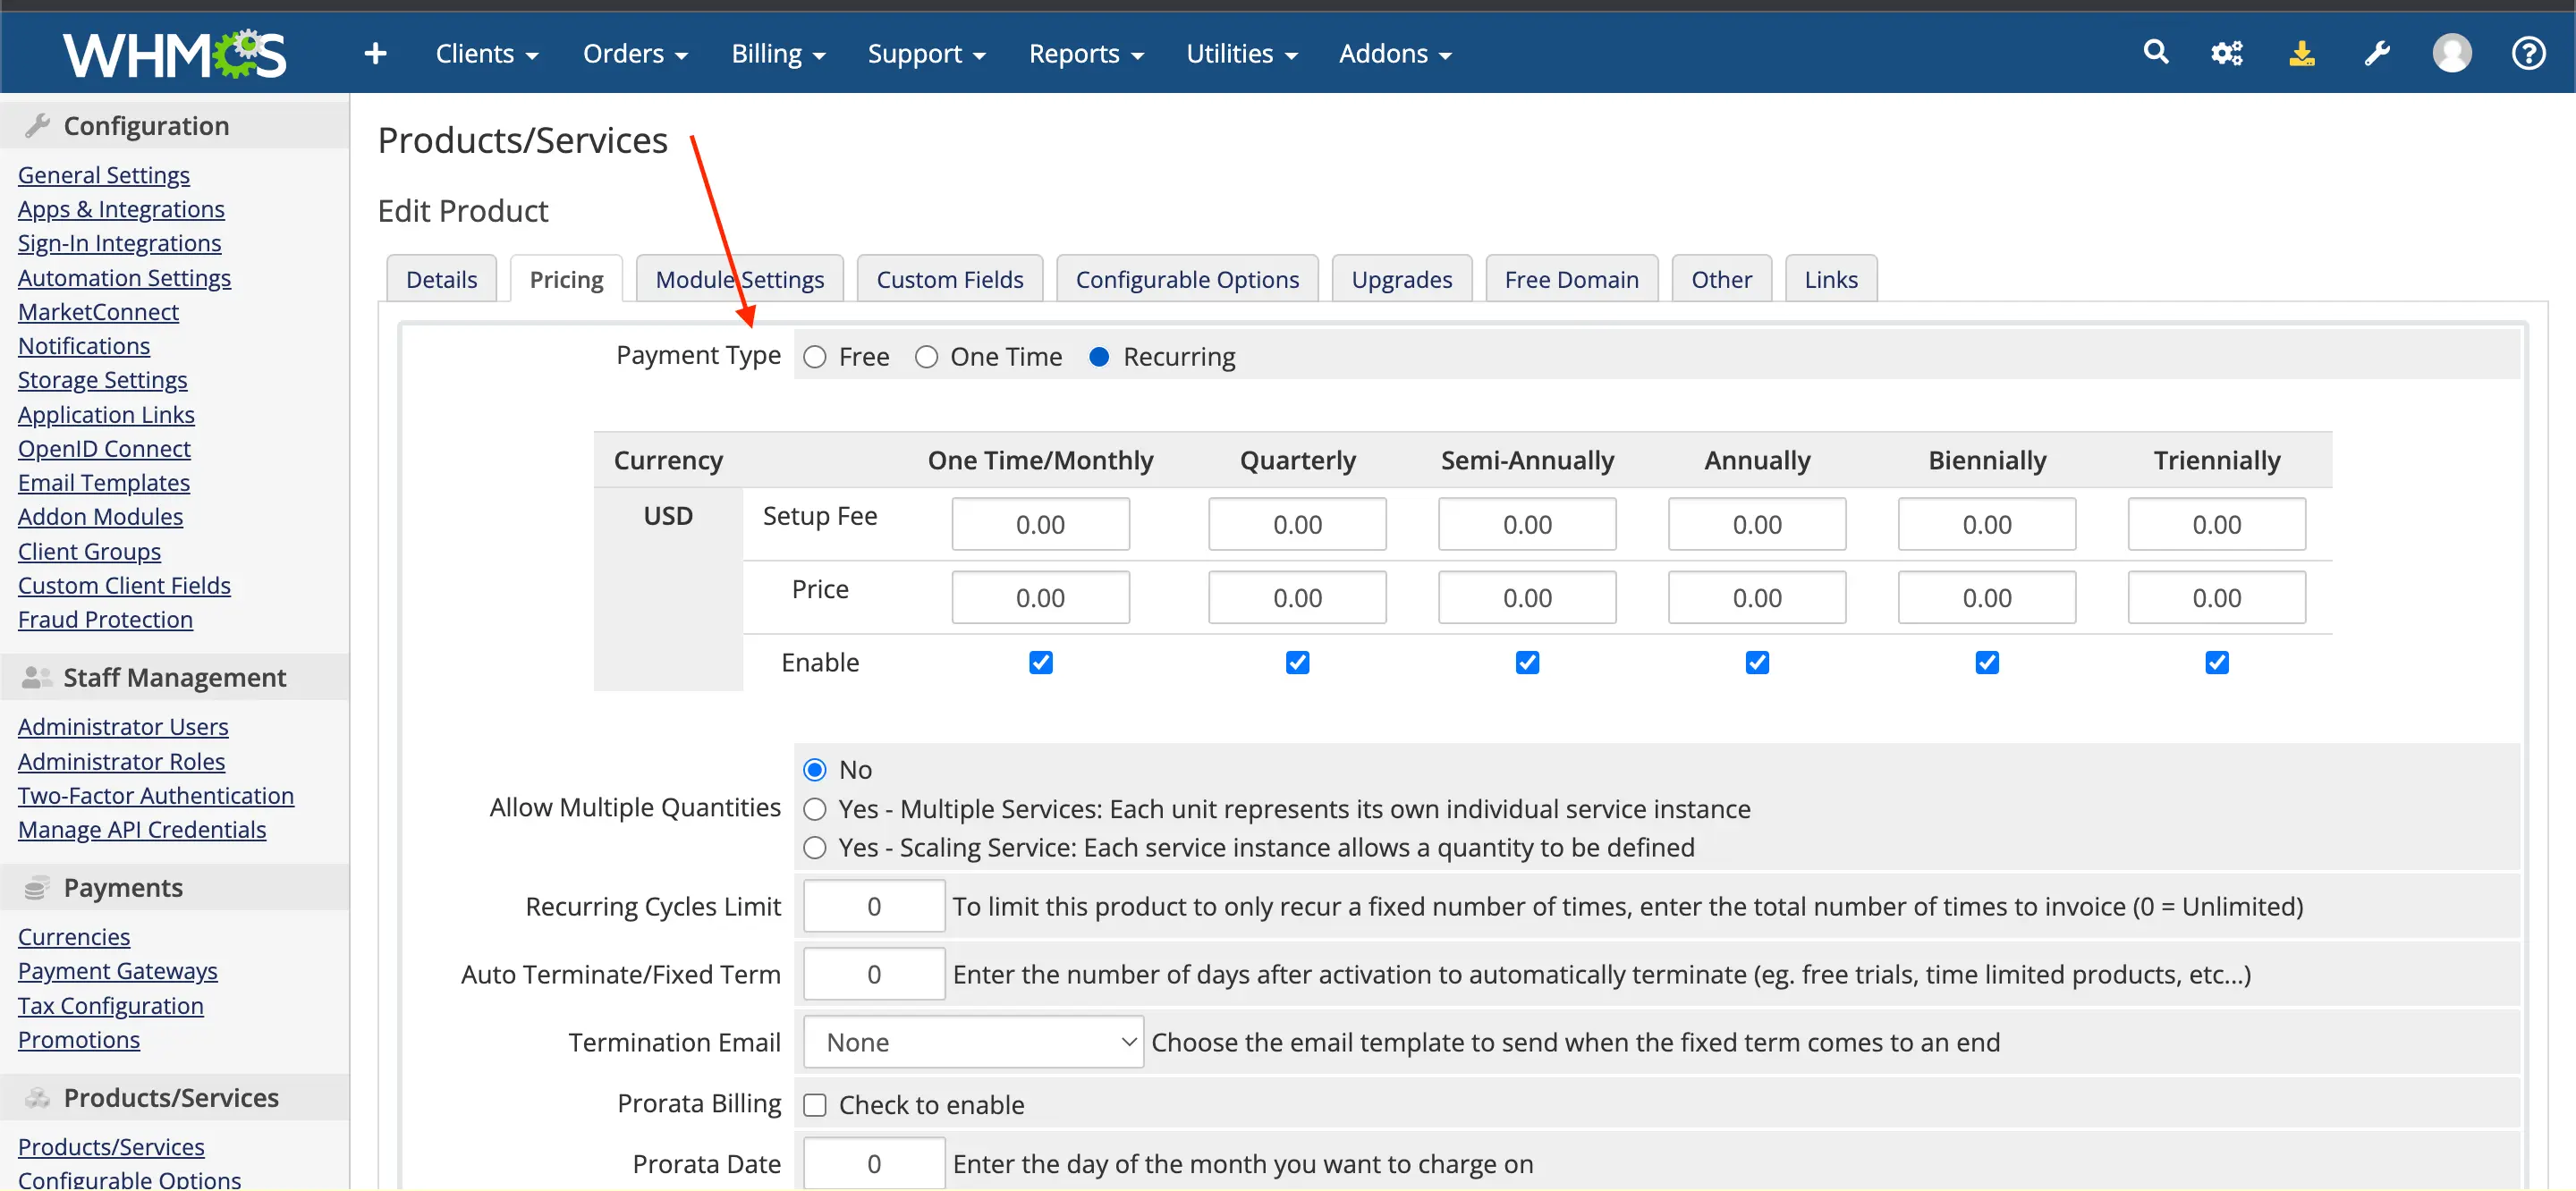
- Make sure the product is associated with the Configurable option "AccelerateWP"

- Allow clients to upgrade Configurable options so they can purchase AccelerateWP for existing subscriptions.
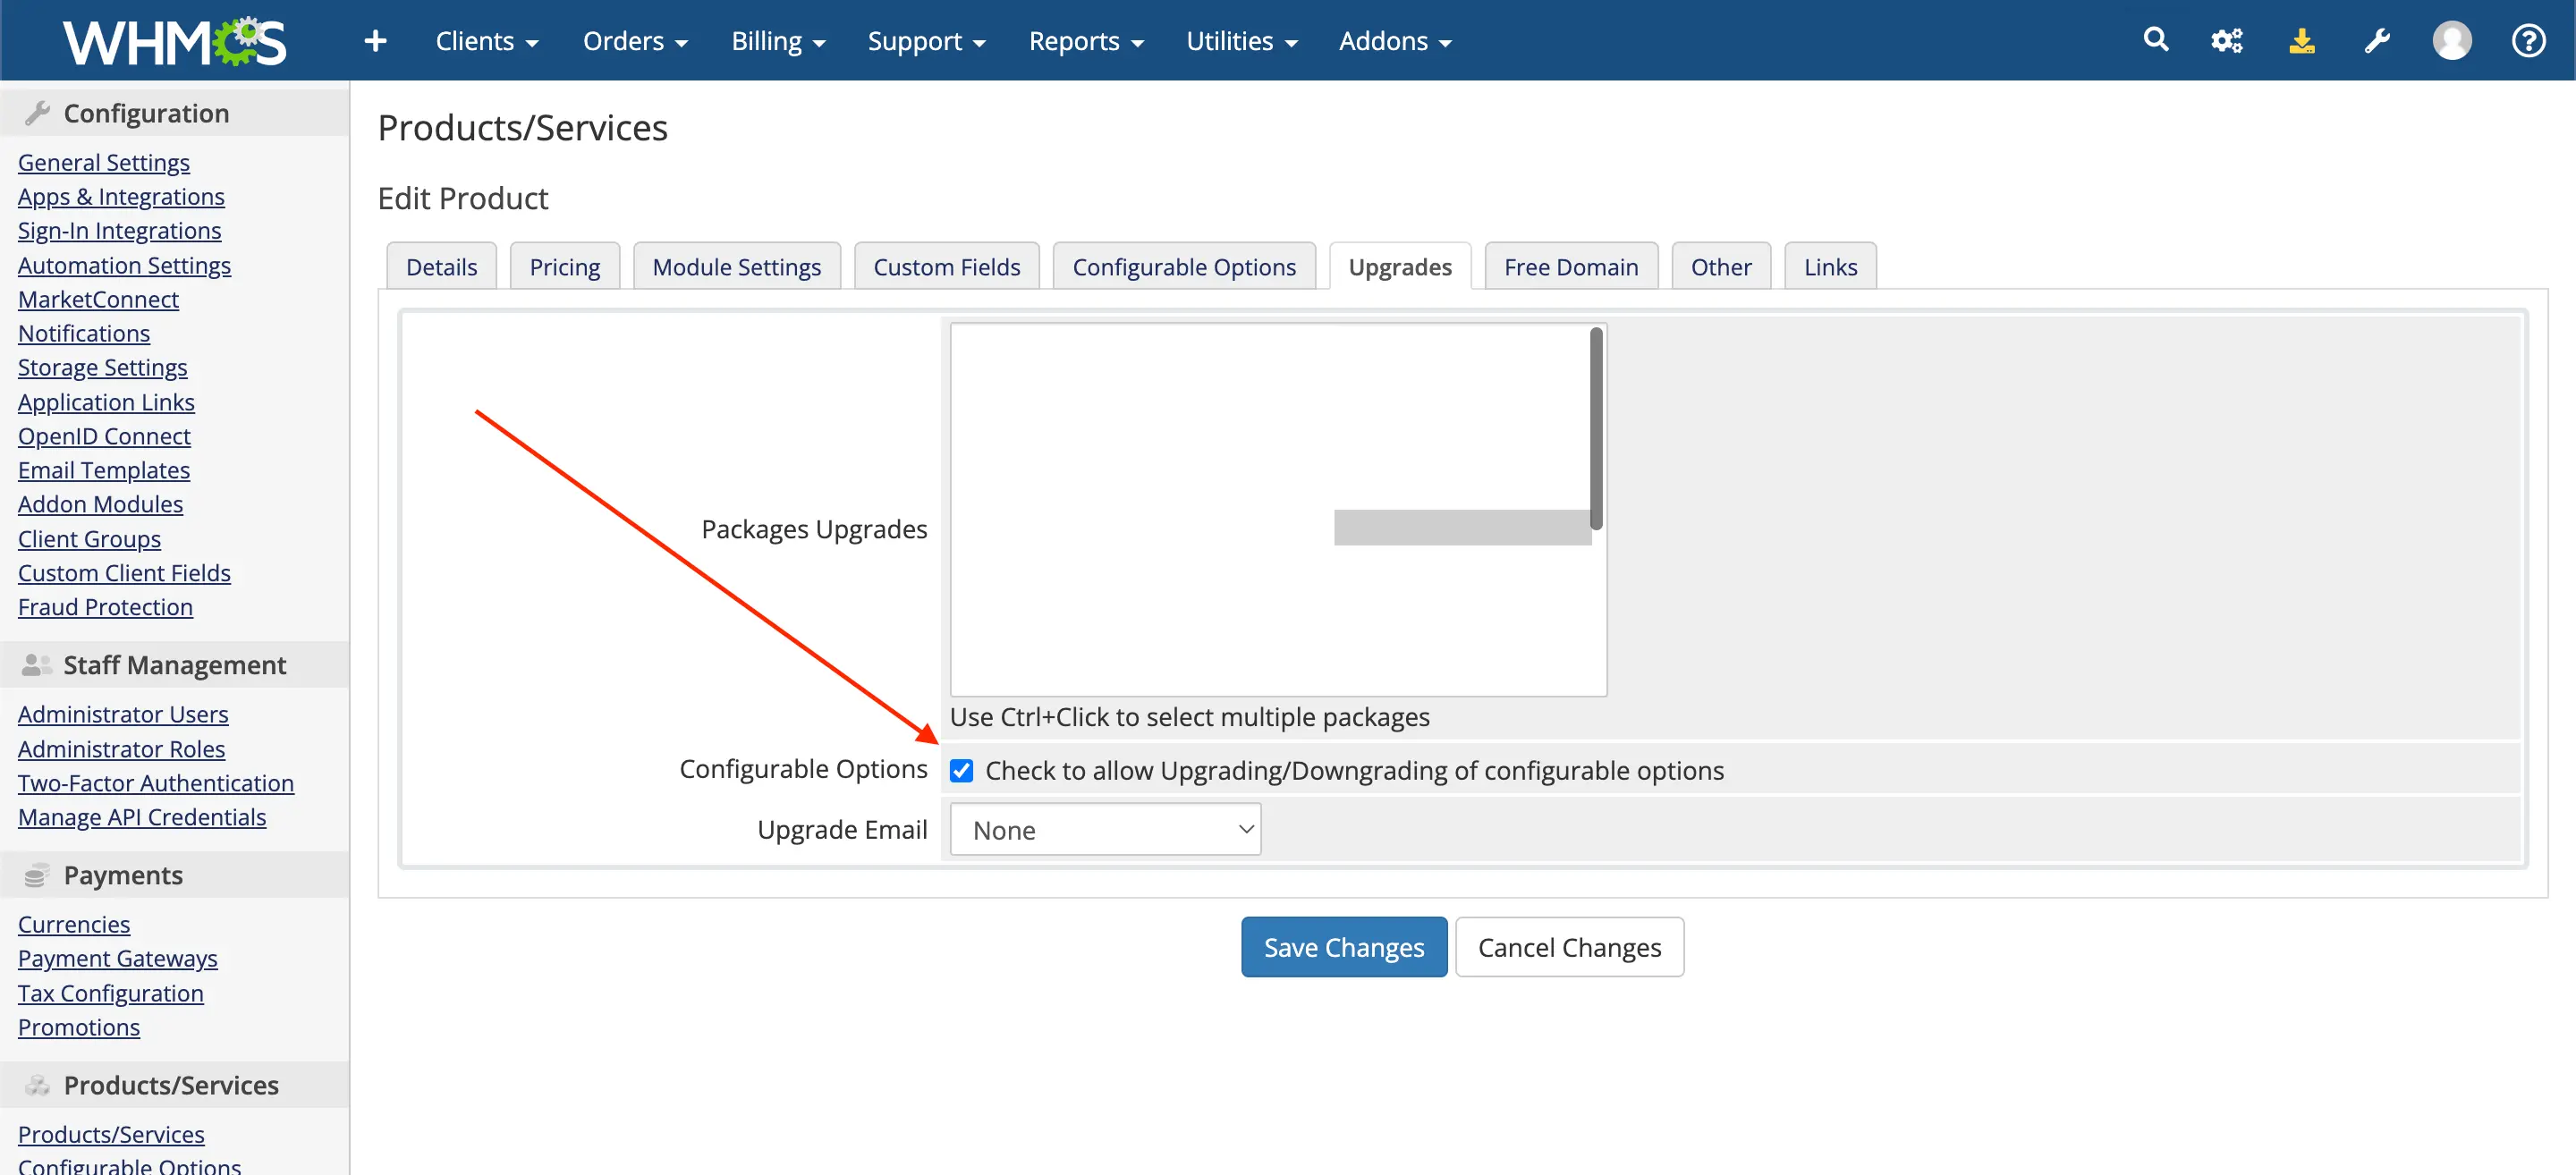
- Save changes.
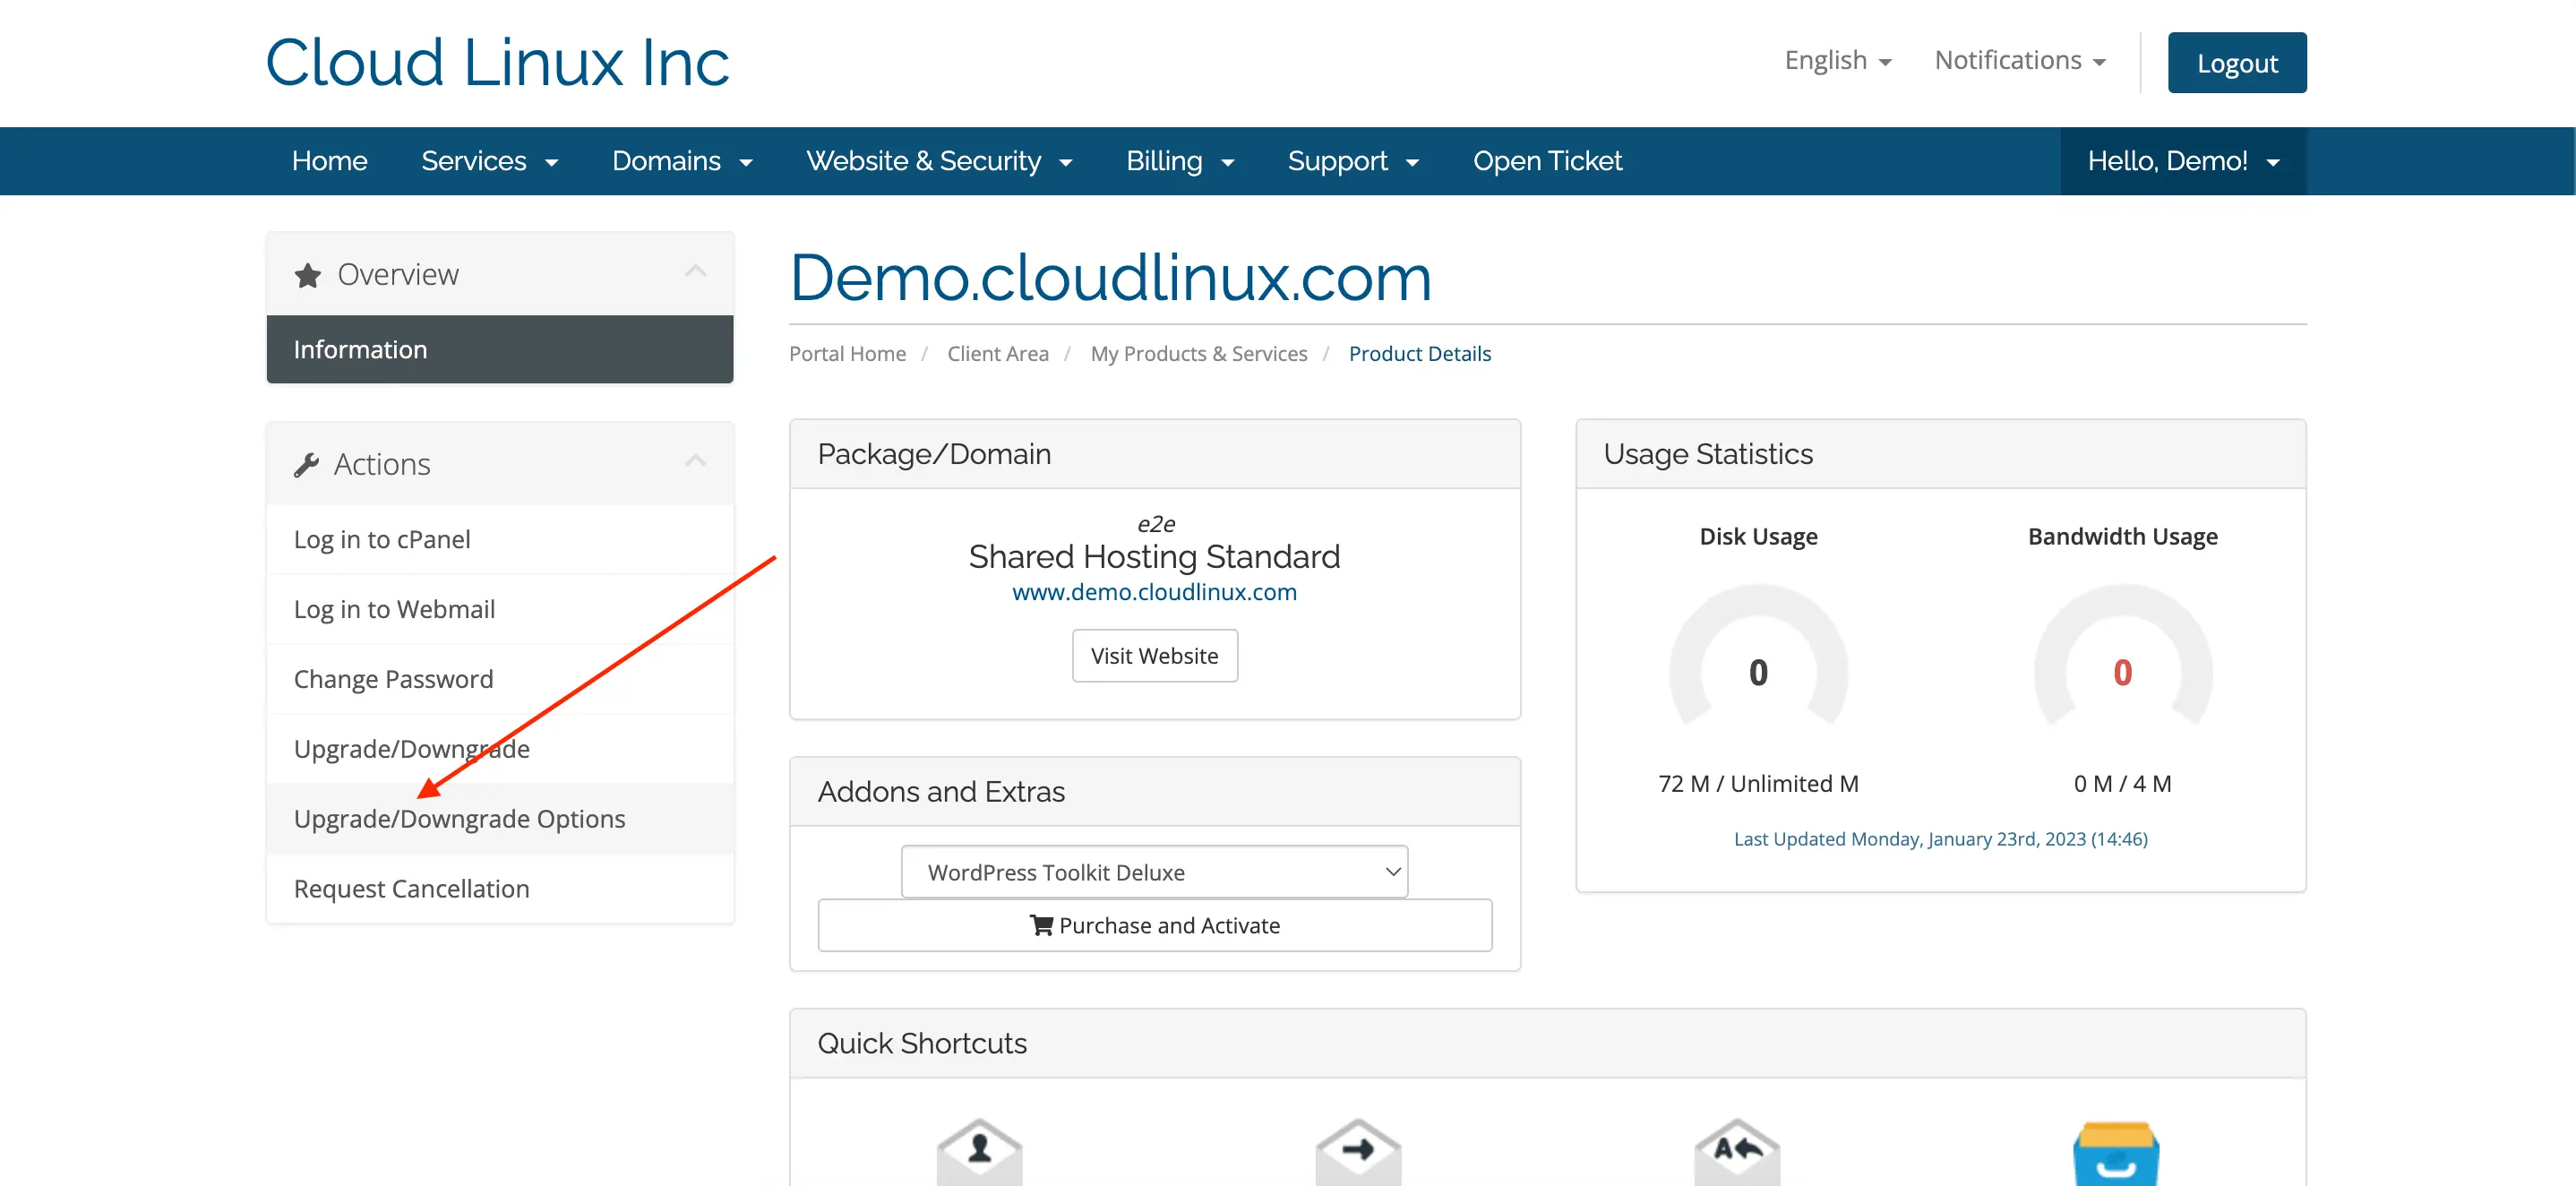
- Existing customers can upgrade their AccelerateWP Premium settings by changing the order using the "Upgrade/Downgrade options" button.
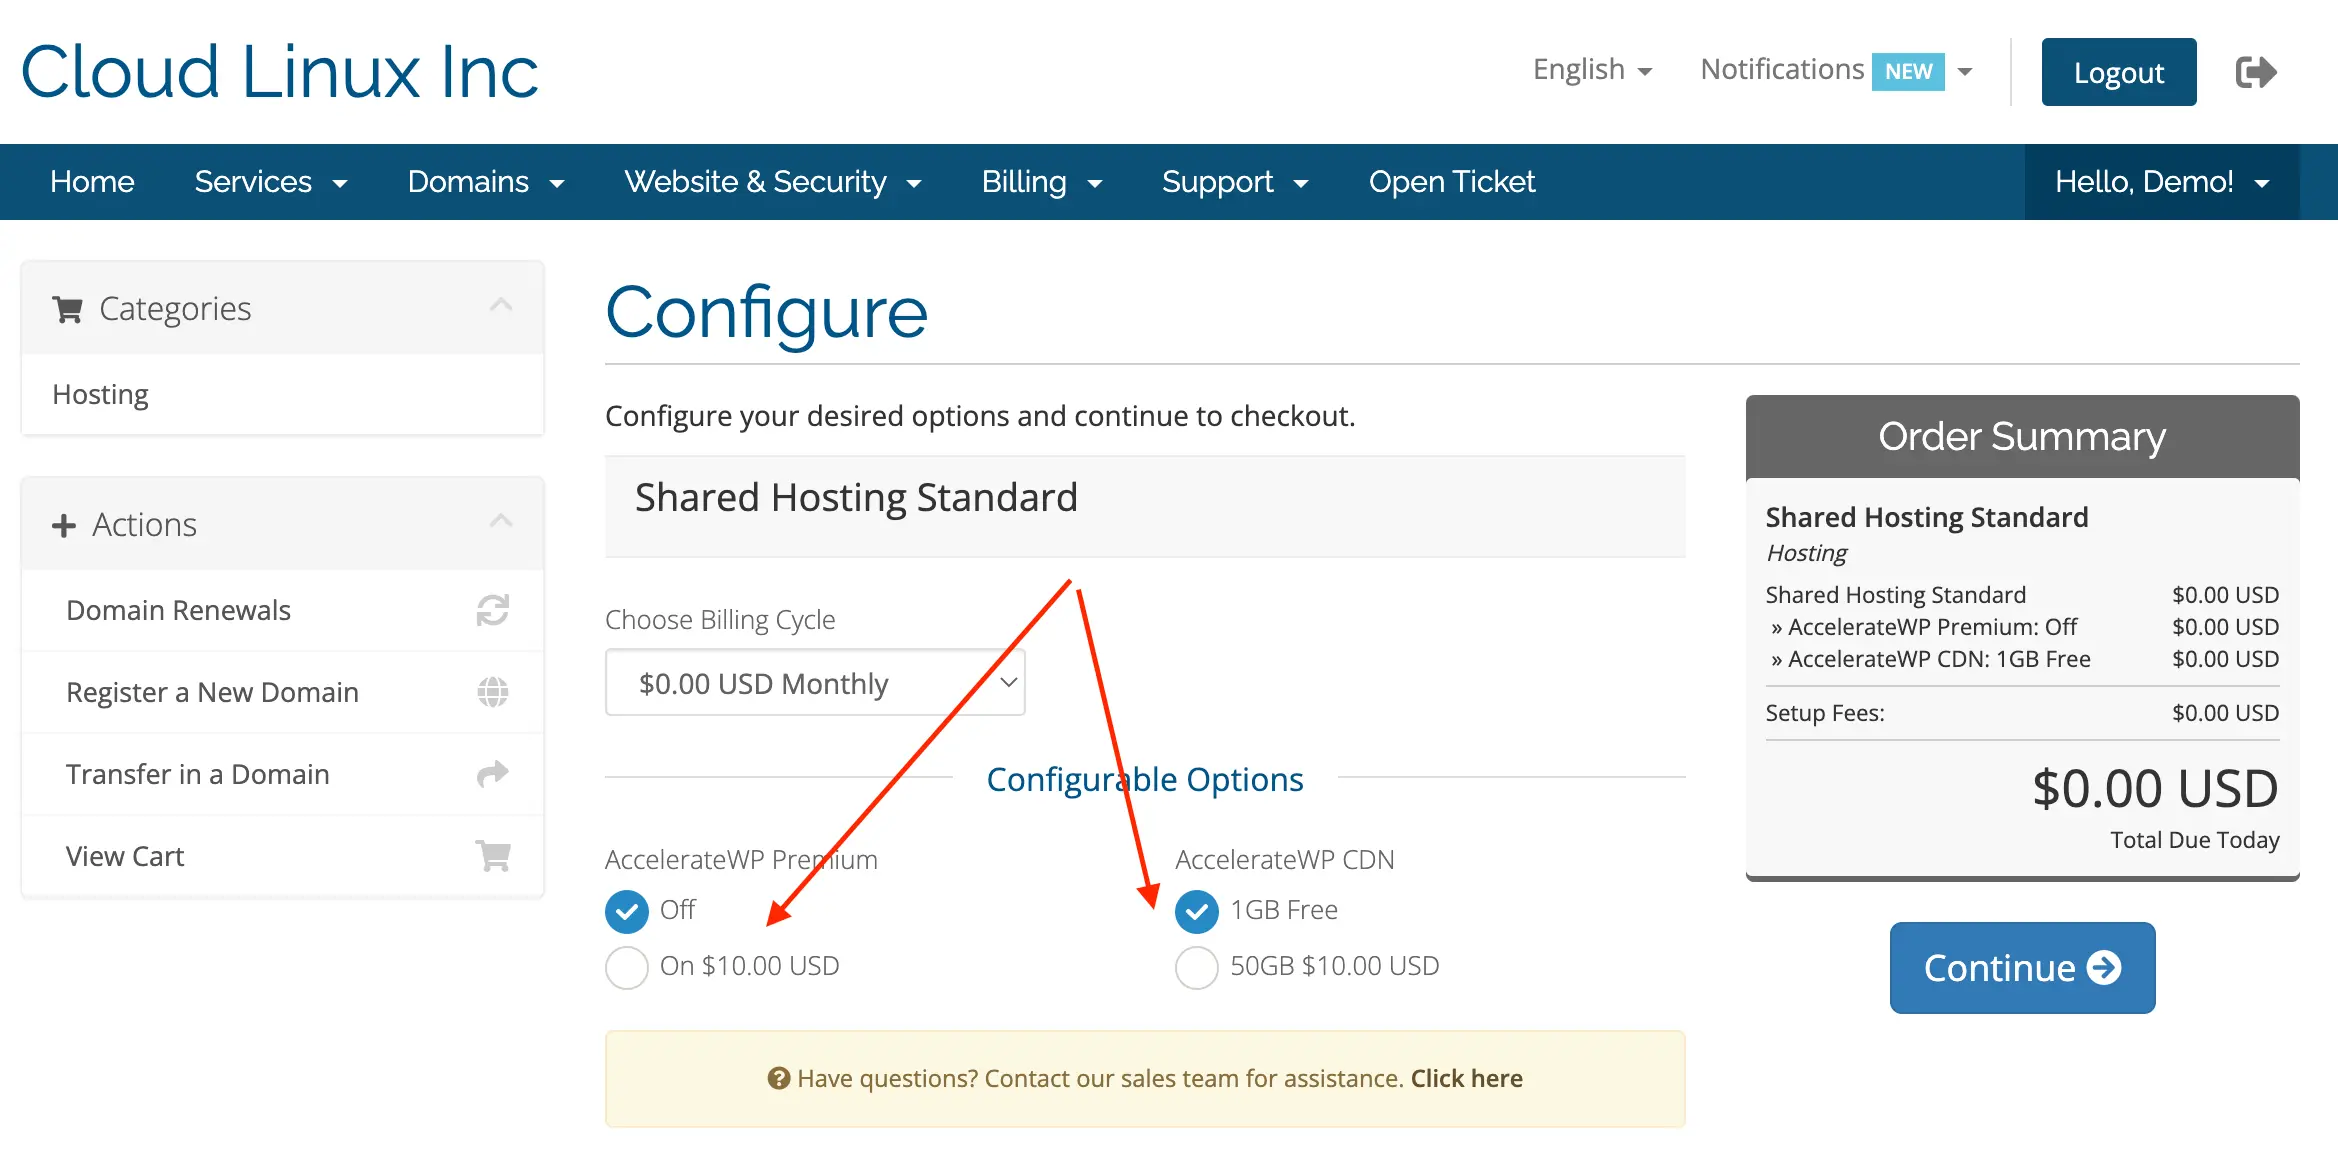
- New customers will be able to select AccelerateWP settings during order creation
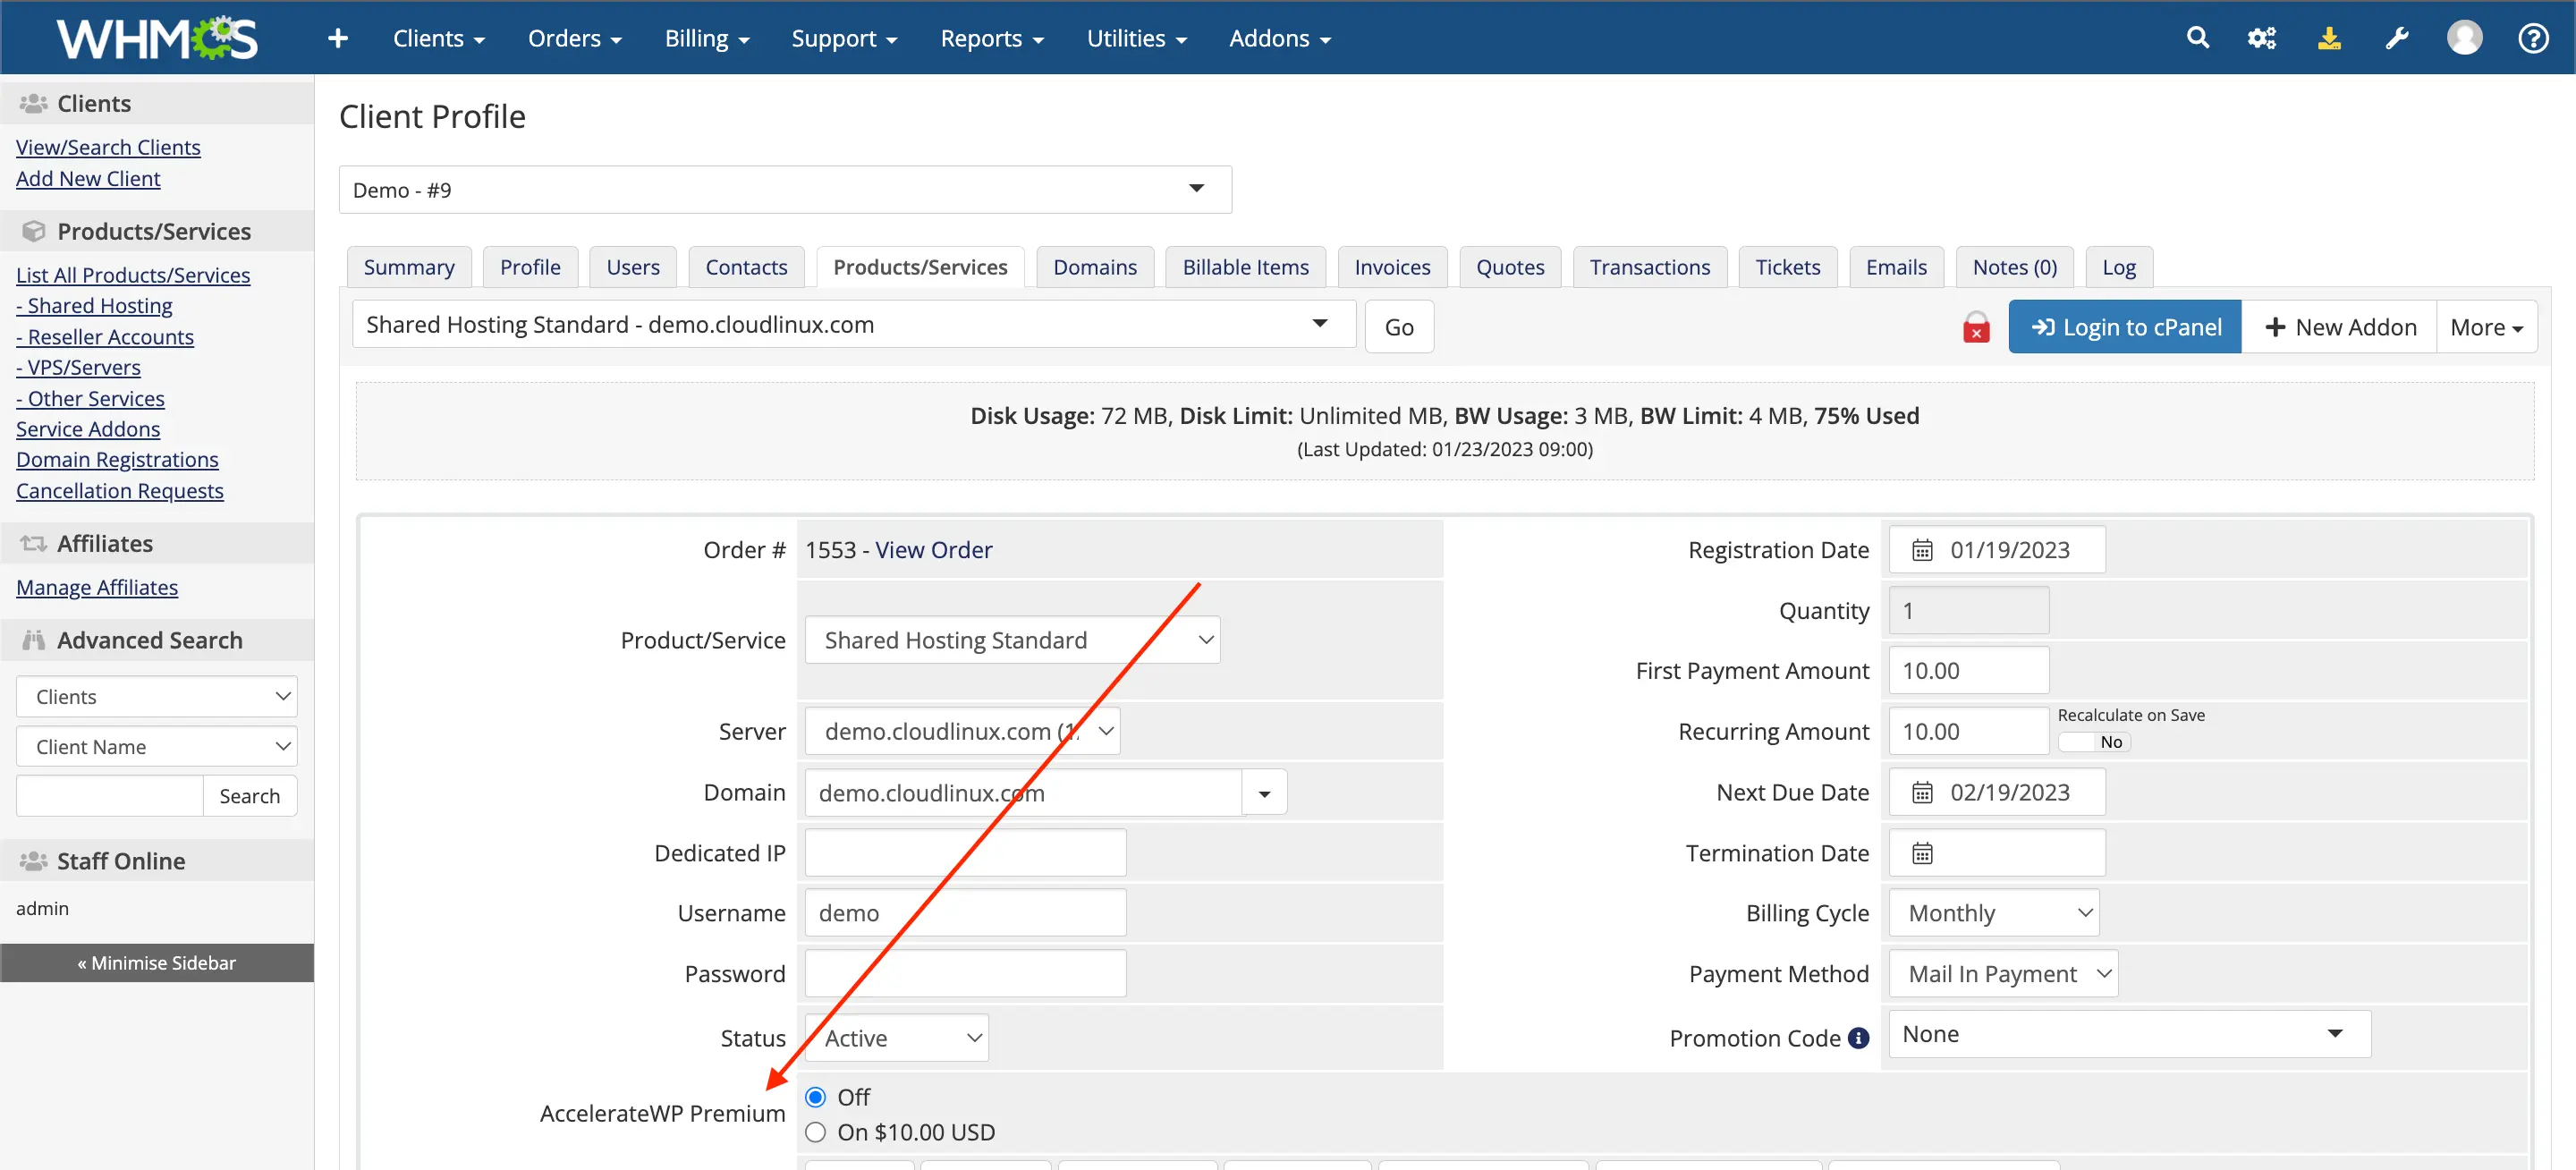
- The administrator can manually change the setting of AccelerateWP by editing the purchased service by the customer
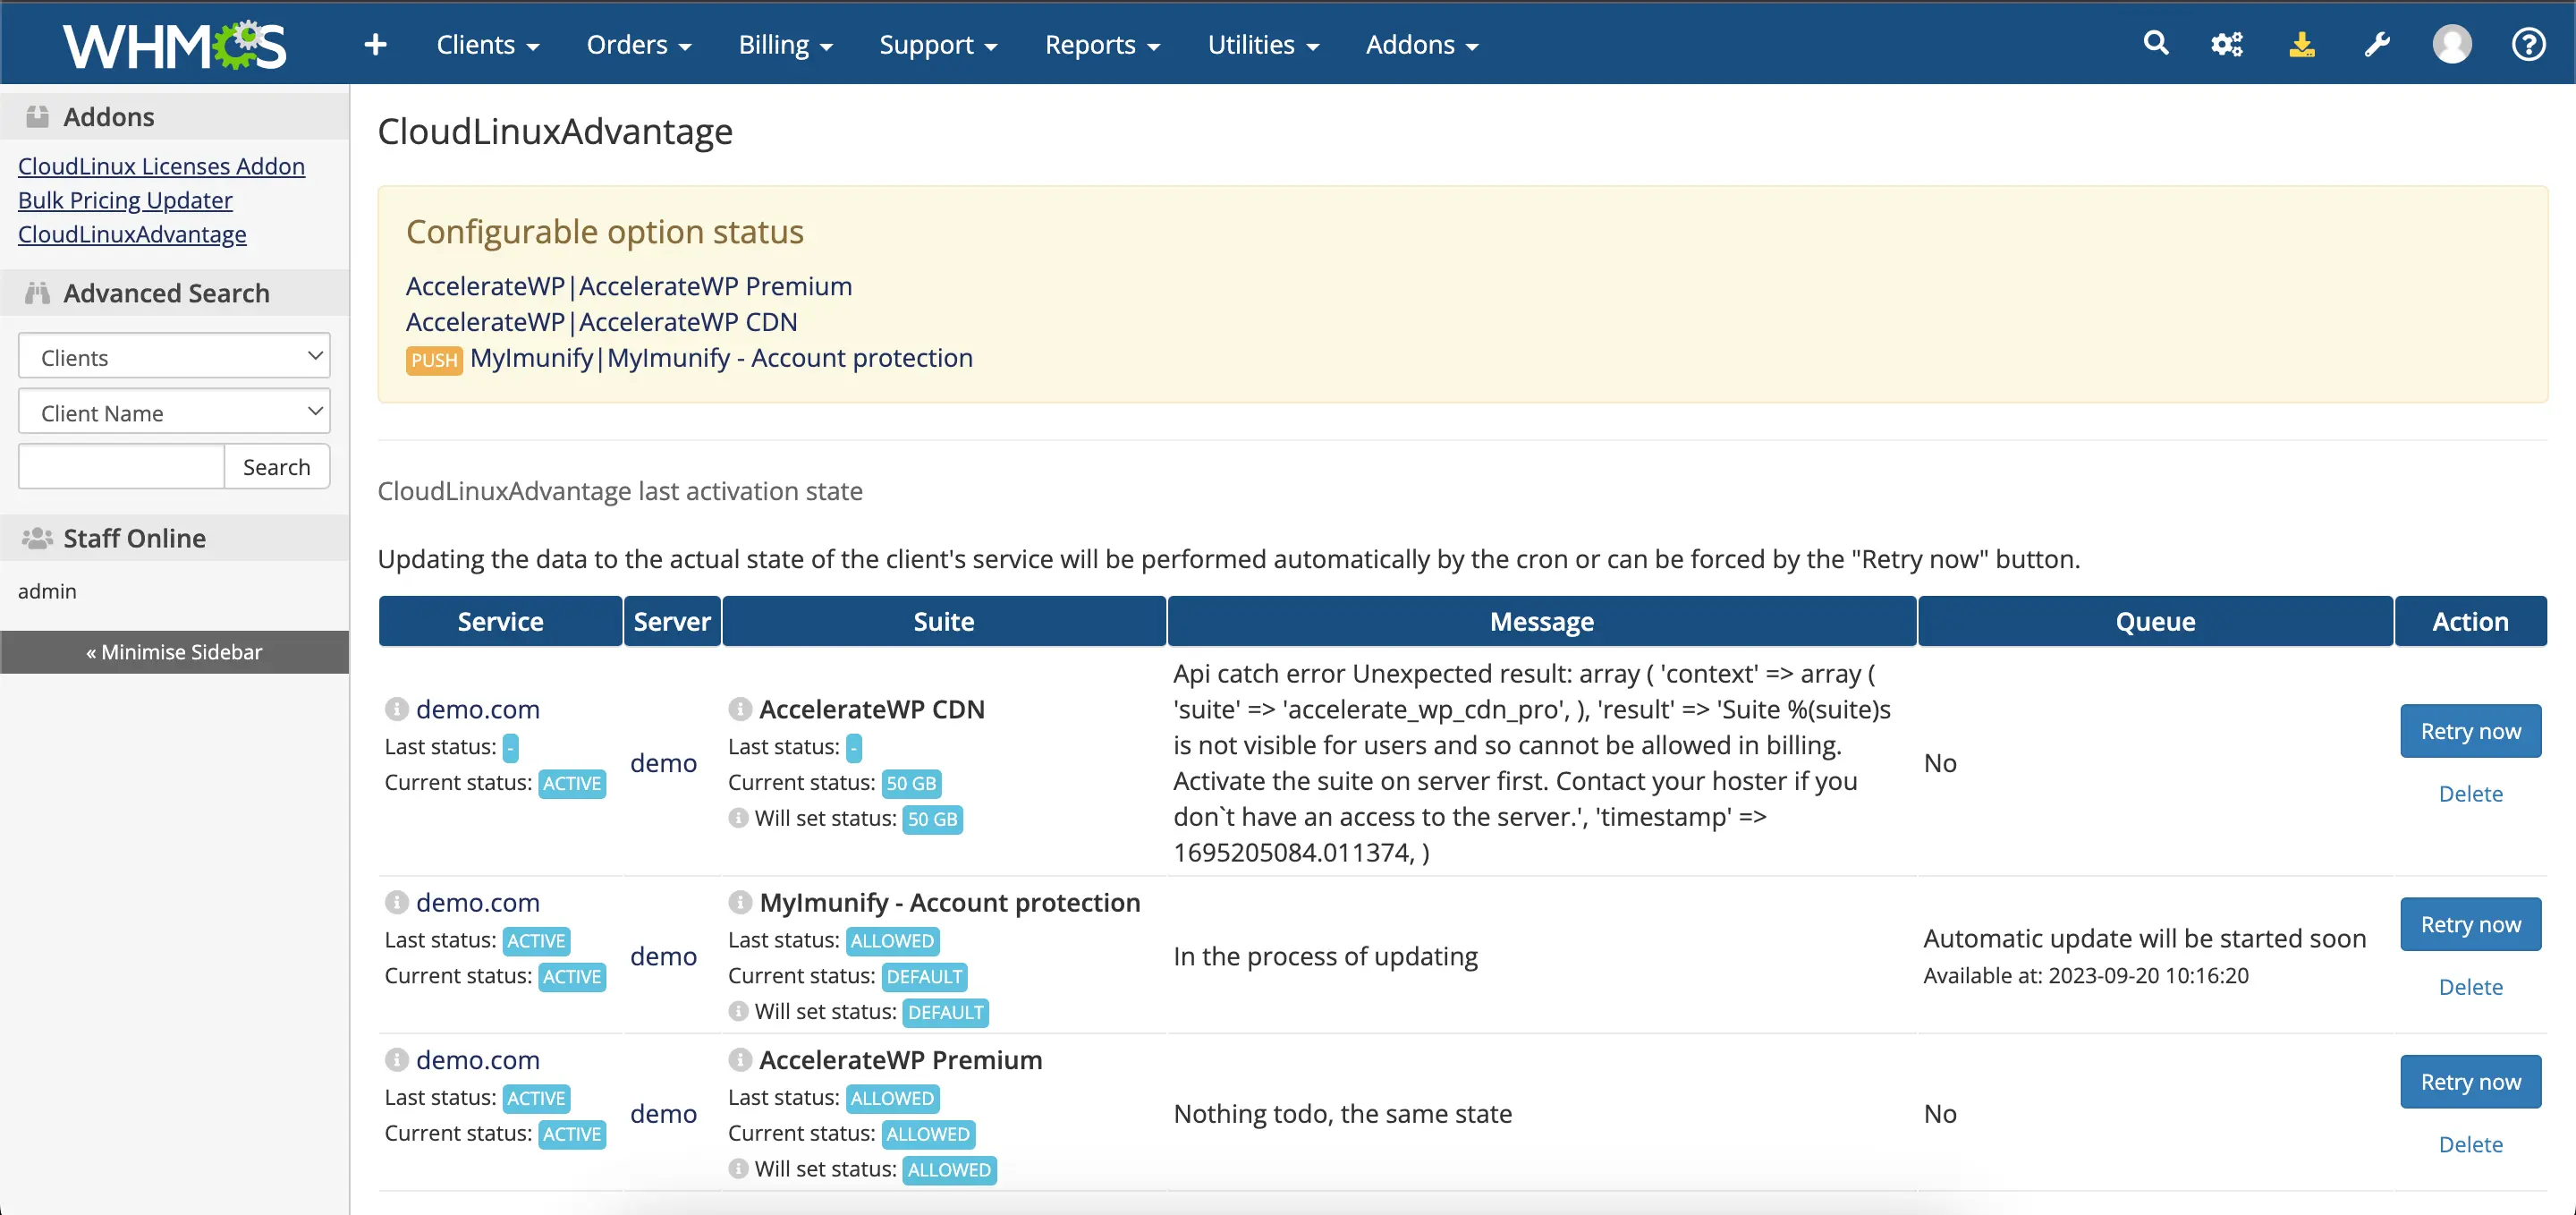
CloudLinuxAdvantage addon page
Module page contains information about the state of active features

In case the configurable options were accidentally removed, you can re-install them on the CloudLinuxAdvantage settings page.

The table shows the queue and history of requests to the servers for which the AccelerateWP status change will be applied.
Note
Deactivating the addon will delete the table with the history of AccelerateWP activity on the servers.
| Column | Description |
|---|---|
| Service | What customer service does the zarpos refer to. |
| Suite | For which product the status will be changed. * Last status: previous status * Current status: current service status * Will set status: What status will be set. Depending on the selected configurable option "AccelerateWP" and the status of the users's service, the status may differ. |
| Message | The last message about the operation. A detailed error may be displayed. |
| Queue | Availability of a queue for executing a cron request |
| Action | Send request manually Delete log entry from module table |
An example of sending requests to the server for selected options for the user. Each line is a report of sending a request to the server for each module that the user enabled or disabled. In case of an error, the response from the server will be displayed in the "Message" column. In this case, you need to fix the problem and manually start sending the request using the "Retry now" button.
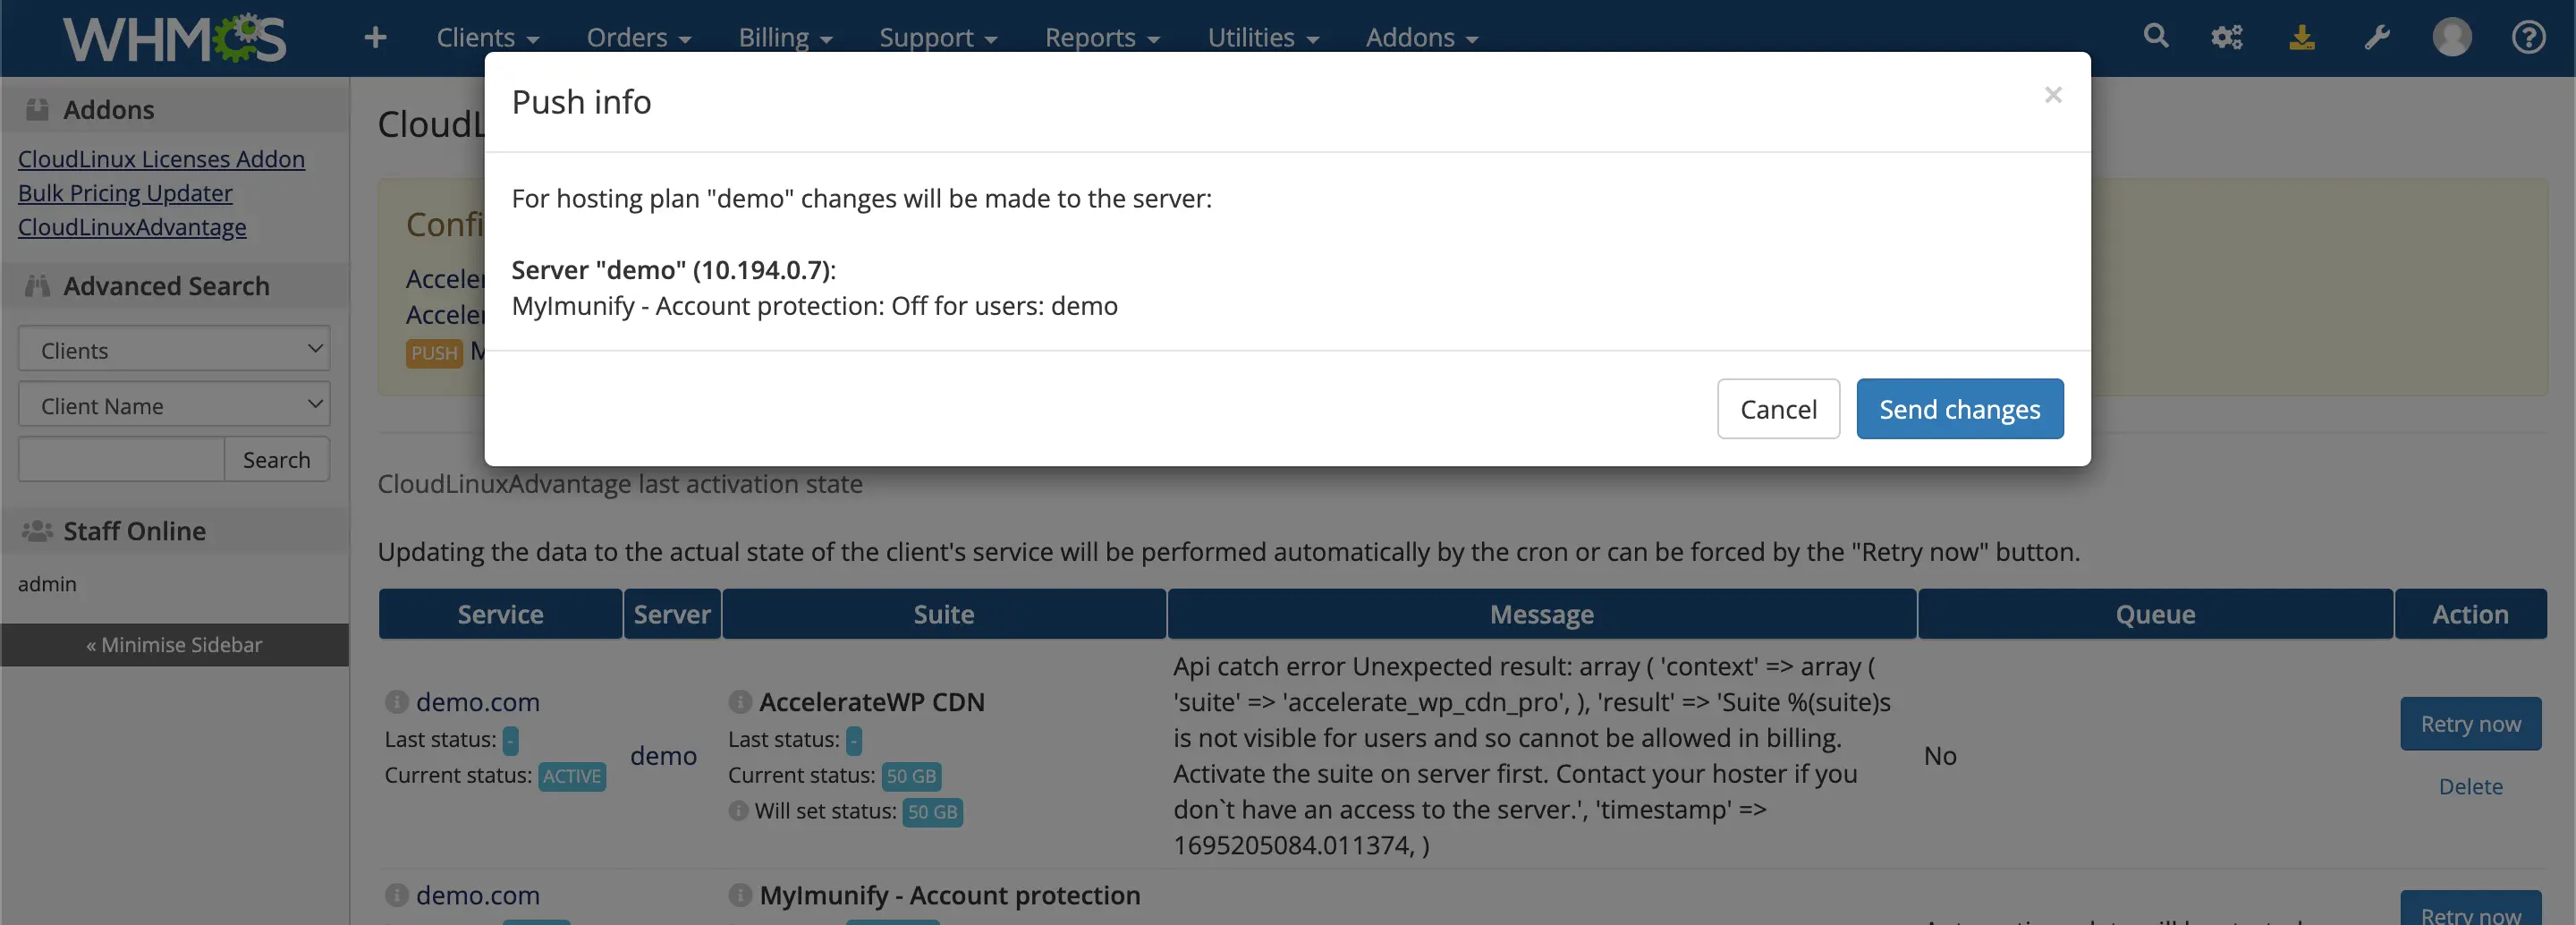
The "PUSH" button is displayed for "MyImunify - Account Protection" for a bulk operation to enable/disable the module on services for which the "MyImunify - Account Protection" option is linked.
By default, the first sorted sub-option for the "MyImunify - Account Protection" option will be sent to all users, and if the user has previously independently changed the sub-option for "MyImunify - Account Protection" using the WHMCS interface, his choice will be saved and also added to the request.
More details: https://docs.imunify360.com/myimunify/#what-is-myimunify-for-hosting-admin
FAQ
How WHMCS communicates with end-server
The addon tracks the change in the order and services of the client.
For those client services that have the configurable options "AccelerateWP", a request is sent to the server to change the status of AccelerateWP products.
Requests are sent by cron once at the beginning of every minute. If the request fails, there will be a retry after 3 seconds.
Information about the servers to which requests were sent can be viewed on the addon page.
If an error occurs, you will be able to retry the request on the addon page.
The CloudLinuxAdvantage enters the "Allowed" status when the client service's status is set to "Active" and the configurable options "On" is selected. In other cases, the status will be set to "Default" and the feature will be turned off for user.
How to automatically open the "Upgrade/Downgrade Options" page?
Parameters can be used to determine the billing account of the user in order to display proper page. WHMCS plugin already has automatic redirect to upgrade page, there is only needed to set upgrade-url to the root of your WHMCS instance.
Update AccelerateWP 0.0.1 module to CloudLinuxAdvantage 0.0.2
If you previously had version 0.0.1 of the module installed, you need to perform the following procedure:
- Follow the process for installing the module version 0.0.2
- The module will automatically update the database
- After that, you can deactivate and remove the old module AccelerateWP 0.0.1 (
<whmcs_root>/modules/addons/acceleratewp) - If you are using the extension, you need to update it to the latest version from the "accelerate-wp-1.5-1" package
https://your.whmcs.com/?m=cloudlinux_advantage&action=provisioning&username=democom&domain=demo.com&server_ip=10.51.0.10
| Parameter | Value | Description |
|---|---|---|
| m | cloudlinux_advantage | Constant. |
| action | provisioning | Constant. |
| username | democom | Customer's account name. |
| domain | demo.com | Customer's account primary domain. |
| server_ip | 10.51.0.10 | Primary IP of the server where AccelerateWP is installed. |
| suite | accelerate_wp_premium | Optional. To display the settings of the specified suite only. Options: accelerate_wp_premium or accelerate_wp_cdn_pro. |
Plesk extension
Note
From version AccelerateWP 1.9-8, installation and activation of the extension for Plesk starts automatically.
The extension adds the ability to execute the accelerate-wp-admin set-suite command to the Plesk XML API.
Do not install it if you are not using AccelerateWP WHMCS billing integration.
Note
Requires Plesk version 17.0 or higher
The Plesk extension is available since accelerate-wp-1.3-2 version
Installation
- Install
/usr/sbin/plesk bin extension -i /usr/share/cloudlinux/plesk-accelerate-wp-latest.zip
- Activate
/usr/sbin/plesk bin extension --enable accelerate-wp
Deinstallation
/usr/sbin/plesk bin extension -u accelerate-wp
End user workflow
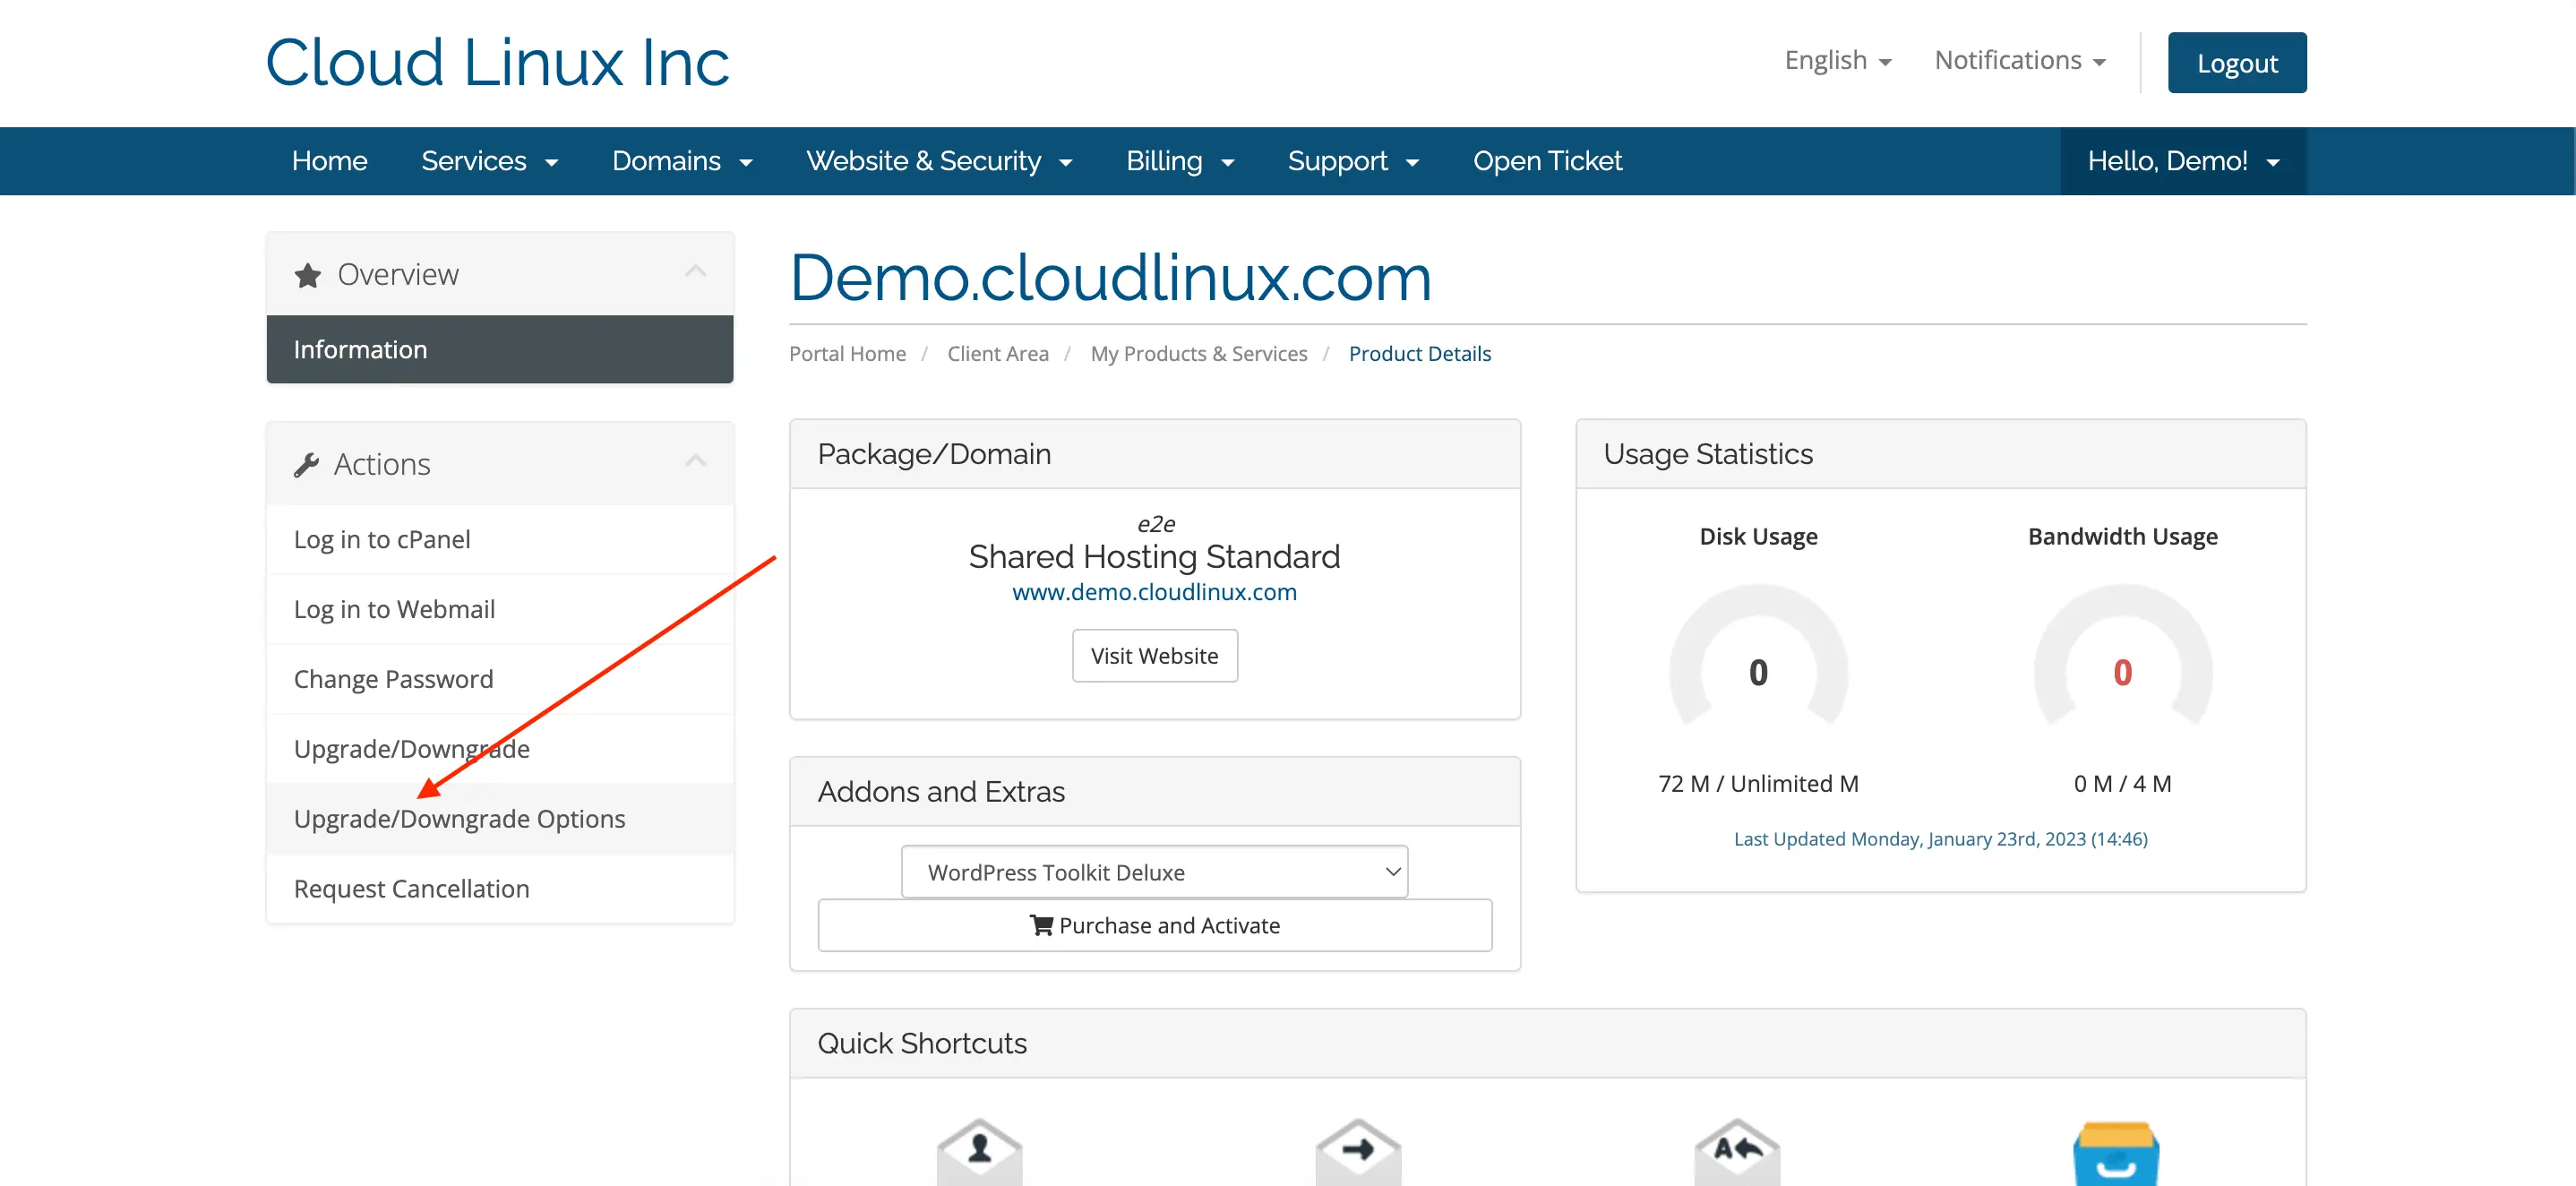
How to update an existing order (service)
- Open the services page through the menu "Services - My services"
- Choose the service you need
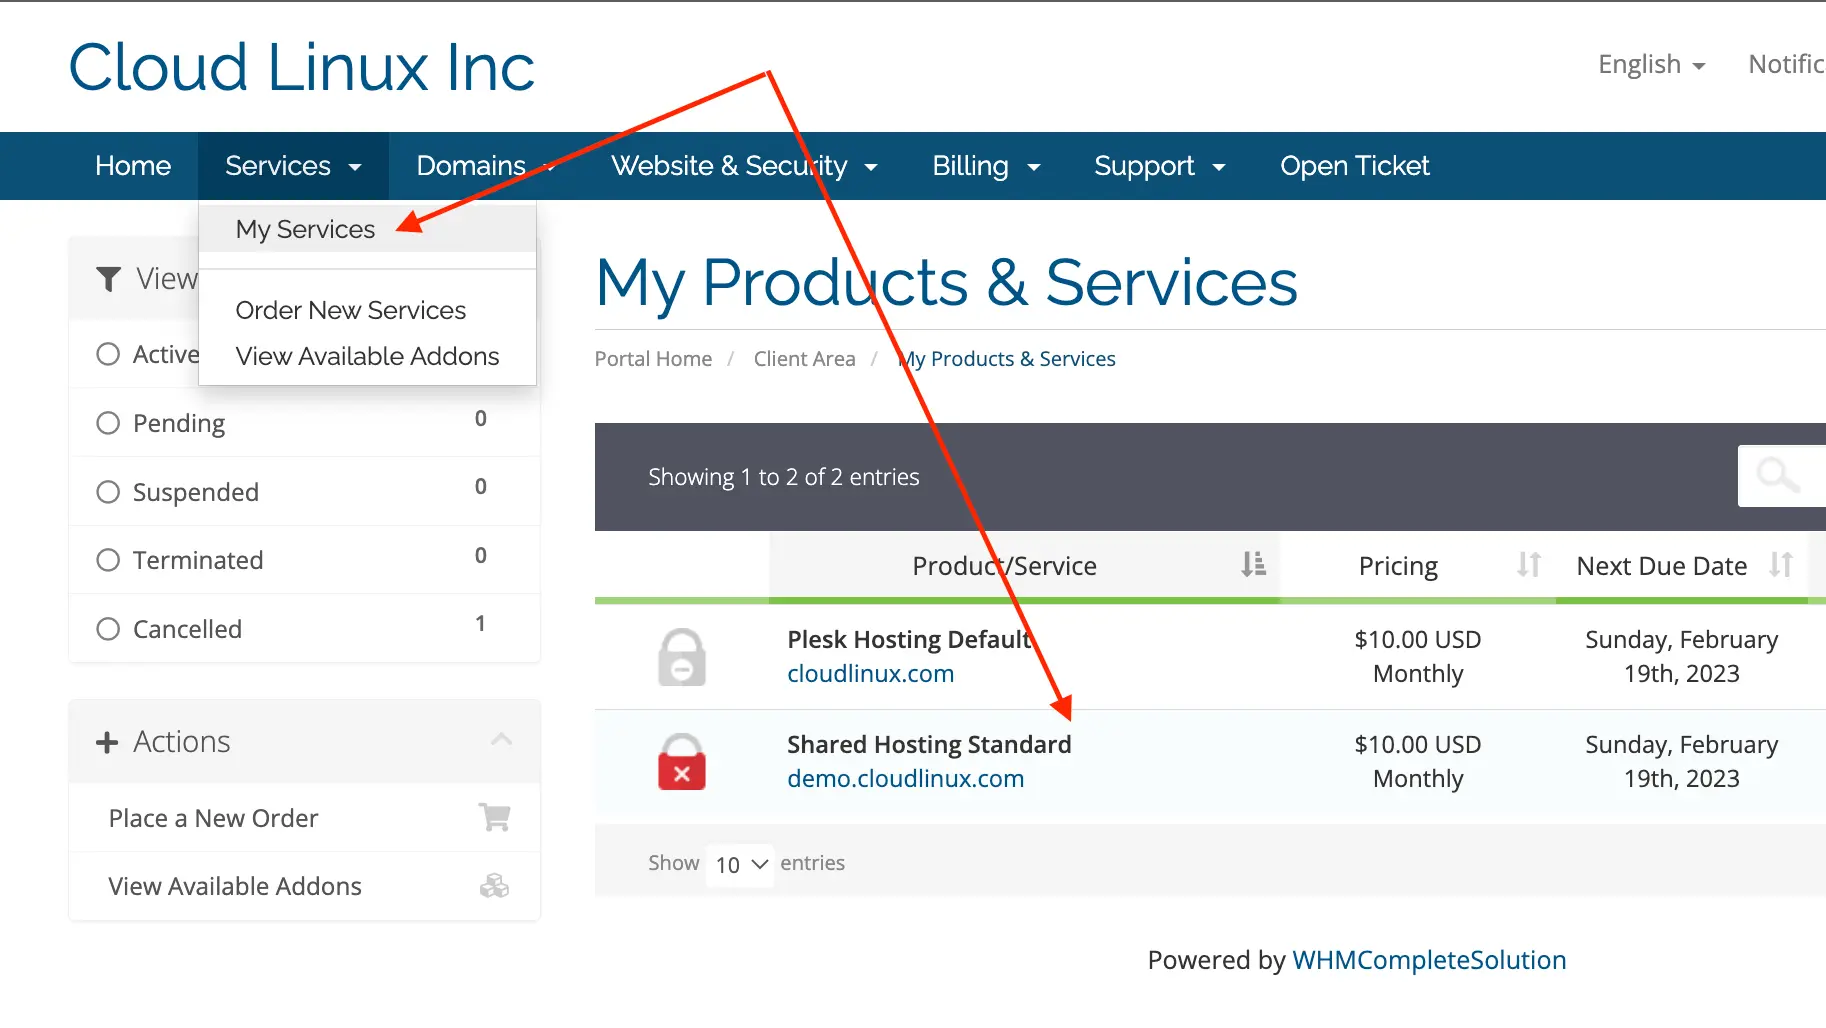
- Select the action "Upgrade/Downgrade Options"
- Choose a new configuration and place an order
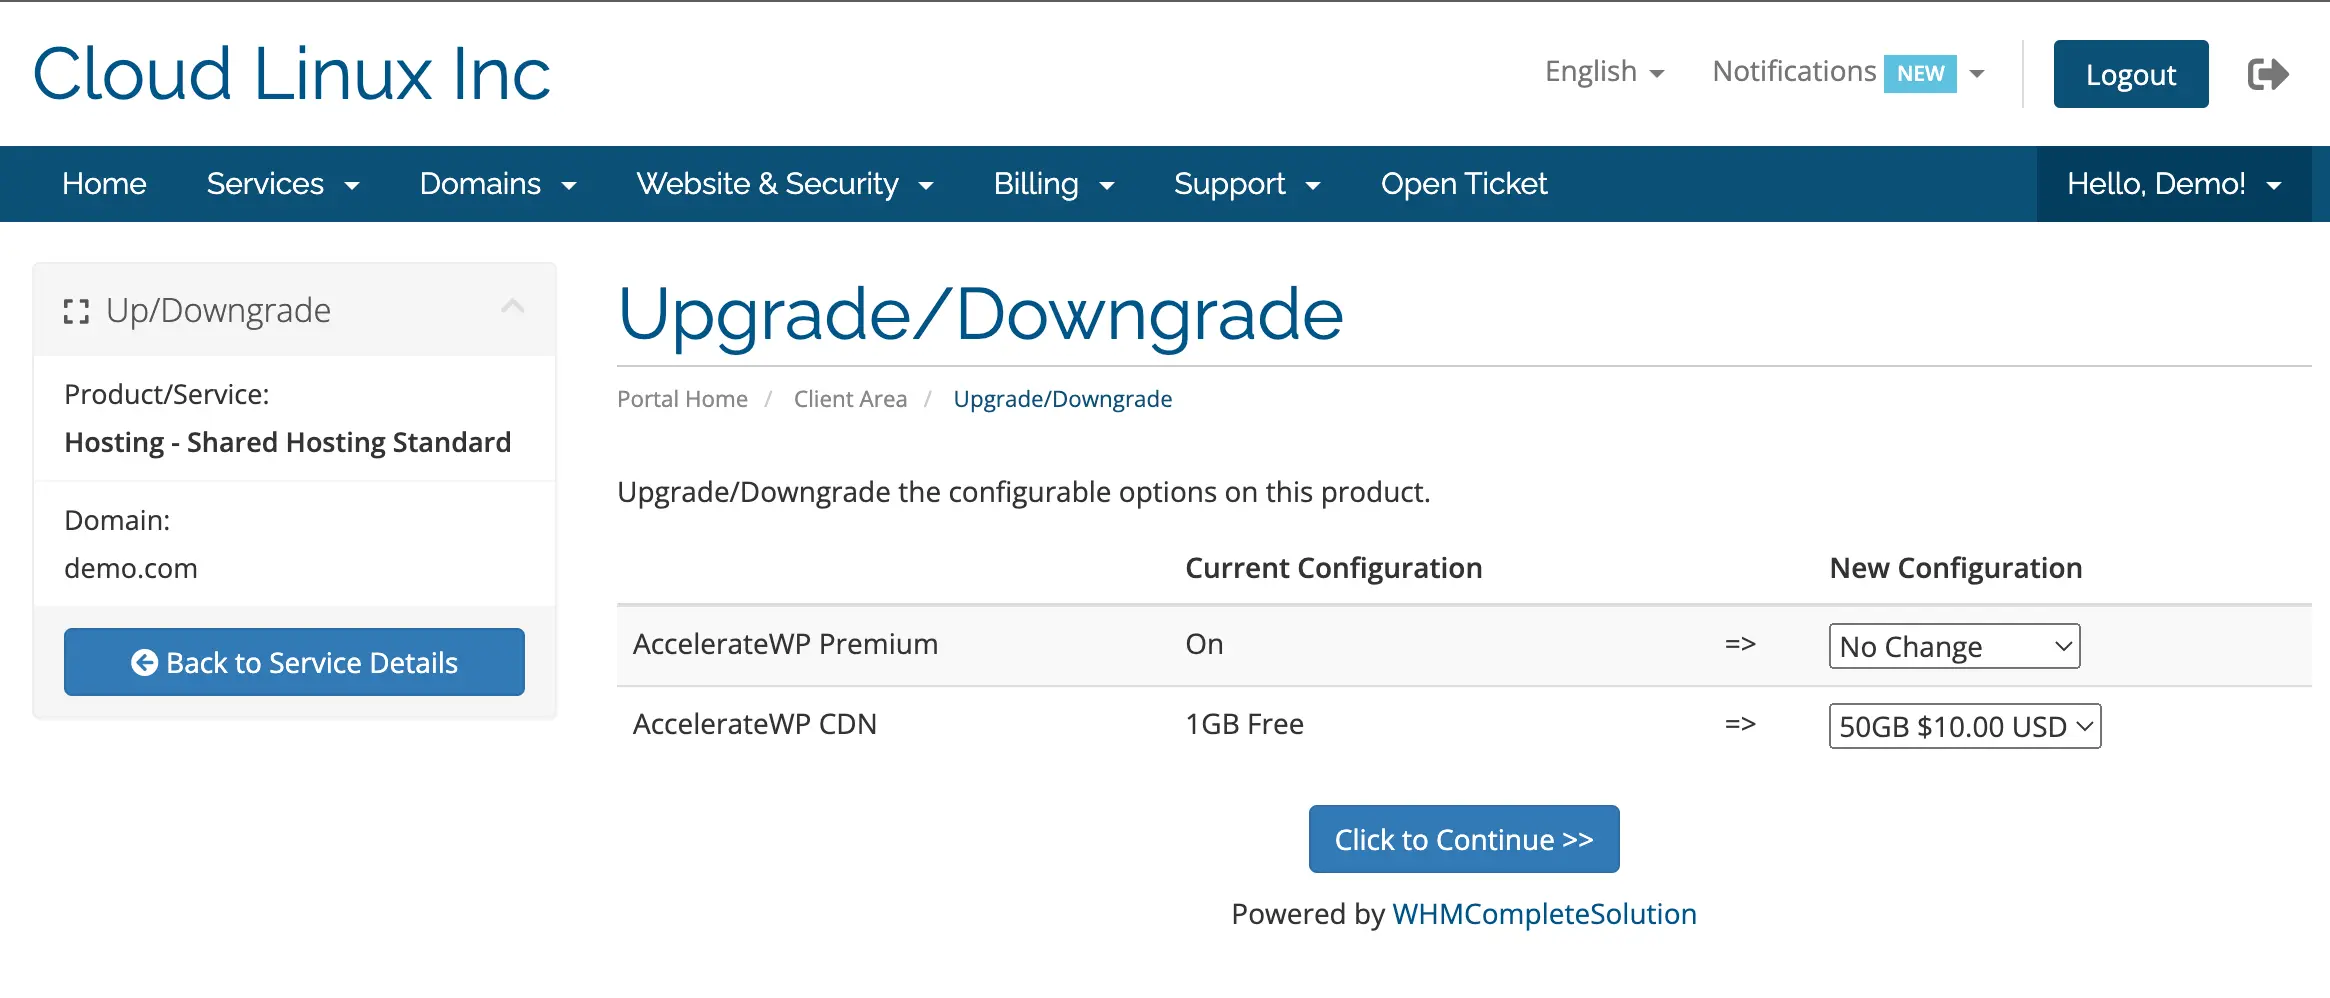
- Changes will occur automatically after 1 minute or after confirmation of the order by the service provider
How to checkout new order
- Select a service in the service provider's WHMCS portal
- A service with AccelerateWP enabled will display options to enable them
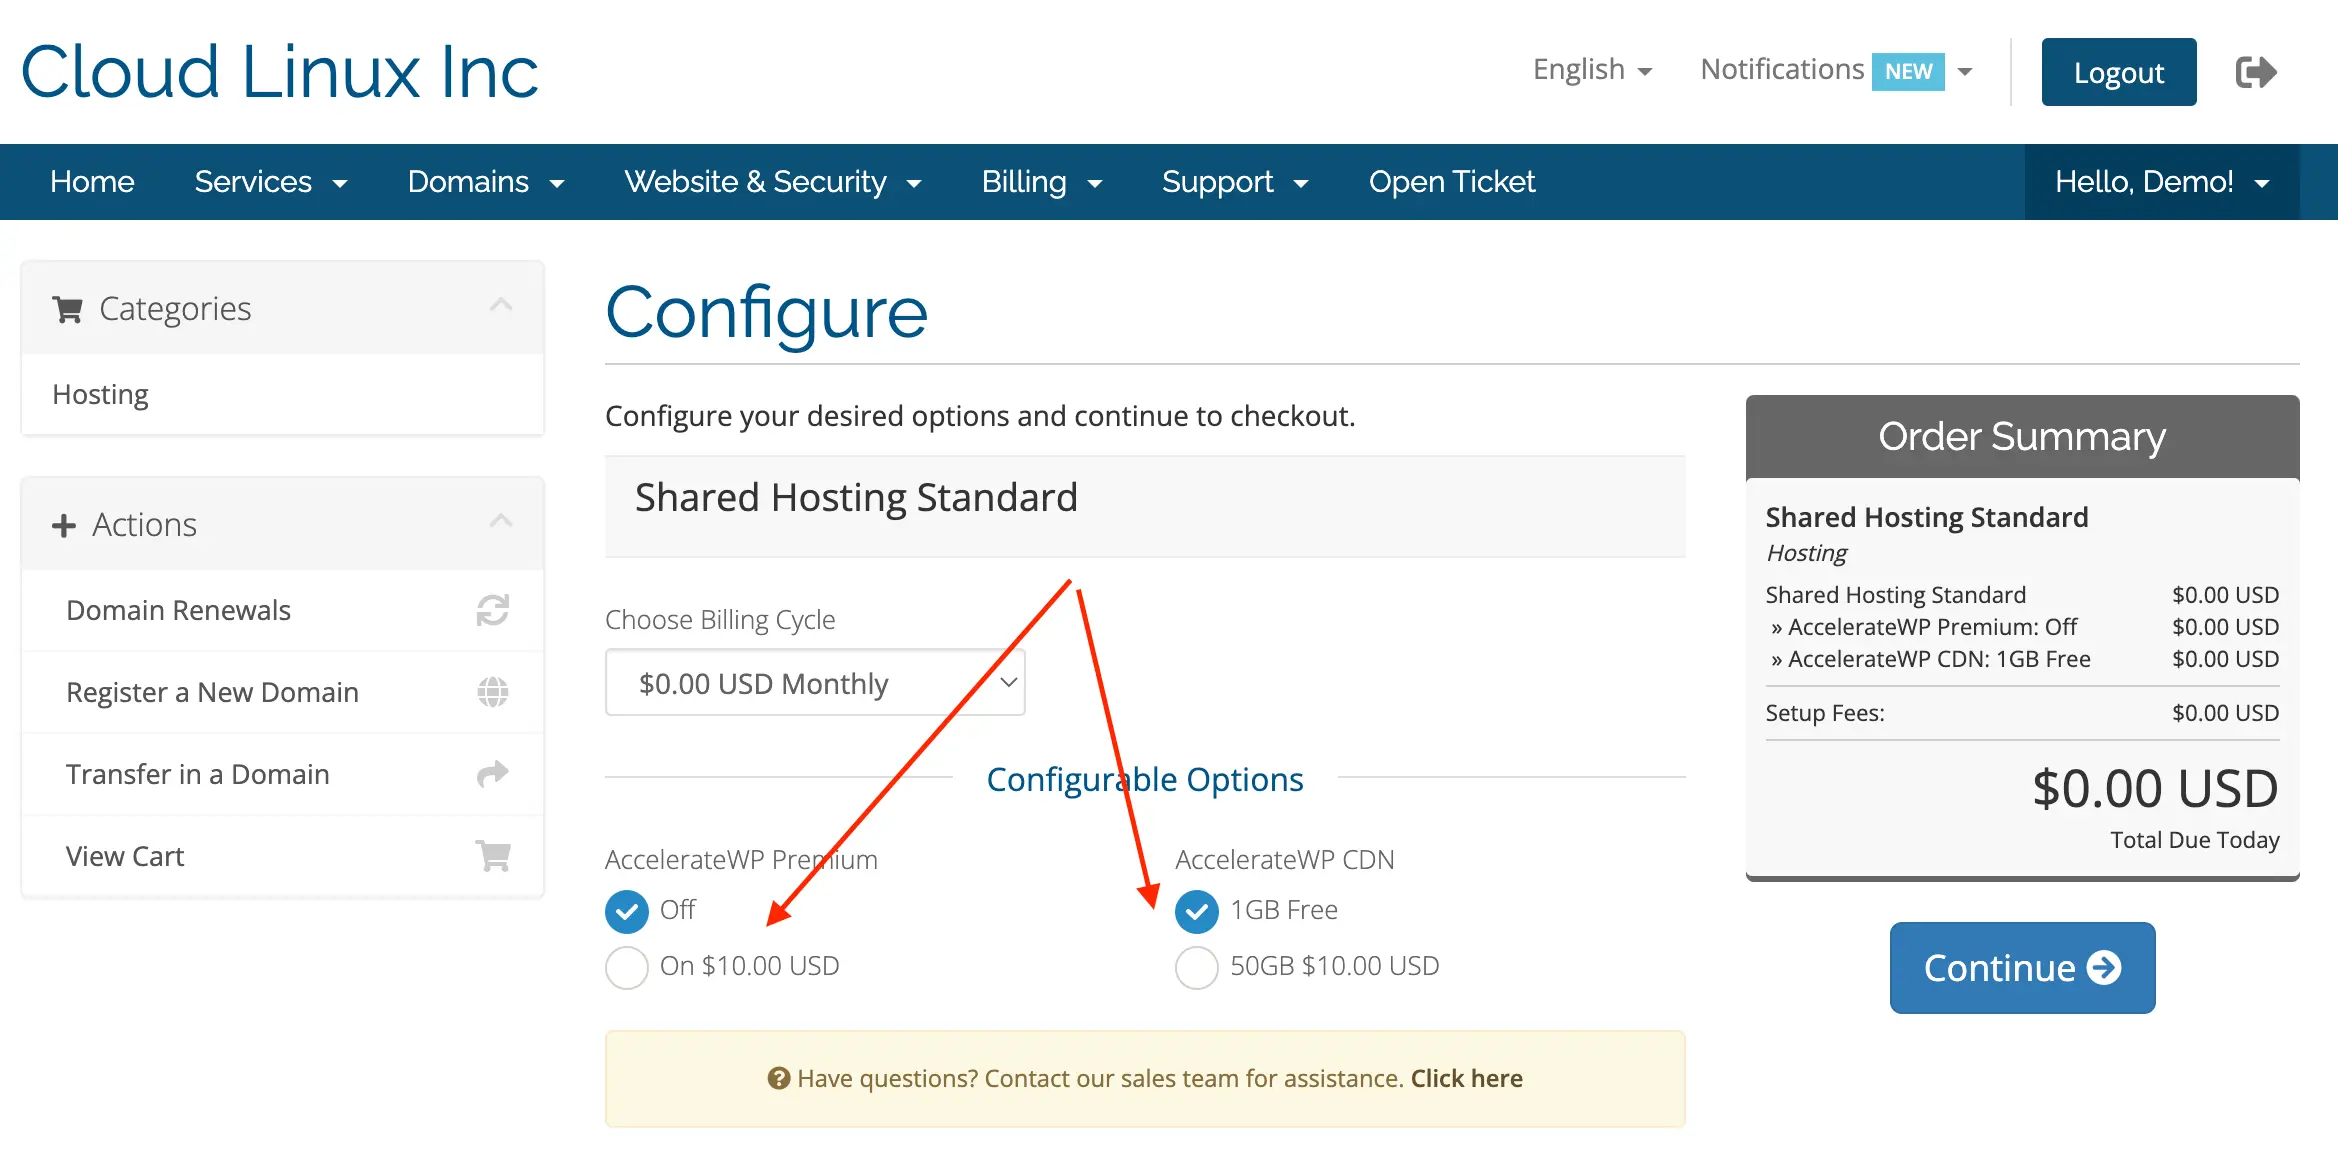
- Changes will occur automatically after 1 minute or after confirmation of the order by the service provider
- After purchase, you need to manually activate the modules in the AccelerateWP panel
Changelog
0.0.3
- Added the ability to purchase MyImunify - Account protection
- Add the ability to bulk send the statuses of custom options "MyImunify - Account protection" to the servers
0.0.2
- Module renamed from Accelerate WP to CloudLinux Advantage
- Added the ability to purchase AccelerateWP CDN
- Improved display of service and server names on the AccelerateWP module page
- Added the ability to hide suites on the update options page
- Changed "m" parameter in provisioning link (upgrade url) from accelerate_wp to cloudlinux_advantage
0.0.1
- Beta release
Requirements
0.0.3
- Imunify360 ^7.4.0
0.0.2
- WHMCS ^8.0
- accelerate-wp-1.5-1
0.0.1
- WHMCS ^8.0
- accelerate-wp-1.3-2


