Features
Below you can find the list of supported features with the links to the documentation available.
LVE limits
- Understanding limits
- SPEED limit
- Memory limit
- IO
- IOPS
- Entry processes
- Number of processes
- Inodes
- Network traffic bandwidth control and accounting system
- Limits validation
- Compatibility matrix
- Reseller limits
Inode limits
The documentation is available here.
Reseller limits
The documentation is available here.
MySQL Governor
MySQL Governor is a software package that monitors and restricts MySQL usage in a shared hosting environment. The monitoring is done via resource usage statistics per each MySQL thread.
MySQL Governor can also kill off slow SELECT queries.
MySQL Governor has multiple modes of operations, depending on the configuration. It can work in monitor-only mode, or it can use different throttling scenarios.
MySQL Governor allows restricting customers that use too many resources. It supports following limits:
| CPU | % | CPU speed relative to one core. 150% would mean one and a half cores |
| READ | bytes | bytes read. Cached reads are not counted, only those that were actually read from disk will be counted |
| WRITE | bytes | bytes written. Cached writes are not counted, only once data is written to disk, it is counted |
You can set different limits for different periods: current, short, mid, long. By default those periods are defined as 1 second, 5 seconds, 1 minute and 5 minutes. They can be re-defined using the configuration file. The idea is to use larger acceptable values for shorter periods. Like you could allow a customer to use two cores (200%) for one second, but only 1 core (on average) for 1 minute, and only 70% within 5 minutes. That would make sure that customer can burst for short periods of time.
When a customer is restricted, the customer will be placed into special LVE with ID 3. All restricted customers will be placed into that LVE, and you can control the amount of resources available to restricted customers. Restricted customers will also be limited to only 30 concurrent connections. This is done so they wouldn't use up all the MySQL connections to the server.
Installation
Attention!
MySQL Governor on Ubuntu supports the following only:
- cl-MySQL80 on non-panel systems
- cl-MySQL80 on cPanel
- Install MySQL Governor
apt install governor-mysql
To use MySQL Governor with
- cl-MySQL80
/usr/share/lve/dbgovernor/mysqlgovernor.py --mysql-version=mysql80Backup your databases.
Run the cl-MySQL/cl-MariaDB installation.
/usr/share/lve/dbgovernor/mysqlgovernor.py --install --yes
In case of installing on cPanel + Ubuntu server, set the following parameter:

- After installation, check that the database server is working properly. If you have any problems, use Support Portal.
- Configure user mapping to the database. The mapping format is described in the following section.
In case of a non-panel system the /etc/container/dbuser-map mapping file should be created and updated with new users by an admin.
The format is as follows:
[dbuser_name1] [account_name1] [UID1]
...
[dbuser_nameN] [account_nameN] [UIDN]
The control panel should automatically generate this mapping and write it to the /etc/container/dbuser-map file. Usually, it is enough to write a hook when adding, deleting or renaming a database for a user. The control panel should implement such a mechanism for MySQL Governor to operate properly. MySQL Governor automatically applies changes from the dbuser-map file every five minutes.
- MySQL Governor configuration can be found in the following section.
- MySQL Governor CLI tools description can be found in the following section.
- Having configured the mapping use
dbtopto see the current user load on the database (you'd need to make some database queries).
dbtop
- If the load appears in the dbtop output, then you have successfully configured MySQL Governor.
How To upgrade database server
You can find the instructions in this documentation.
Uninstalling
To remove MySQL Governor, run the following command:
/usr/share/lve/dbgovernor/mysqlgovernor.py --delete
The script will install the original MySQL server, and remove MySQL Governor.
Configuration and operation
You can find the instructions in this documentation.
Administrator WEB interface (CloudLinux Manager)
The documentation is available here.
- Dashboard
- Current Usage
- Users
- Statistics
- Packages
- Options
- PHP Selector
- Installation instructions
- Selector tab
- Selector tab additional features (cPanel) CloudLinux Manager 6.0.1-2
- PHP Selector troubleshooting (cPanel) CloudLinux Manager 6.0.1-2
- PHP Selector diagnostic tool and notifications CloudLinux Manager 6.0.1-2
Dashboard
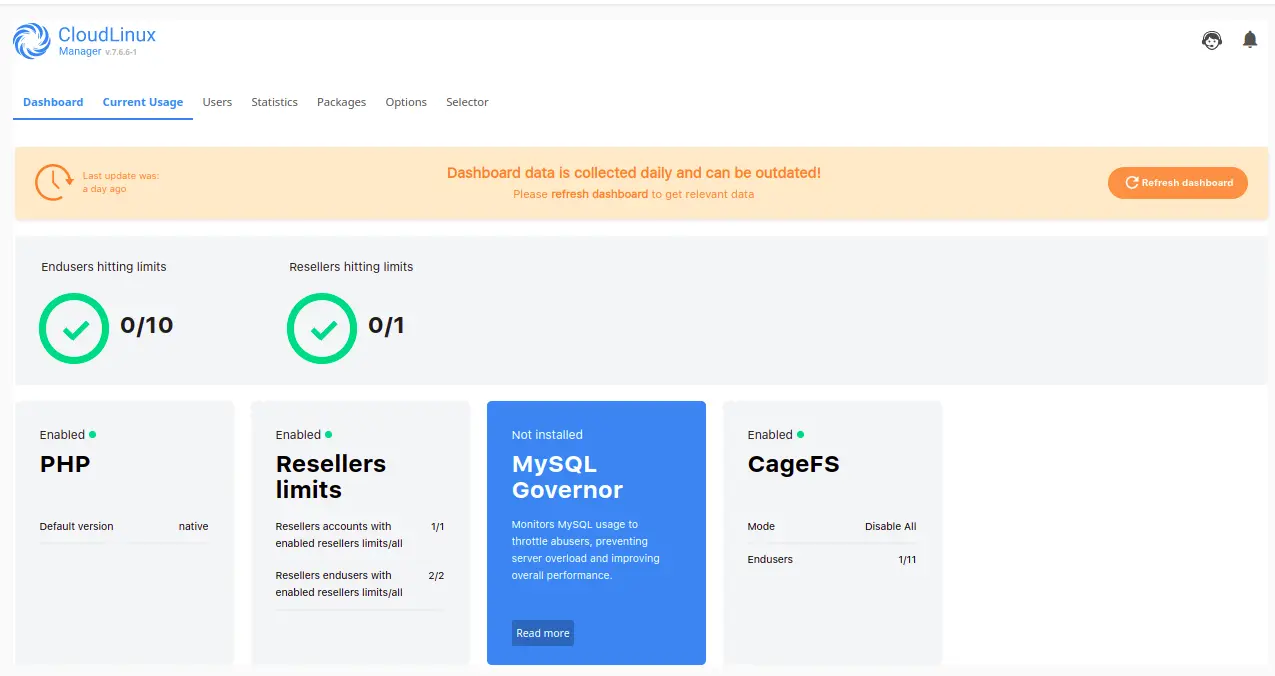
Dashboard provides a quick overview of statistics and all administrative information for server administrators.
Go to CloudLinux Manager | Dashboard.

- End Users hitting limits — number of users reaching their limit in any kind of resource. Data is within the last 24 hours.
- Resellers hitting limits — number of enrolled Resellers that are reaching their limit in any kind of resource. Data is within the last 24 hours.
- PHP Selector block displays the following information:
- Default version — the default version of PHP binaries. Click Manage to change the default version, enable or disable PHP Selector, change the list of supported versions, and choose default modules. You will be redirected to CloudLinux Manager | PHP Selector. PHP Selector (cPanel) has malfunctions warnings about the most common issues.
- CageFS block displays the following information:
- CageFS status (Enabled/Disabled/Not installed). To manage CageFS, click Manage. You will be redirected to CloudLinux Manager | Options | CageFS. Click Install to install CageFS.
- Mode displays the current CageFS mode of operation.
- End users — displays the number of users with CageFS enabled/all.
Reseller WEB interface (CloudLinux Manager)
User WEB interface
LVE Wrappers
The documentation is available here.
- lve_wrapper
- lve_suwrapper
CageFS and running commands inside
The documentation is available here.
- cagefs_enter
- cagefs_enter_user
Hardened PHP
- alt-php versions 5.5 - 8.2
Mod_hostinglimits
LVE is a kernel level technology developed by the CloudLinux team. The technology has common roots with container based virtualization and uses cgroups in its latest incarnation. It is lightweight and transparent. The goal of LVE is to make sure that no single web site can bring down your web server.
Today, a single site can consume all CPU, IO, Memory resources or Apache processes - and bring the server to a halt. LVE prevents that. It is done via collaboration of Apache module, PAM module and kernel.
mod_hostinglimits is an Apache module that:
- detects VirtualHost from which the request came;
- detects if it was meant for CGI or PHP script;
- puts Apache process used to serve that request into LVE for the user determined via SuexecUserGroup directive for that virtual host;
- lets Apache to serve the request;
- removes Apache process from user's LVE.
The kernel makes sure that all LVEs get fair share of the server's resources, and that no customer can use more then the limits set for that customer. Today we can limit CPU , Memory (virtual and physical), IO, number of processes as well as the number of entry processes (concurrent connections to apache).
Each LVE limits amount of entry processes (Apache processes entering into LVE) to prevent single site exhausting all Apache processes. If the limit is reached, then mod_hostinglimits will not be able to place Apache process into LVE, and will return error code 508. This way very heavy site would slow down and start returning 508 errors, without affecting other users.
- If the site is limited by CPU or IO, then the site will start responding slower.
- If the site is limited by memory or number of processes limits, then the user will receive 500 or 503 errors that server cannot execute the script.
ea-php81 with php-fpm
To install, run the following command:
apt install ea-php81*
alt-php with suphp, cgi
To install, follow these steps:
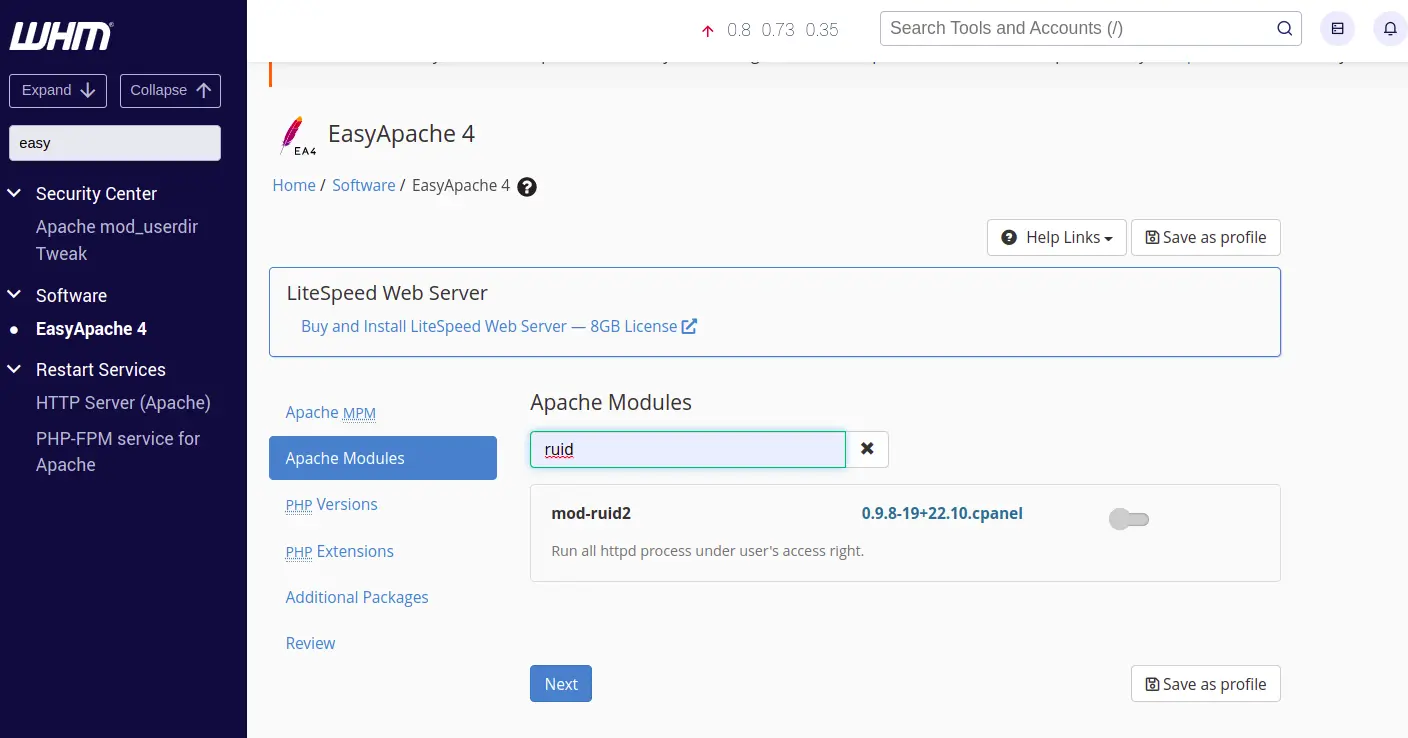
Remove
mod-ruid2:
Install packages (with
alt-php74as an example):apt install ea-apache24-mod-suphp ea-apache24-mod-suexec apt install alt-php74
PHP Selector installation instructions
The documentation is available here.
To install, run the following commands:
apt install ea-apache24-mod-suphp ea-apache24-mod-suexec
apt install cagefs
cagefsctl –-init
Symlink owner match protection
The documentation is available here.
Link traversal protection
Tuned profiles
The documentation is available here.
Apache mod_lsapi
General requirements
General requirements are available here.
Installation
Installation on cPanel servers with EasyApache 4:
apt install liblsapi liblsapi-dev
apt install ea-apache24-mod-lsapi
/usr/bin/switch_mod_lsapi --setup
service httpd restart
Installation on servers with no panel:
apt install liblsapi liblsapi-dev
apt install mod-lsapi
/usr/bin/switch_mod_lsapi --setup
service apache2 restart
Configuration
Configuration instructions are available here.
Troubleshooting
In case the site responds with the error: 503 Service unavailable.
- Be sure that /opt has drwxr-xr-x permissions. It can be fixed with the following command:
chmod 755 /opt
- Change the default folder for mod_lsapi socket:
mkdir /var/mod_lsapi
chown nobody.nobody /var/mod_lsapi
chmod 755 /var/mod_lsapi
Add to /etc/apache2/conf.d/lsapi.conf new path:
lsapi_socket_path /var/mod_lsapi
And restart service:
service httpd restart
Uninstallation
Uninstallation procedure for cPanel servers with EasyApache 4:
/usr/bin/switch_mod_lsapi --uninstall
apt remove liblsapi liblsapi-dev ea-apache24-mod-lsapi
Uninstallation procedure for servers with no panel:
/usr/bin/switch_mod_lsapi --uninstall
apt remove liblsapi liblsapi-dev mod-lsapi


