Cloudlinux Solo for end-users
Introduction
CloudLinux OS Solo is designed for installation on VPS or dedicated servers with a single hosting account for any number of websites.
We provide the CloudLinux OS Solo with pre-installed features, but for grafical interface, please install a control panel on your server.
WARNING!
Currently supported OS version is CloudLinux OS Solo 8+ only. Therefore, for now, there is no possibility to use CloudLinux OS Solo on servers with OS version 6 and 7. Please refer to the currently supported OS versions.
AccelerateWP
Overview
AccelerateWP is a complex solution to help customers increase their WordPress site performance. With AccelerateWP you can manage optimization features, like object caching, CSS and JavaScript preprocessing and website preloading.
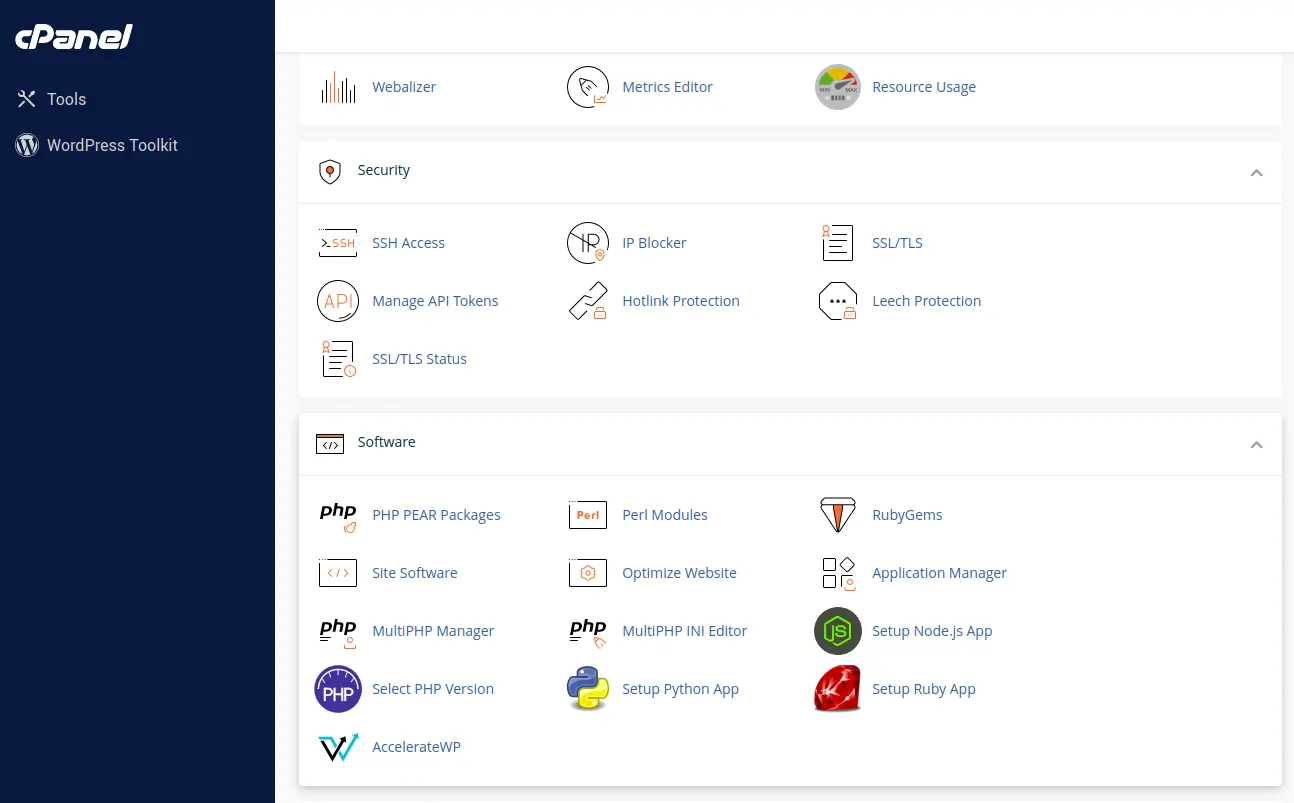
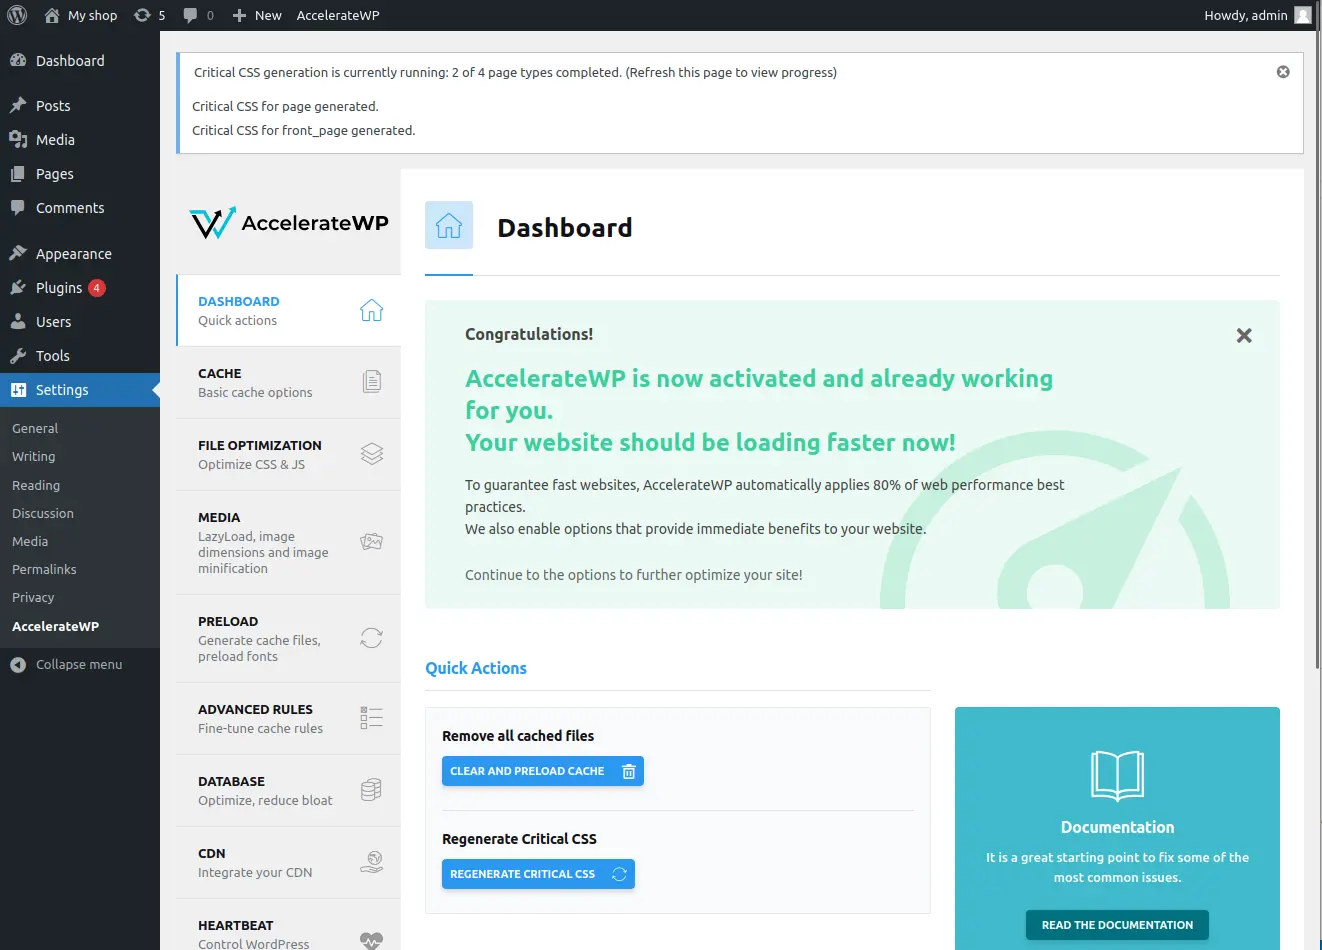
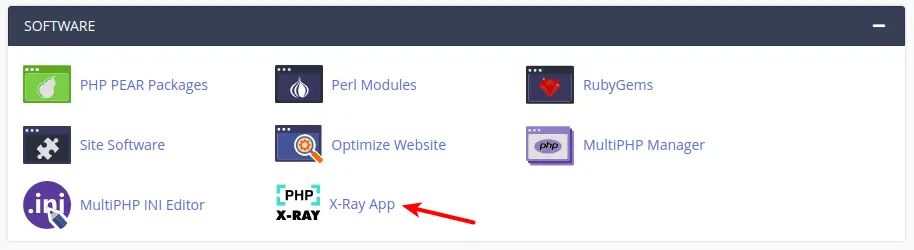
In order to start using AccelerateWP, go to the cPanel interface and find the AccelerateWP application in the Software section.
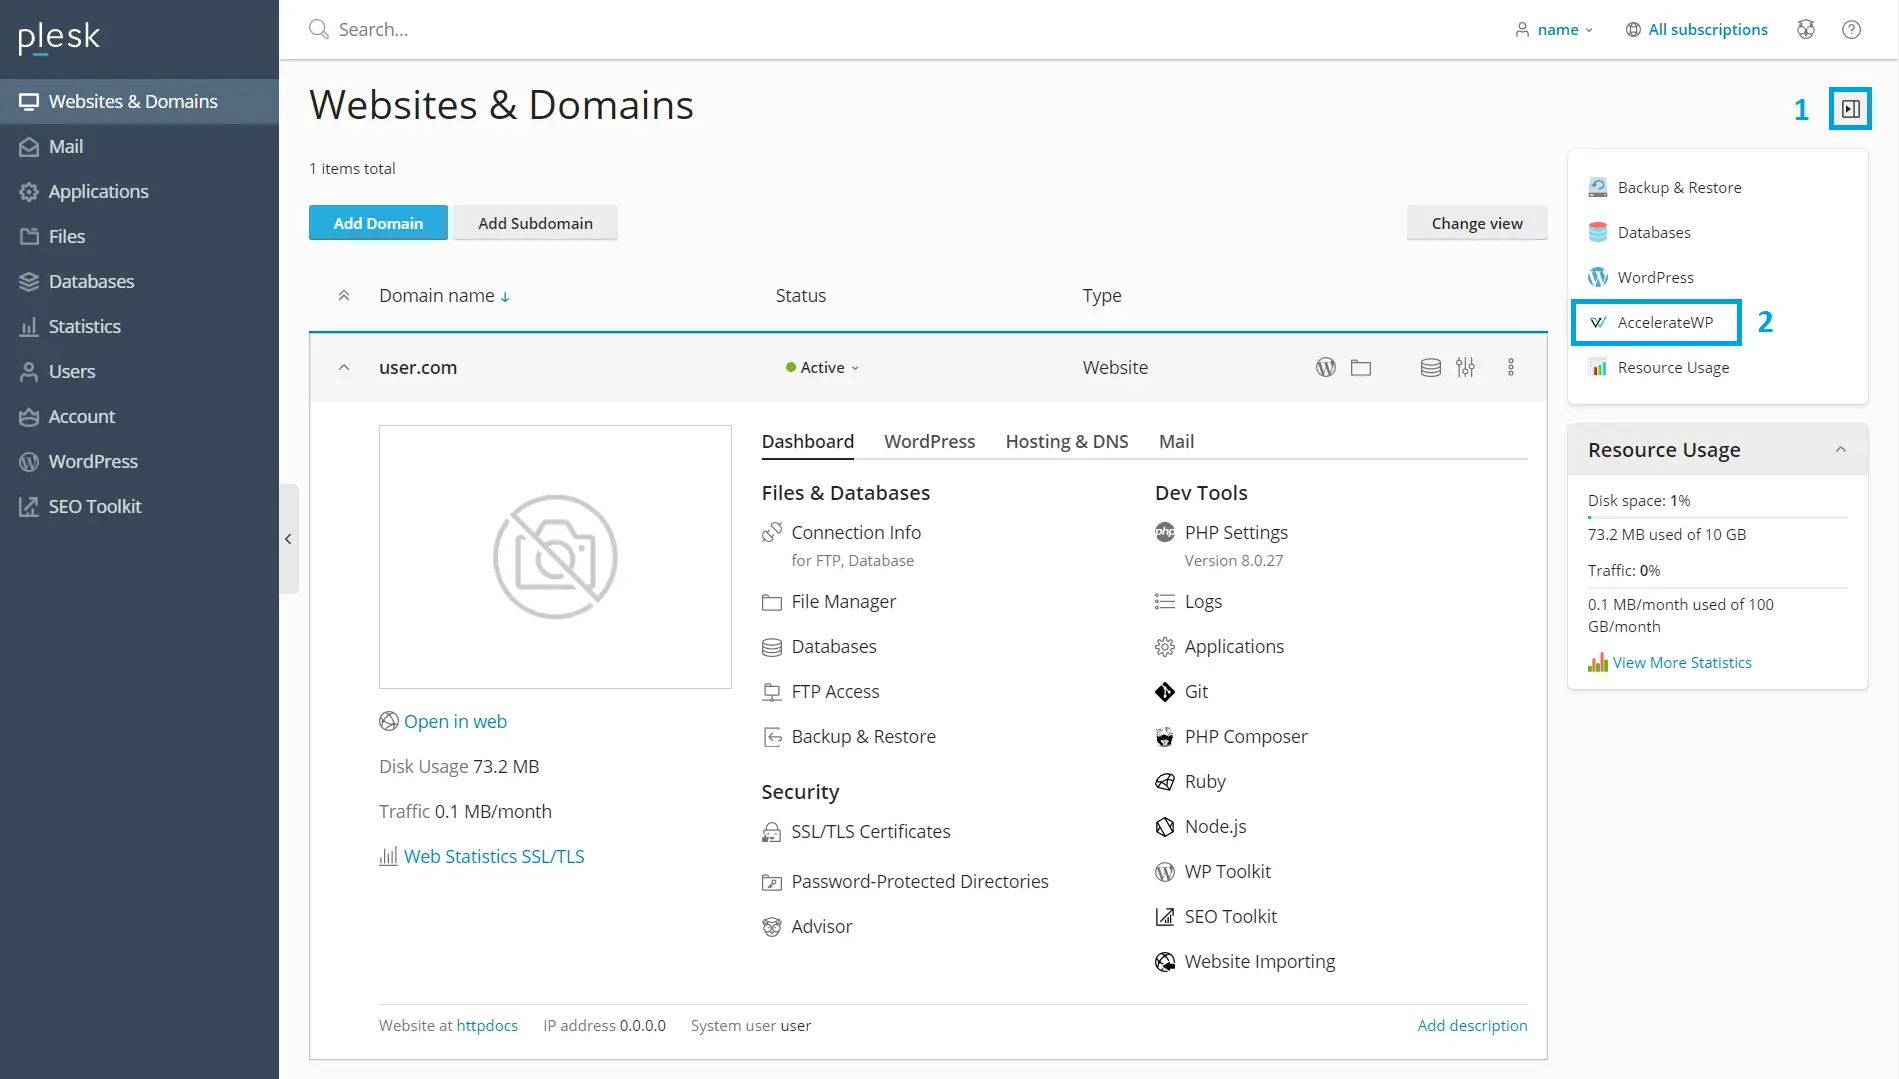
If you use Plesk control panel, (1) trigger the side panel and (2) choose the AccelerateWP widget.
If you use DirectAdmin control panel, hover over the main menu and choose the AccelerateWP in the Extra Features group.

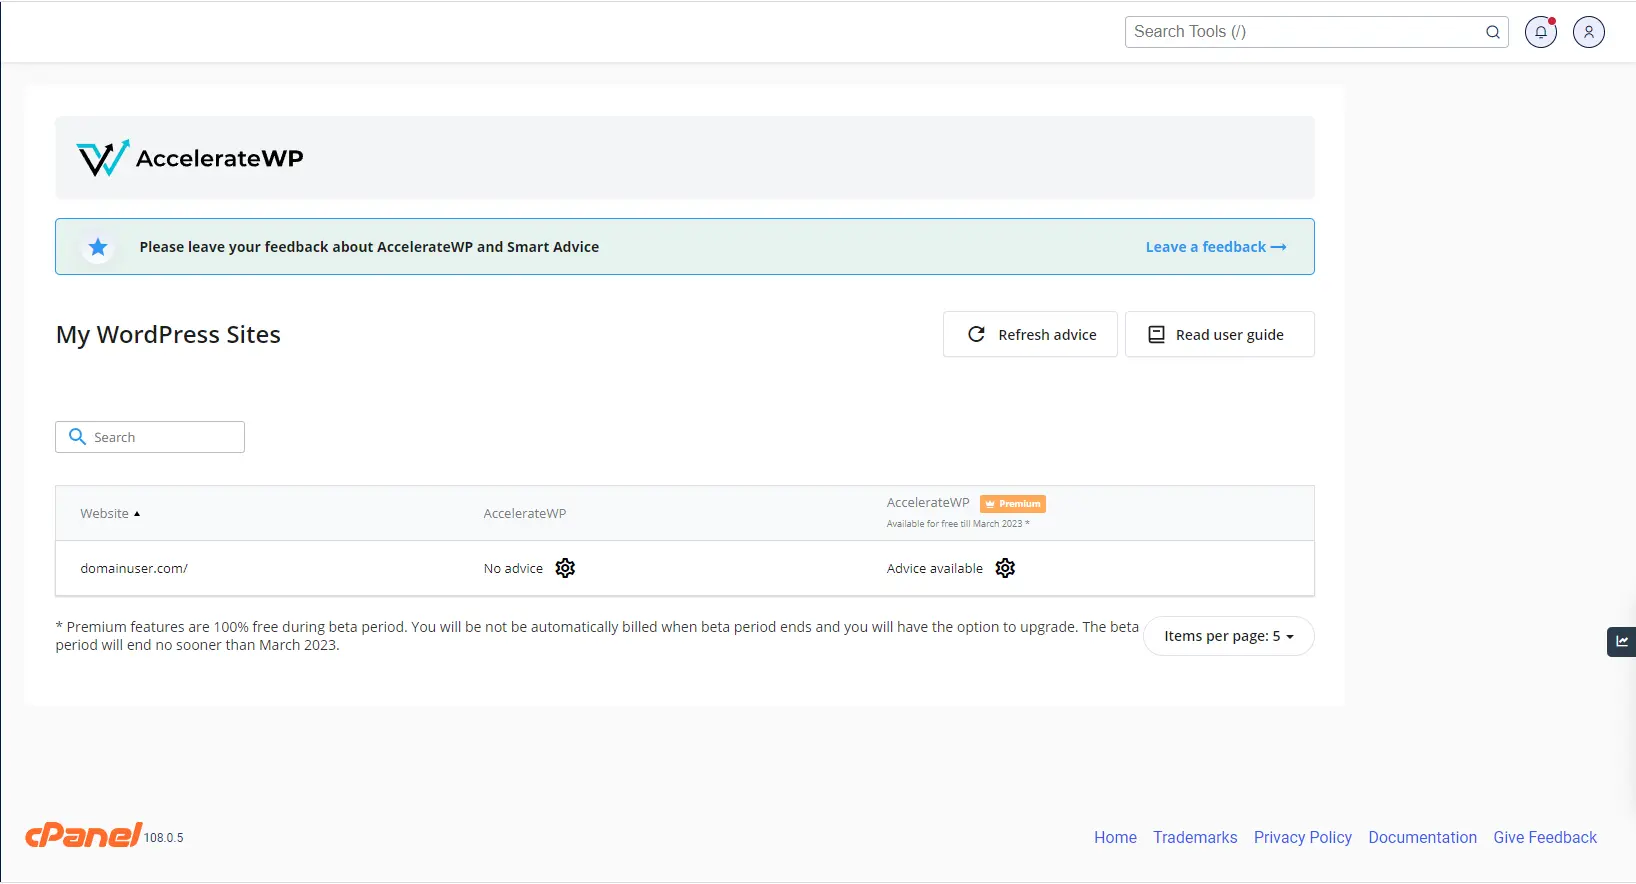
Click the application button and get into the AccelerateWP interface.

Each row in the table is the WordPress website that was found on server and each column is the optimization feature.
AccelerateWP is built as advice-driven plugin: the feature is suggested to be enabled once the Smart Advice is issued. Smart advice may be issued during profiling a website with X-Ray. X-Ray PHP profiler detects concrete bottlenecks in website performance and thus is able to select a best suited optimization feature to increase it significantly.
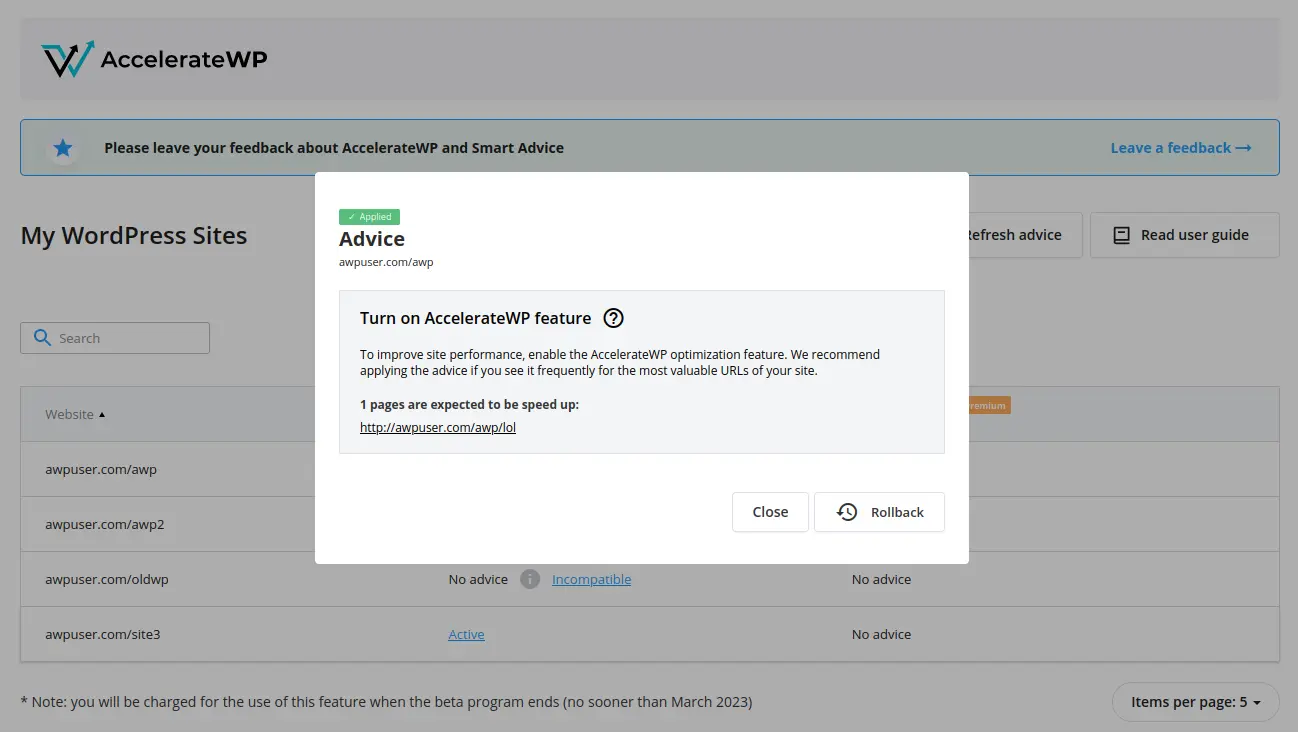
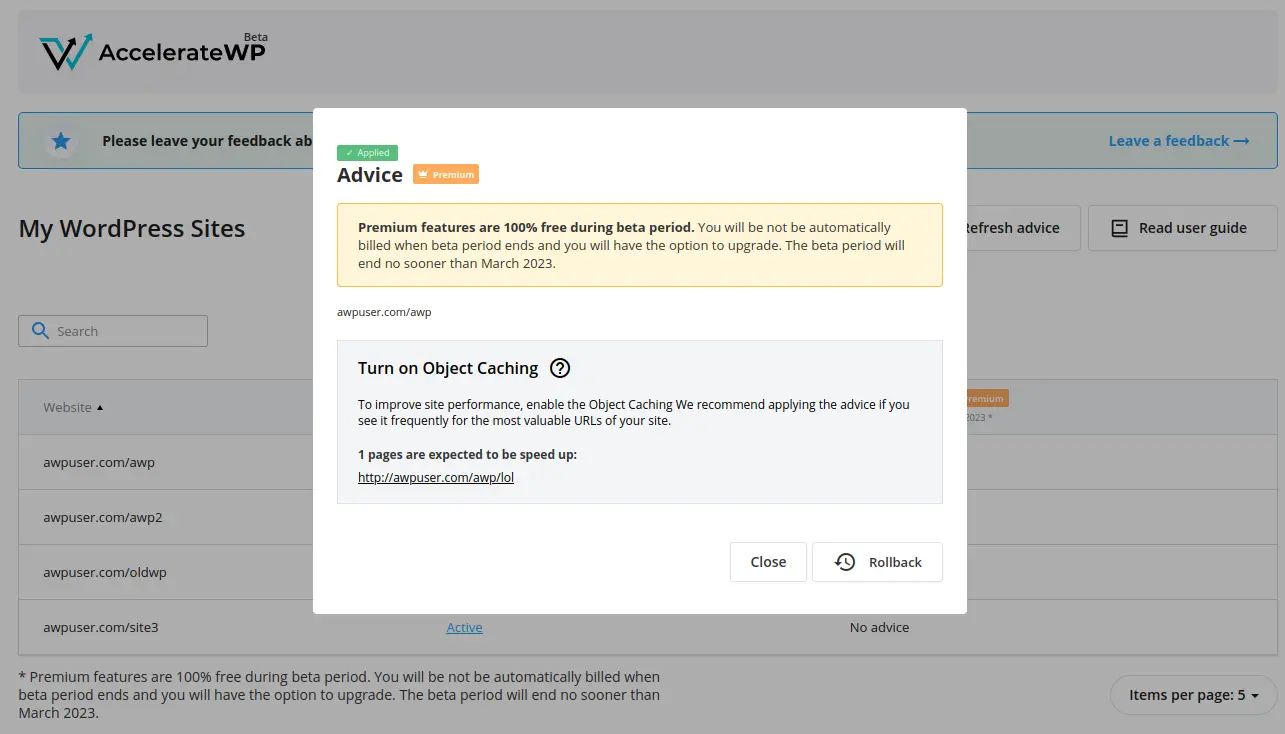
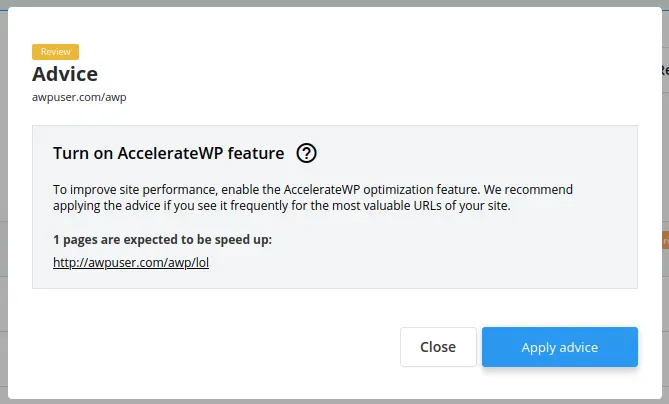
Use the Advice available link to check advice details and click the Apply advice button to activate the feature.

After a couple of minutes, the feature will be activated and advice becomes Applied. Close the window and see Active link in the corresponding cell of the table.
If you still would like to try the feature on the website where advice was not issued, click on the gear icon and enable the feature.
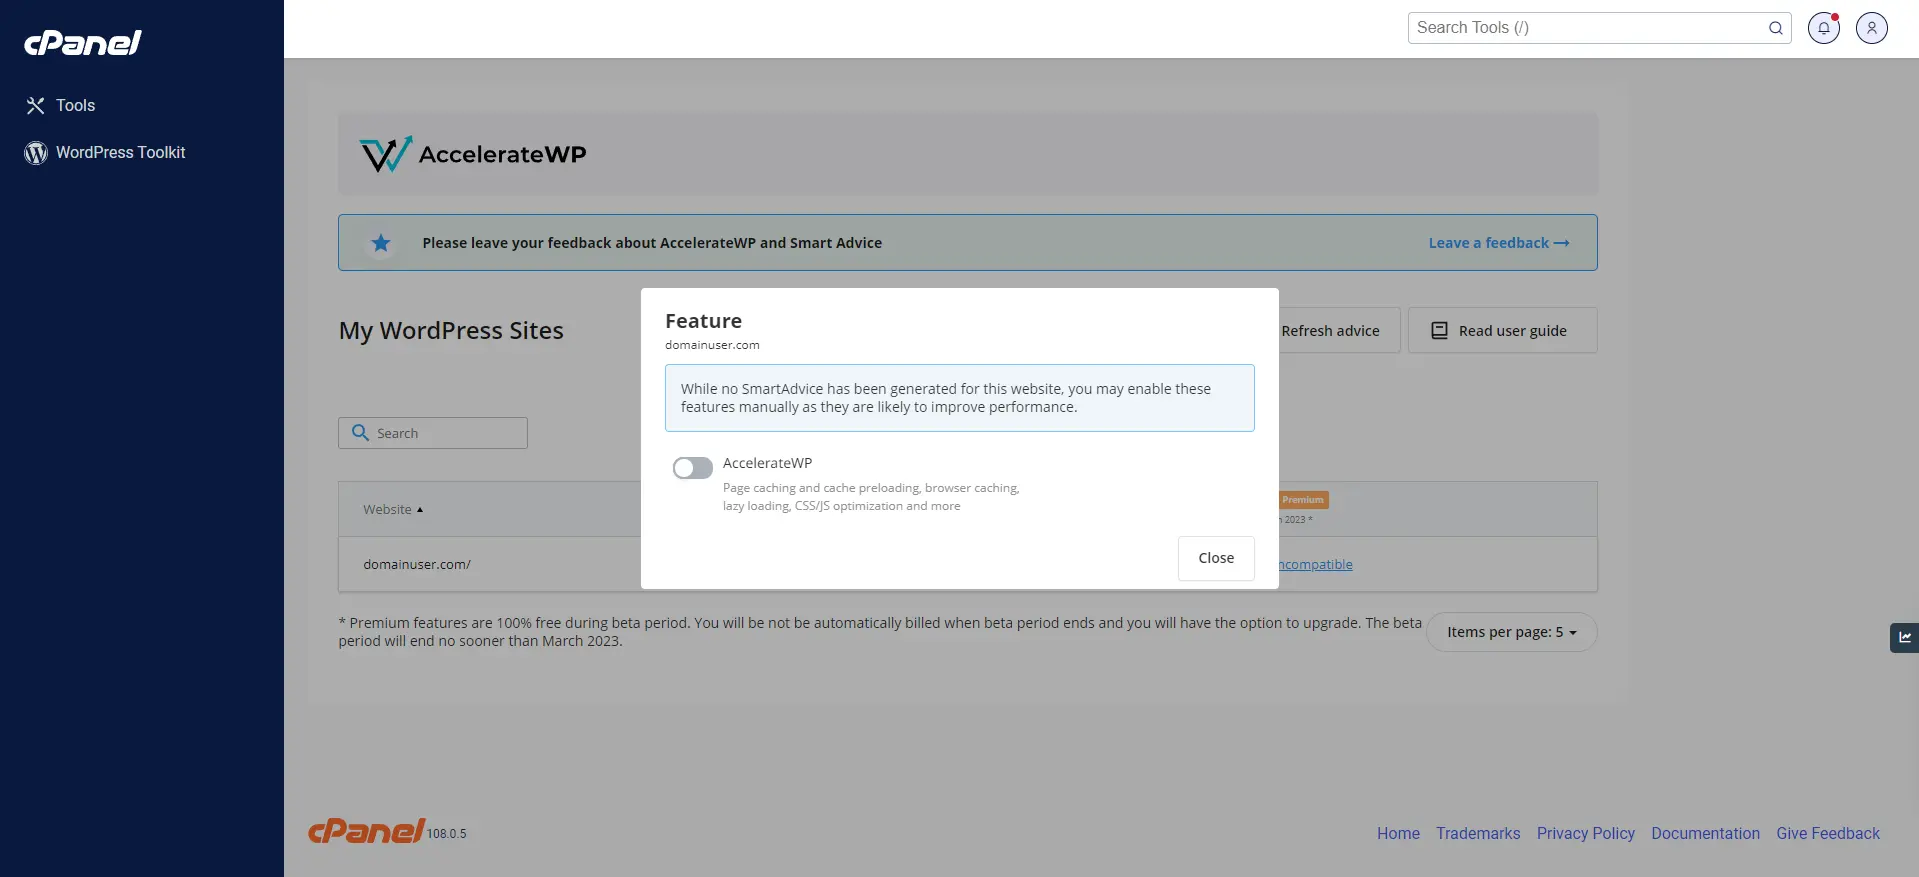
AccelerateWP feature: WordPress optimization plugin
AccelerateWP is a base feature that provides full page caching, GZIP compression and some other useful optimizations.
In order to start working with AccelerateWP feature, check if advice is available in the corresponding cell on the intersection of website and AccelerateWP column.
And click the "Apply advice" button to activate the AccelerateWP feature.
After a couple of minutes, the plugin will be installed. Login into the WordPress Admin and find the AccelerateWP in the list of active plugins.
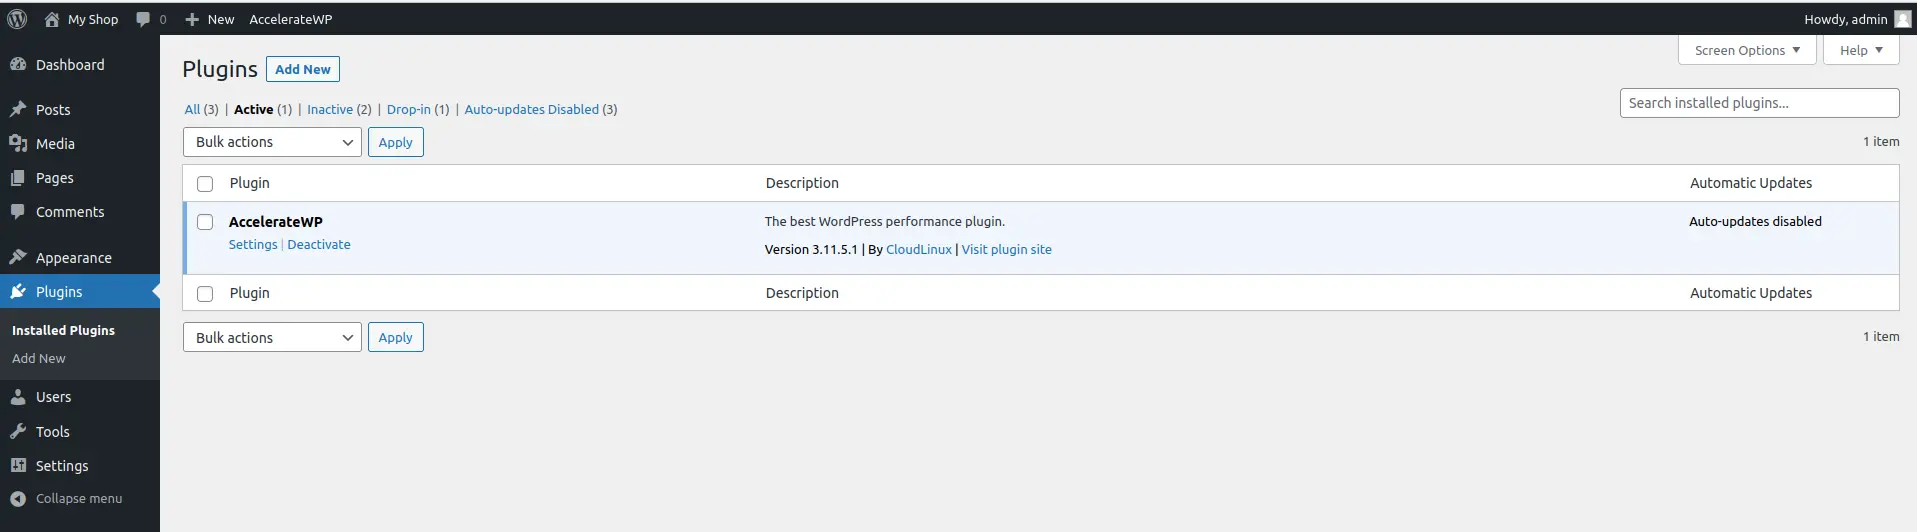
Page caching will be enabled by default. Click the "Settings" link below the plugin name to configure additional options.

Limitations
- the website must use PHP version 7.3 or higher.
- the WordPress version must be 5.8 and higher.
- the other WordPress Caching plugins must not be installed.
- the WordPress should not run in Multisite mode.
AccelerateWP feature additional options
Find more additional options in WordPress admin page.
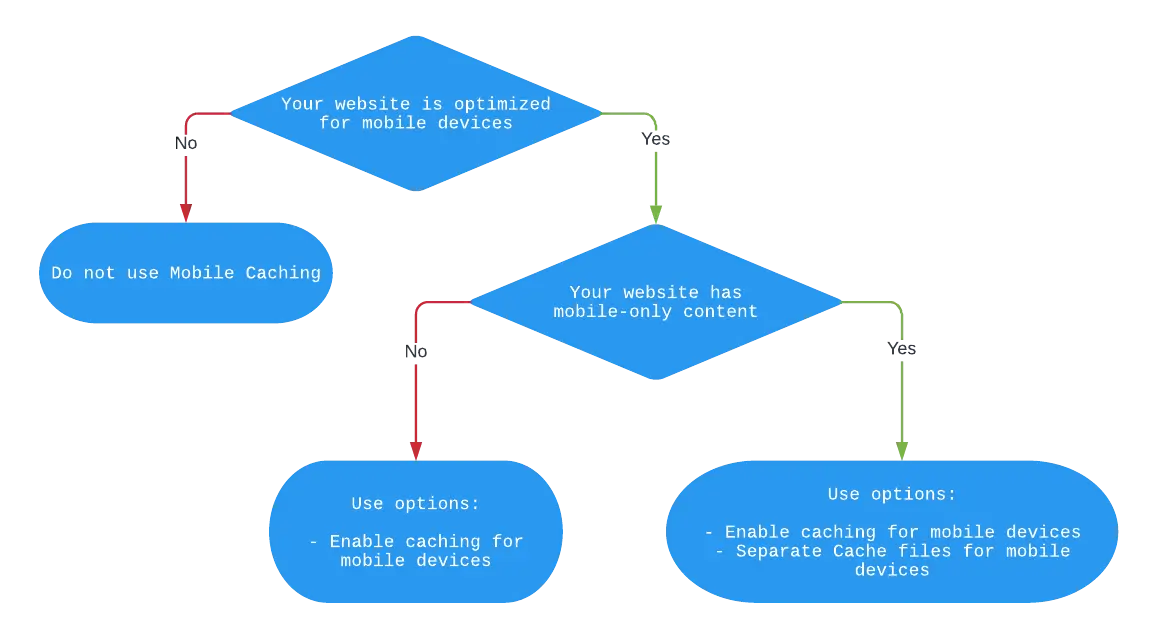
Mobile caching
Use it only if you website is adapted to use on smartphones and mobile phones.
Separate cache files for mobile devices. In this case the content for mobile devices will be cached into different cache file as for desktop\tablets.
This option is necessary if you have some functionality only for mobile devices, not for desktop\tablets.
The following diagram helps you understand if you need mobile caching.
Note
If you use an additional layer of Cache (Varnish, NGINX , etc.) make sure it can distinguish between desktop and mobile visitors.
User Cache
It is recommended to use such an option when your website has a unique content for each logged-in user. If the user is not logged-in, a common site cache will be used, otherwise each logged-in user’s content will be cached separately.
File Optimization
File Optimization consists of Minification and file Combining.
Minification is the process of minimizing code in your web pages and script files. Webmasters look at minification as a primary method of reducing website load times via the bandwidth they use.
Minification also reduces JS, CSS and HTML files. The goal is removing comments and extra spaces. It crunches variables that minimize code and ultimately reduces the file size.
After minification, the file still functions as it should. The difference is a reduction in bandwidth due to network requests.
By combining CSS & JS files, HTTP/1 does not allow multiple requests from the same TCP connection between a host server and a web browser.
Putting CSS and JS files into their respective groups, makes requests for downloads from a browser safe and more efficient. The old way meant multiple connections that took up bandwidth.
File (CSS & JS) combining is not necessary for HTTP/2 (see https://webspeedtools.com/should-i-combine-css-js/)
HTTP/2 introduced multiplexing. Now, the browser can send unlimited number of requests to the server, then download all files simultaneously with only one TCP connection.
Consequently, HTTP/2 takes care of multiple TCP connections and the waiting time before each download. In one sense, consolidating CSS and JS files might be unnecessary.
To verify which HTTP version is used for requests on your site, you can use https://tools.keycdn.com/http2-test
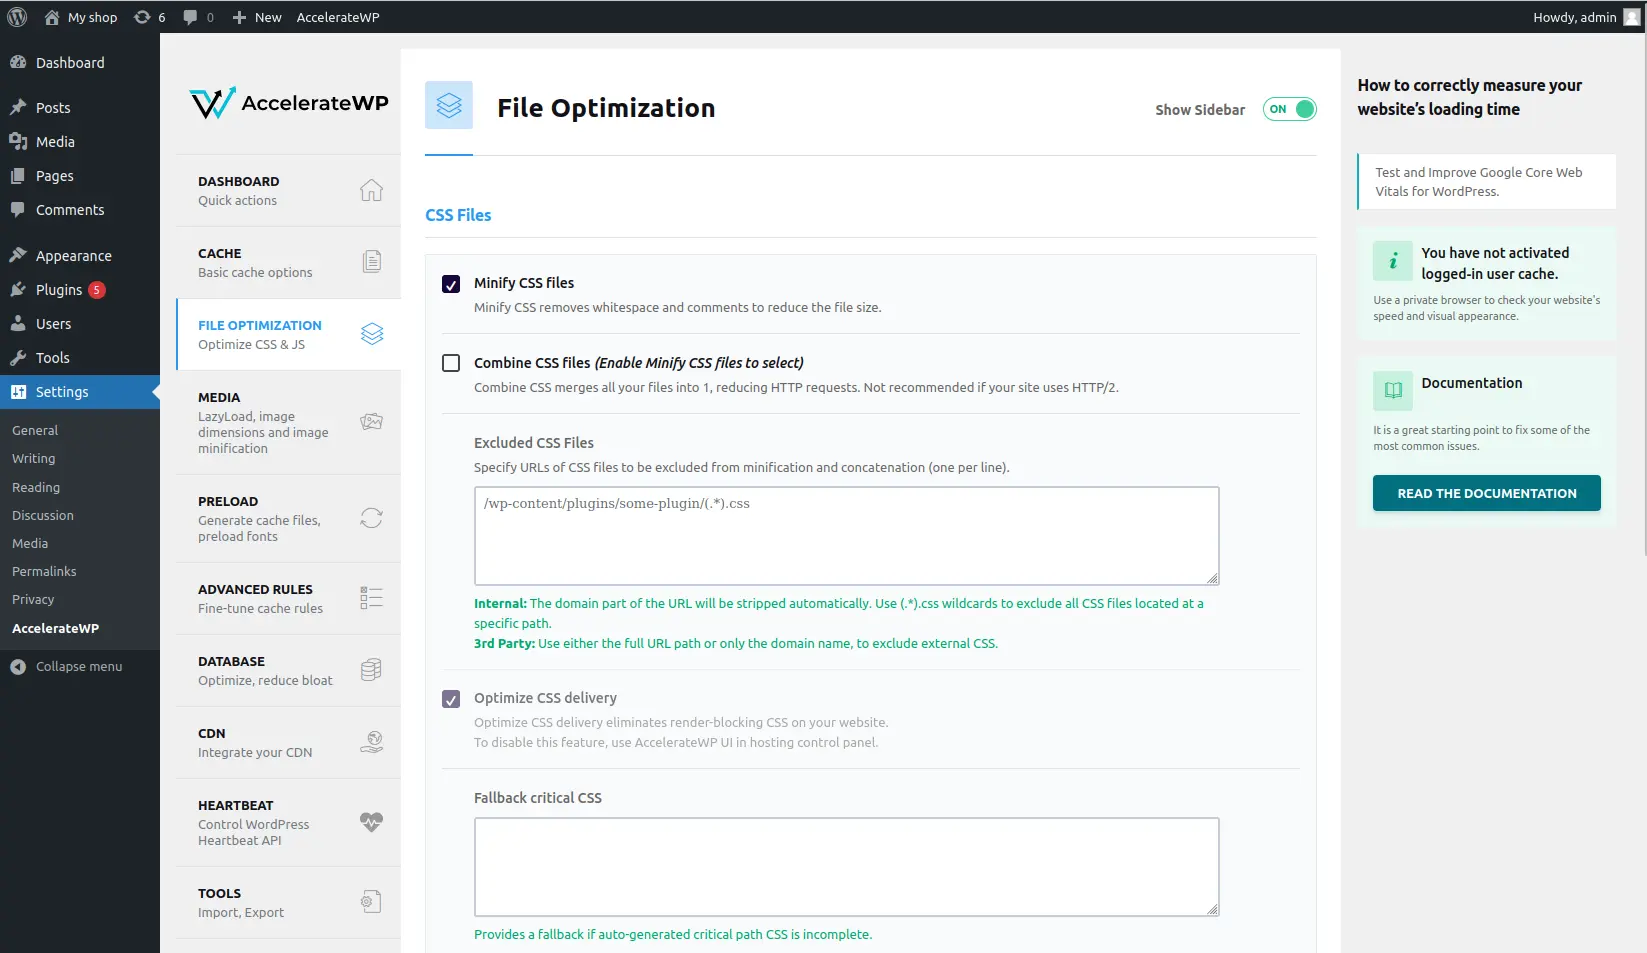
CSS Files
Minify CSS
Minify CSS reduces file sizes by taking out white space and comments embedded in the code.
Combine CSS
Combine CSS reduces HTTP requests by merging all your files into one. Combine CSS is not recommended if your site uses HTTP/2.
Excluded CSS Files
To single out those CSS files that should not be minimized, list the URLs attached to the CSS files that should be excluded from minification and concatenation (one per line).
Caution!
Minification removes the domain from the URL.
To prevent that, use (. *).CSS wildcards to exclude all files in a specific location.
3rd Party: when excluding external CSS files, use the domain or the full URL path.
Optimize CSS delivery (Critical Path CSS)
Critical Path CSS eliminates render-blocking CSS on your website and improves browser page render performance. Your website will load much faster for your visitors.
Note
This feature can only be activated in the AccelerateWP hosting panel interface or in the SmartAdvice WordPress plugin. Once activated, you will be able to manage the options in the AccelerateWP WordPress plugin.
The function starts automatically after switching on. It takes some time to generate the Critical CSS. You will see a notification with the generation status. If necessary, you can add additional styles to the Critical CSS in the fallback CSS field.
Each time you change the site's theme, the Critical CSS will be regenerated. Also, if you have made any changes to the styles of your site, you need to manually regenerate the Critical CSS by clicking on the "Regenerate critical CSS" button.
Aggressive mobile CSS optimization
Reduces CSS exclusions on mobile, keeping only critical ones (admin-bar, dashicons, wp-admin). This option is a child of "Optimize CSS delivery" and requires "Separate cache files for mobile devices" to be enabled.
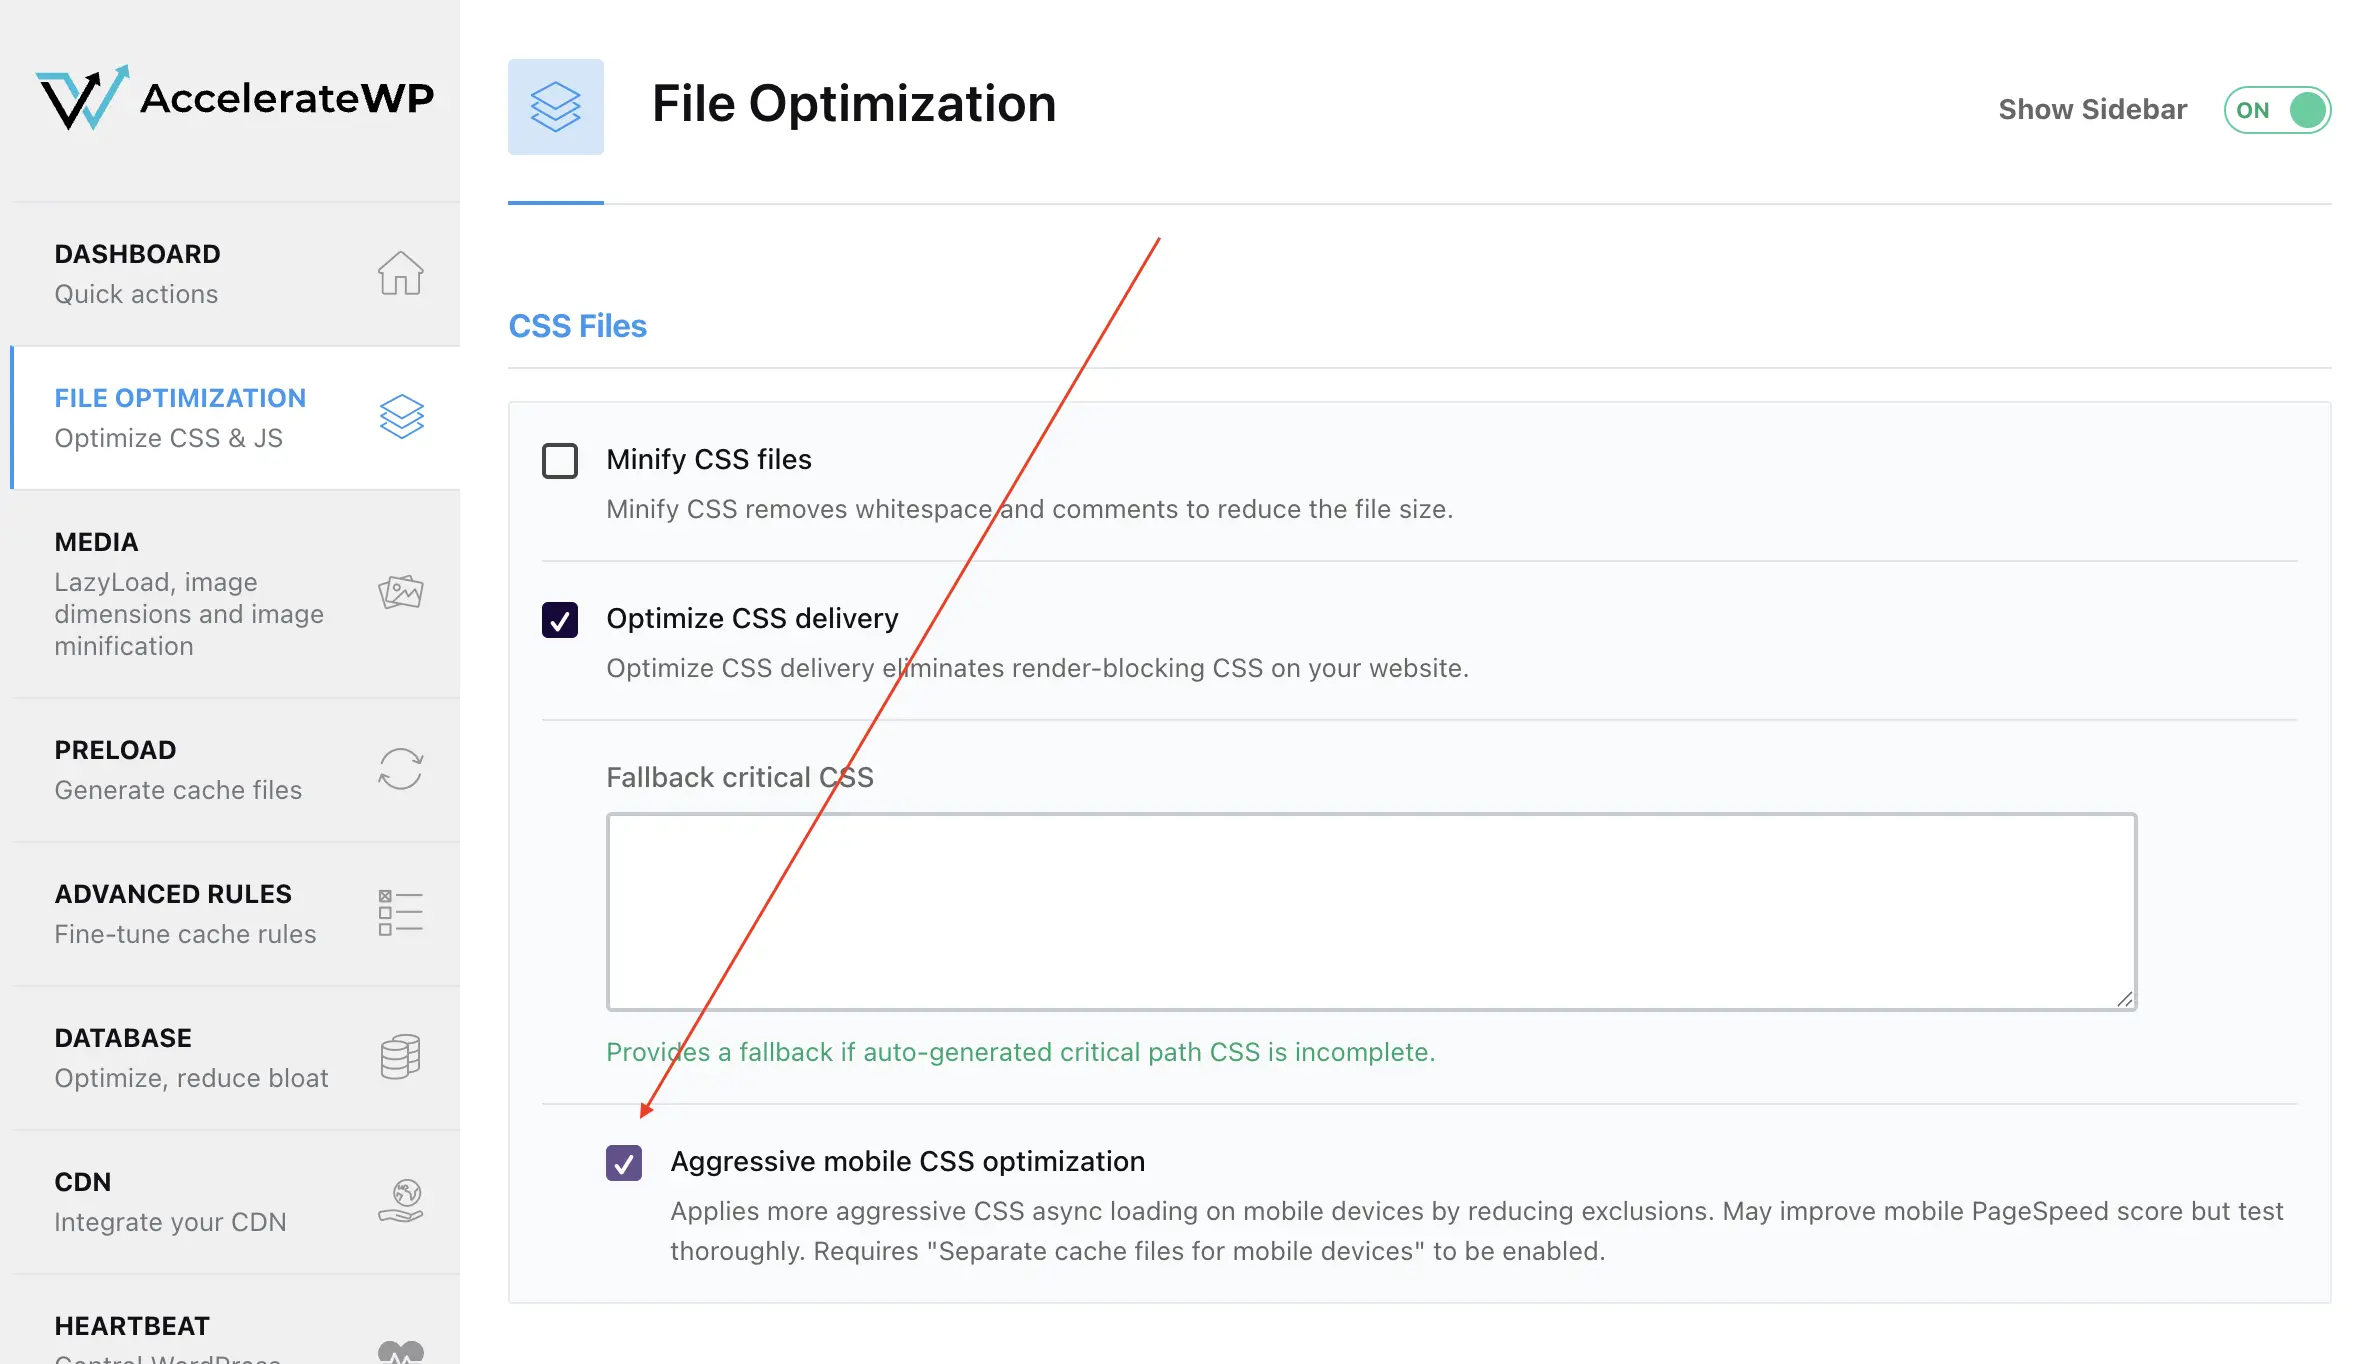
Default: OFF. Aggressive CSS optimization may break styling on some sites. Each site needs individual testing after enabling.
JavaScript Files
Minify javascript files
Minify JavaScript removes whitespace and comments to reduce the file size.
Combine JavaScripts files
This option will be active only if you choose Minify javascript files. It is not recommended for HTTP2.
Load JavaScript deferred
One major cause of slow web pages is a so-called blocking script: https://www.dummies.com/web-design-development/javascript/deferred-loading-with-javascript/.
Loading JavaScript called a blocking script blocks the webpage from loading.
Using the defer attribute alerts the browser not to wait for the script. Things will continue as usual per the build HTML and DOM processes. Quietly, the script rests in the background, then runs once the DOM is built.
So, the Load JavaScript deferred option adds to each script tag the defer attribute.
Delay JavaScript Execution
This option helps to decrease the page load time by delaying loading of all JavaScripts on the page. This option can be applied only for already cached pages, it is incompatible with the Combine JavaScripts files option.
Apply Delay JS only on mobile devices
When enabled, Delay JS is applied only for mobile visitors while desktop visitors get standard JavaScript loading. This option is a child of "Delay JavaScript Execution" and requires "Separate cache files for mobile devices" to be enabled.
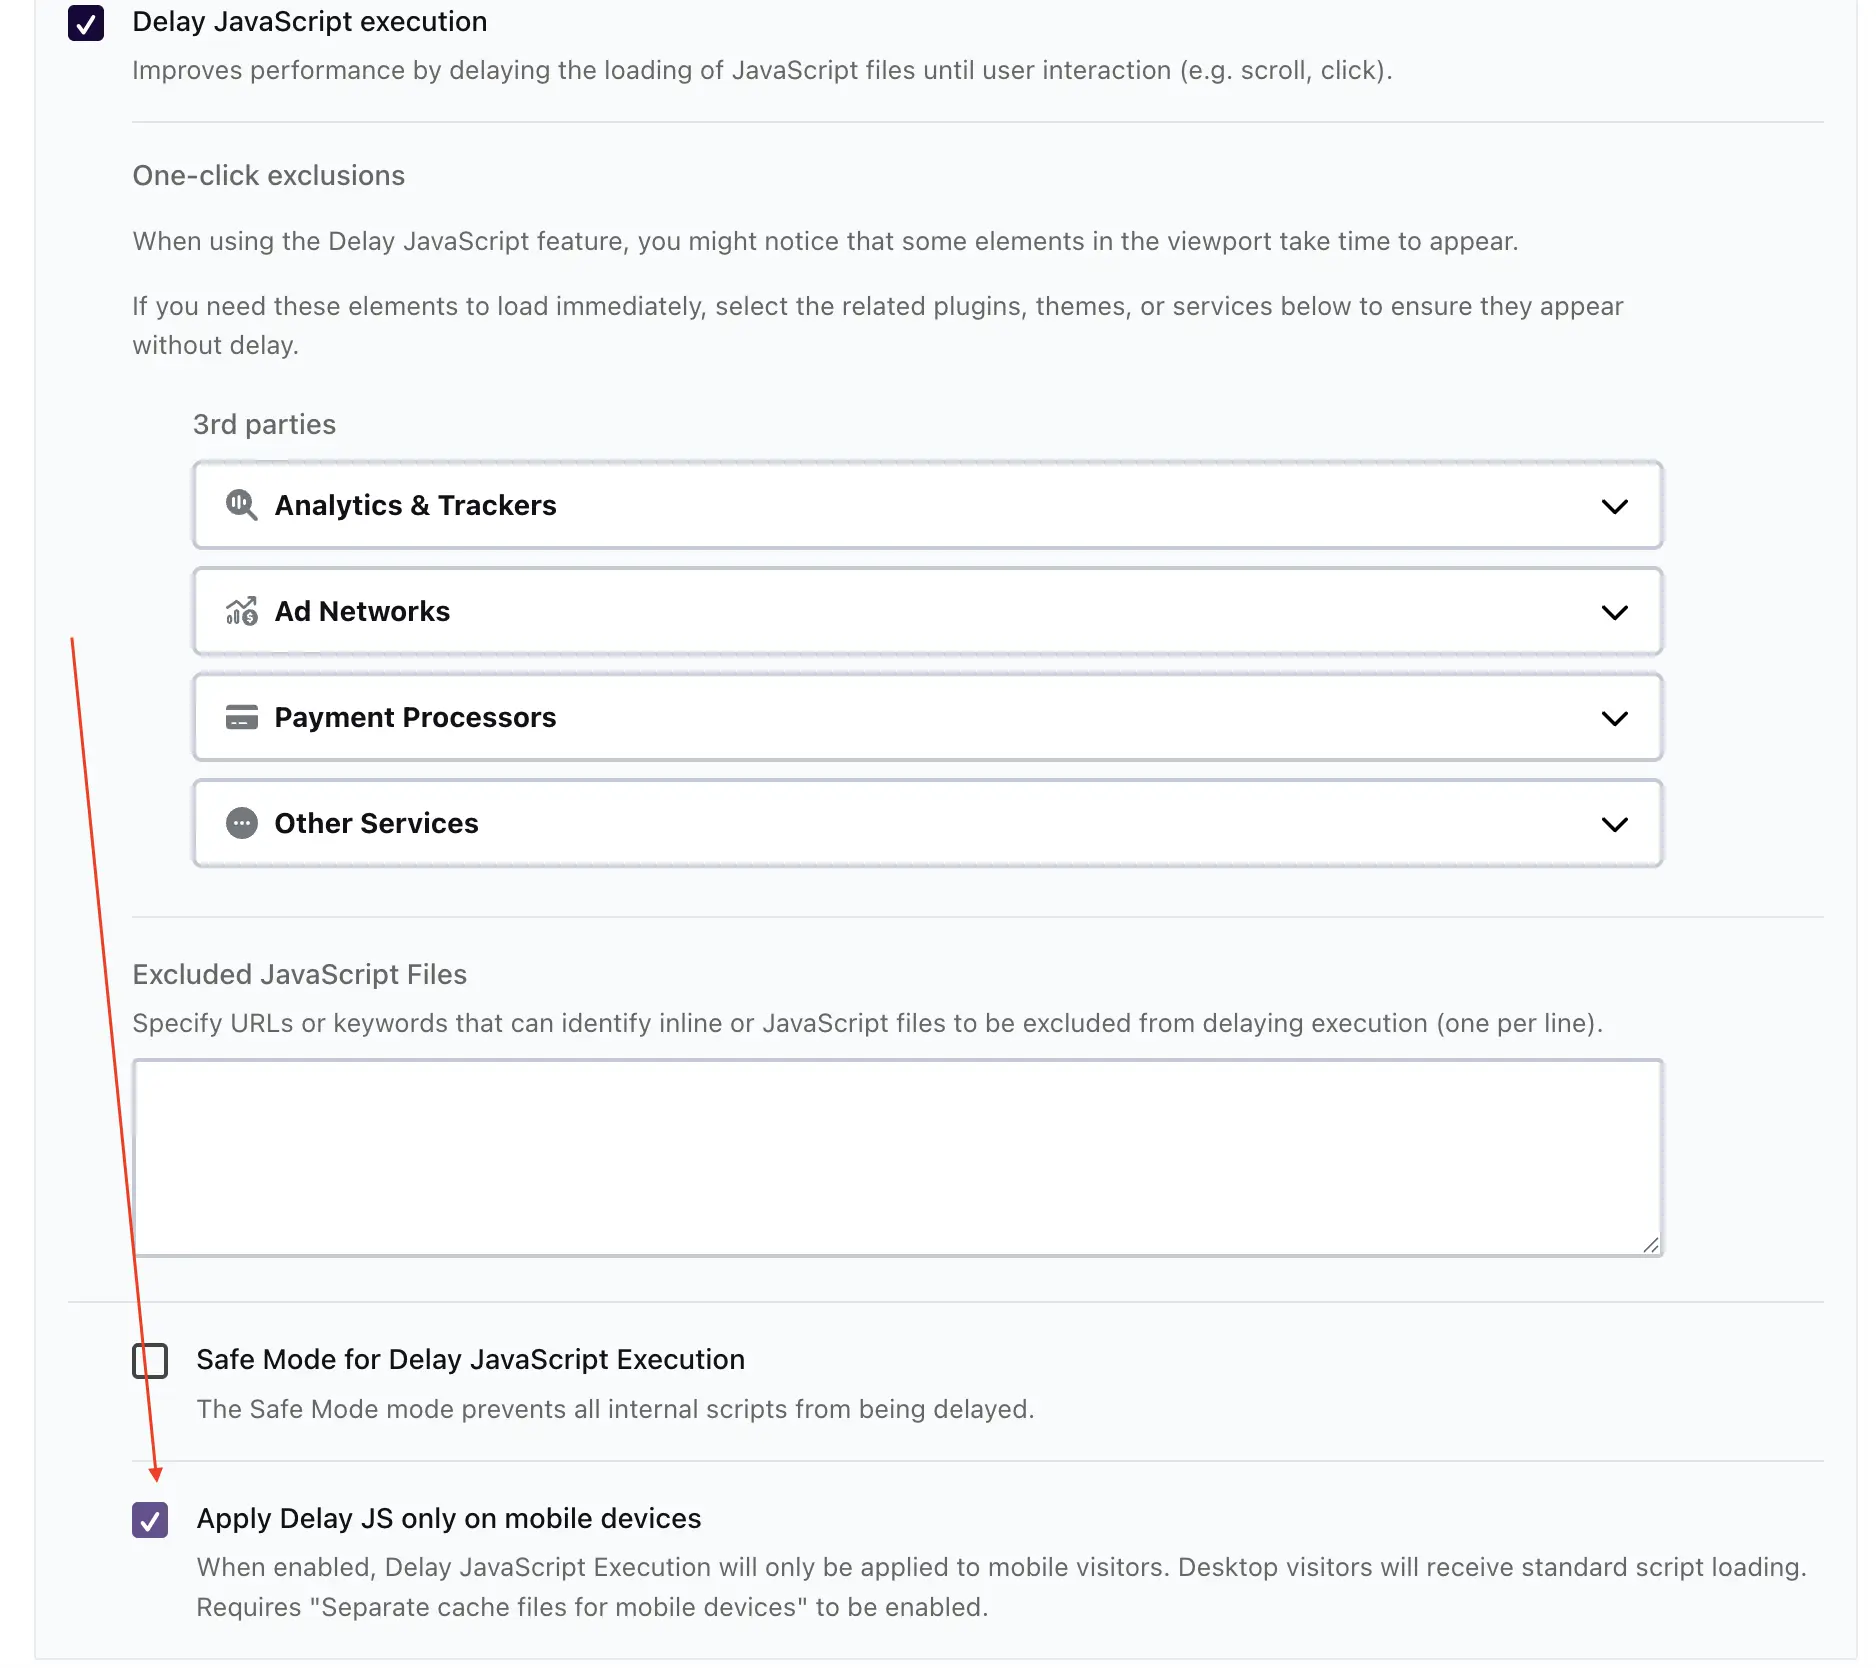
Default: OFF. Aggressive optimization may affect JavaScript interactivity on some sites. Each site needs individual testing after enabling.
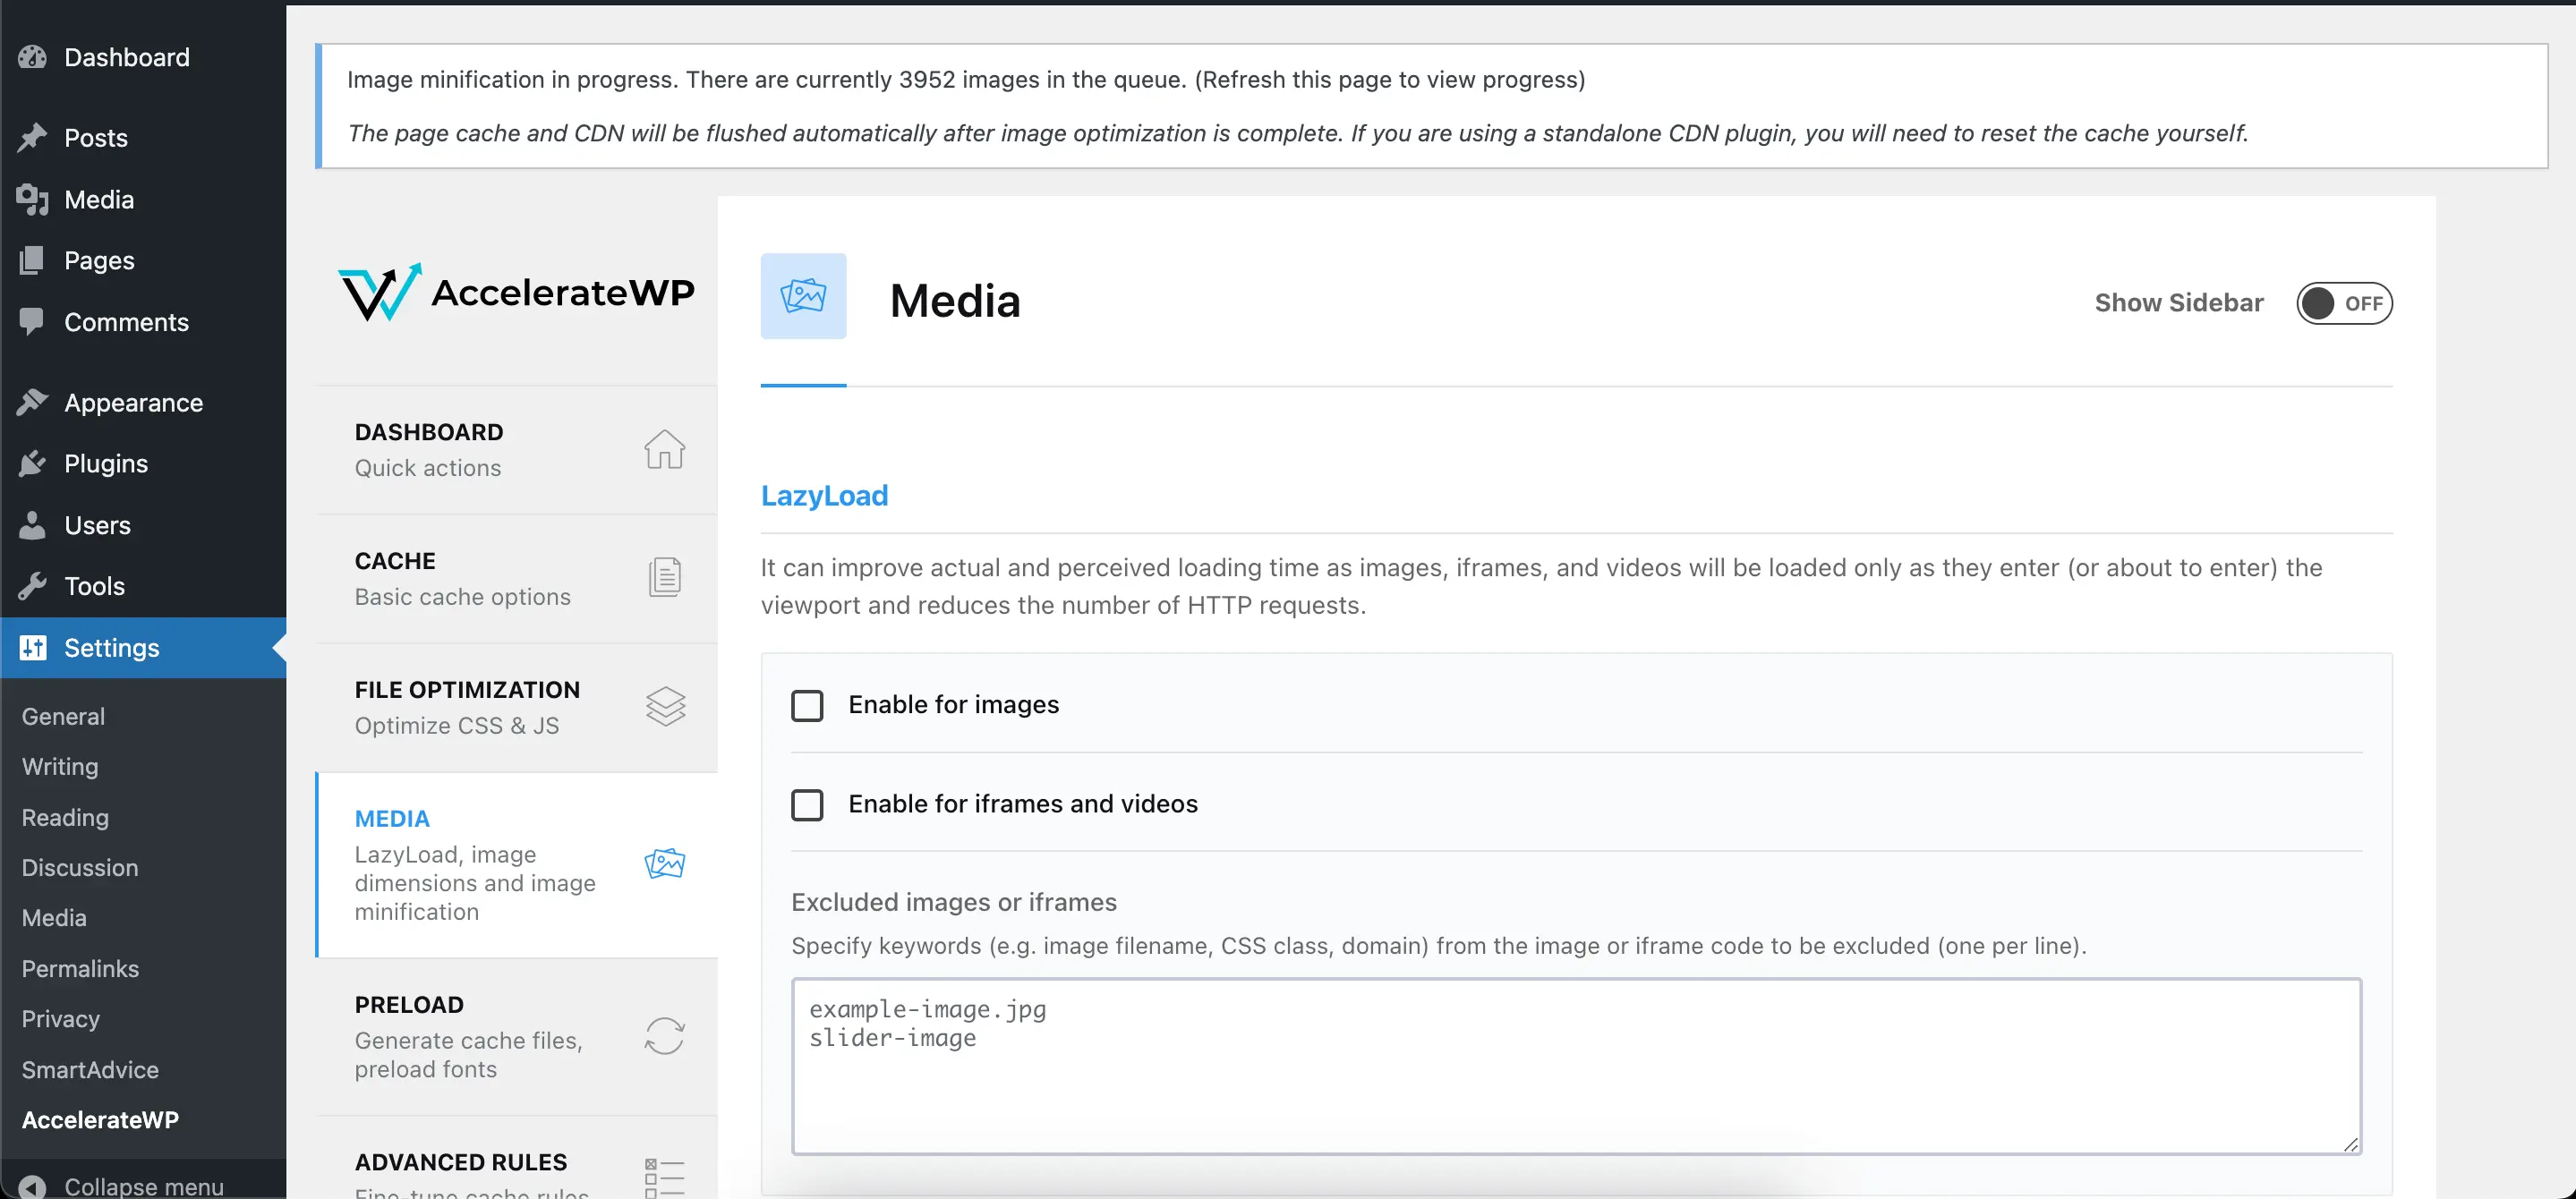
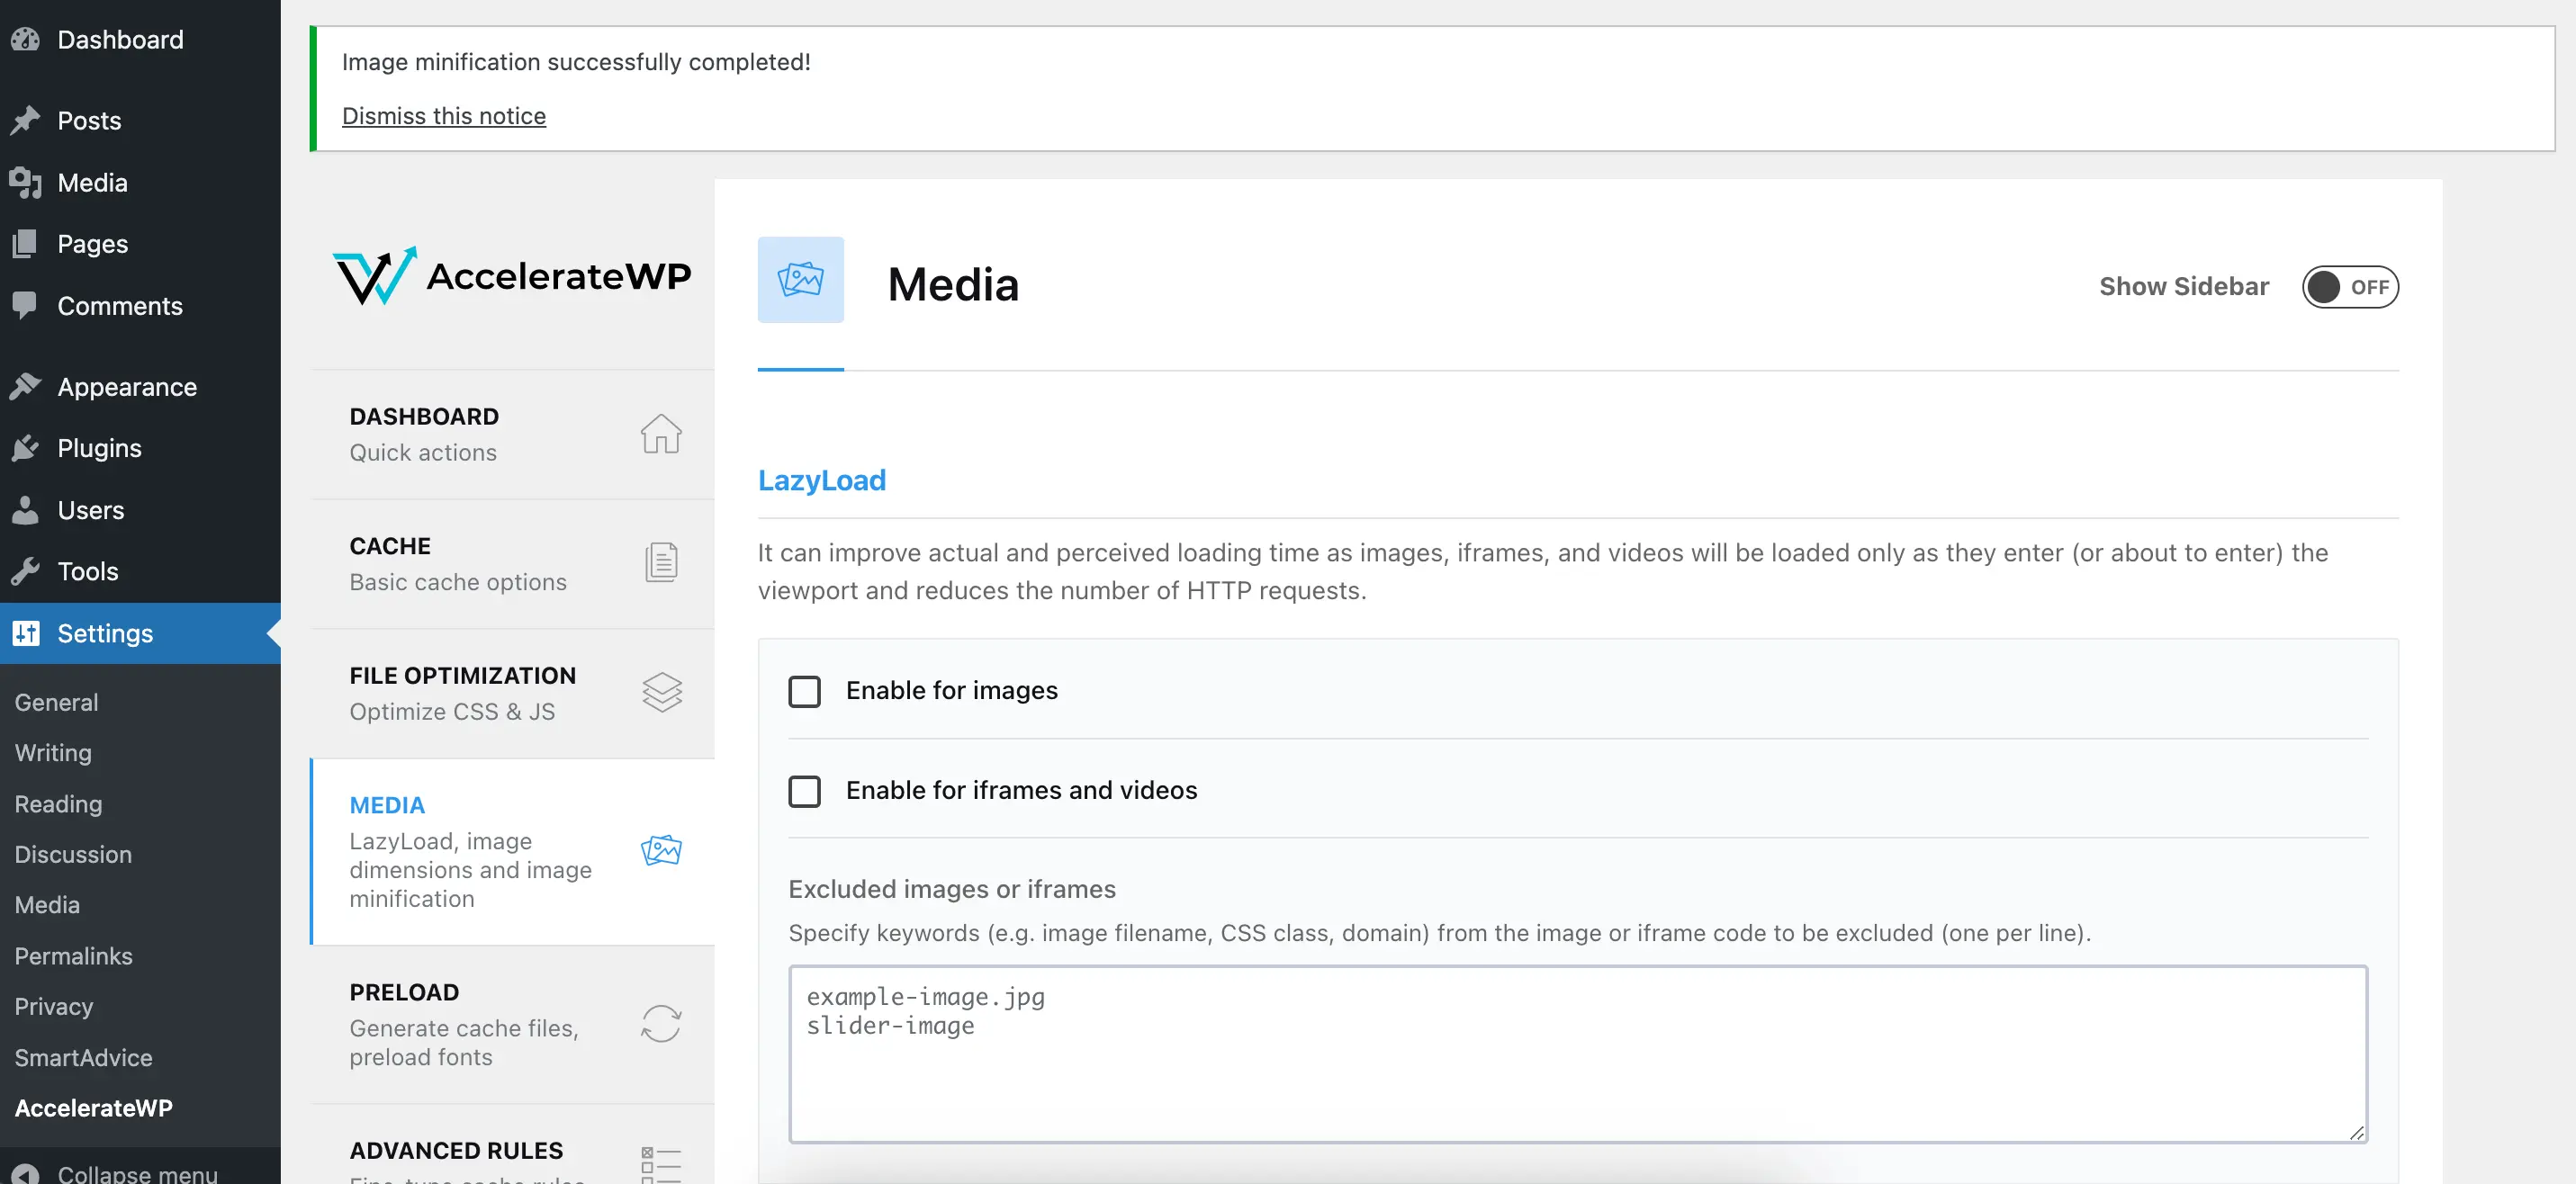
Media
LazyLoad
LazyLoad affects the page in the next way - if the user opens the page for the first loading there will be only first displayed (visible to user) images, others will be loaded if the user scrolls down. Images added via CSS file, the <style> tag or via Elementor will not be affected by the LazyLoad.
The following options allows working with LazyLoad
- Enable LazyLoad for images
- Enable LazyLoad for iframes and videos
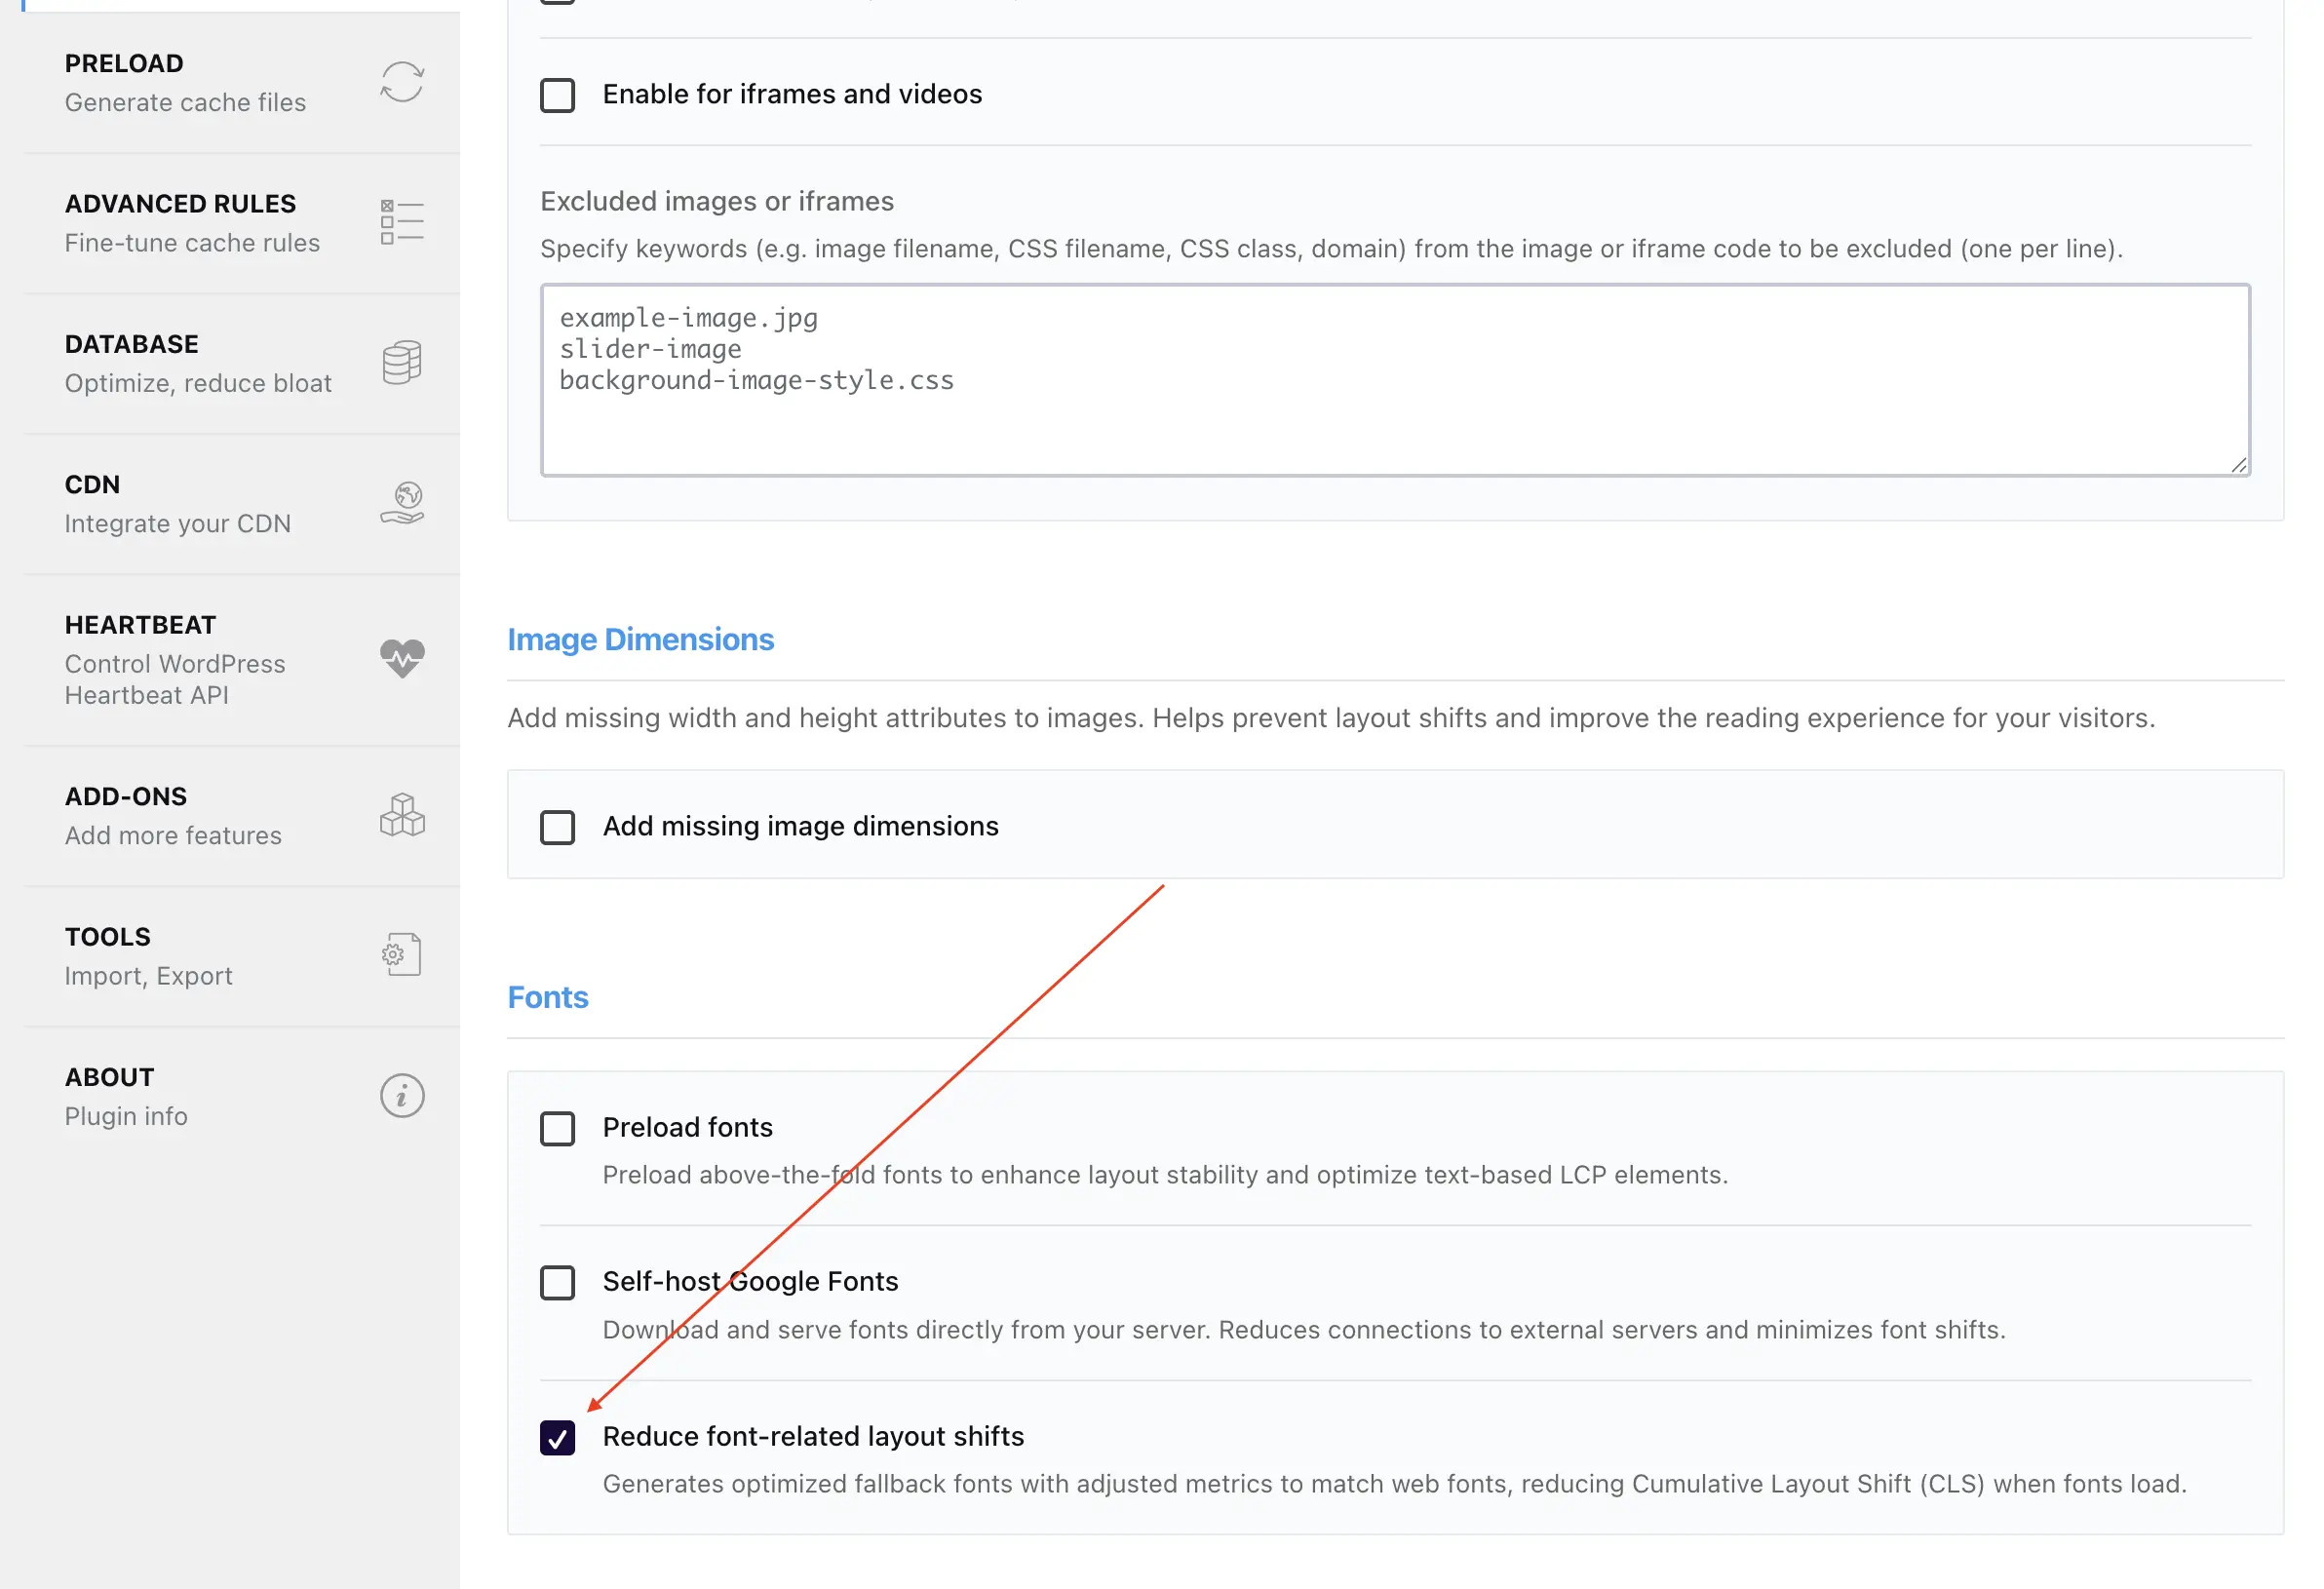
- Excluded images or iframes
Reduce font-related layout shifts
Generates @font-face rules with CSS metric overrides (size-adjust, ascent-override, descent-override, line-gap-override) that adjust fallback fonts to match web font dimensions, reducing Cumulative Layout Shift (CLS).
Supported font sources:
- Google Fonts URLs (
fonts.googleapis.com) @font-facerules in CSSfont-familydeclarations
Note
Default: ON.
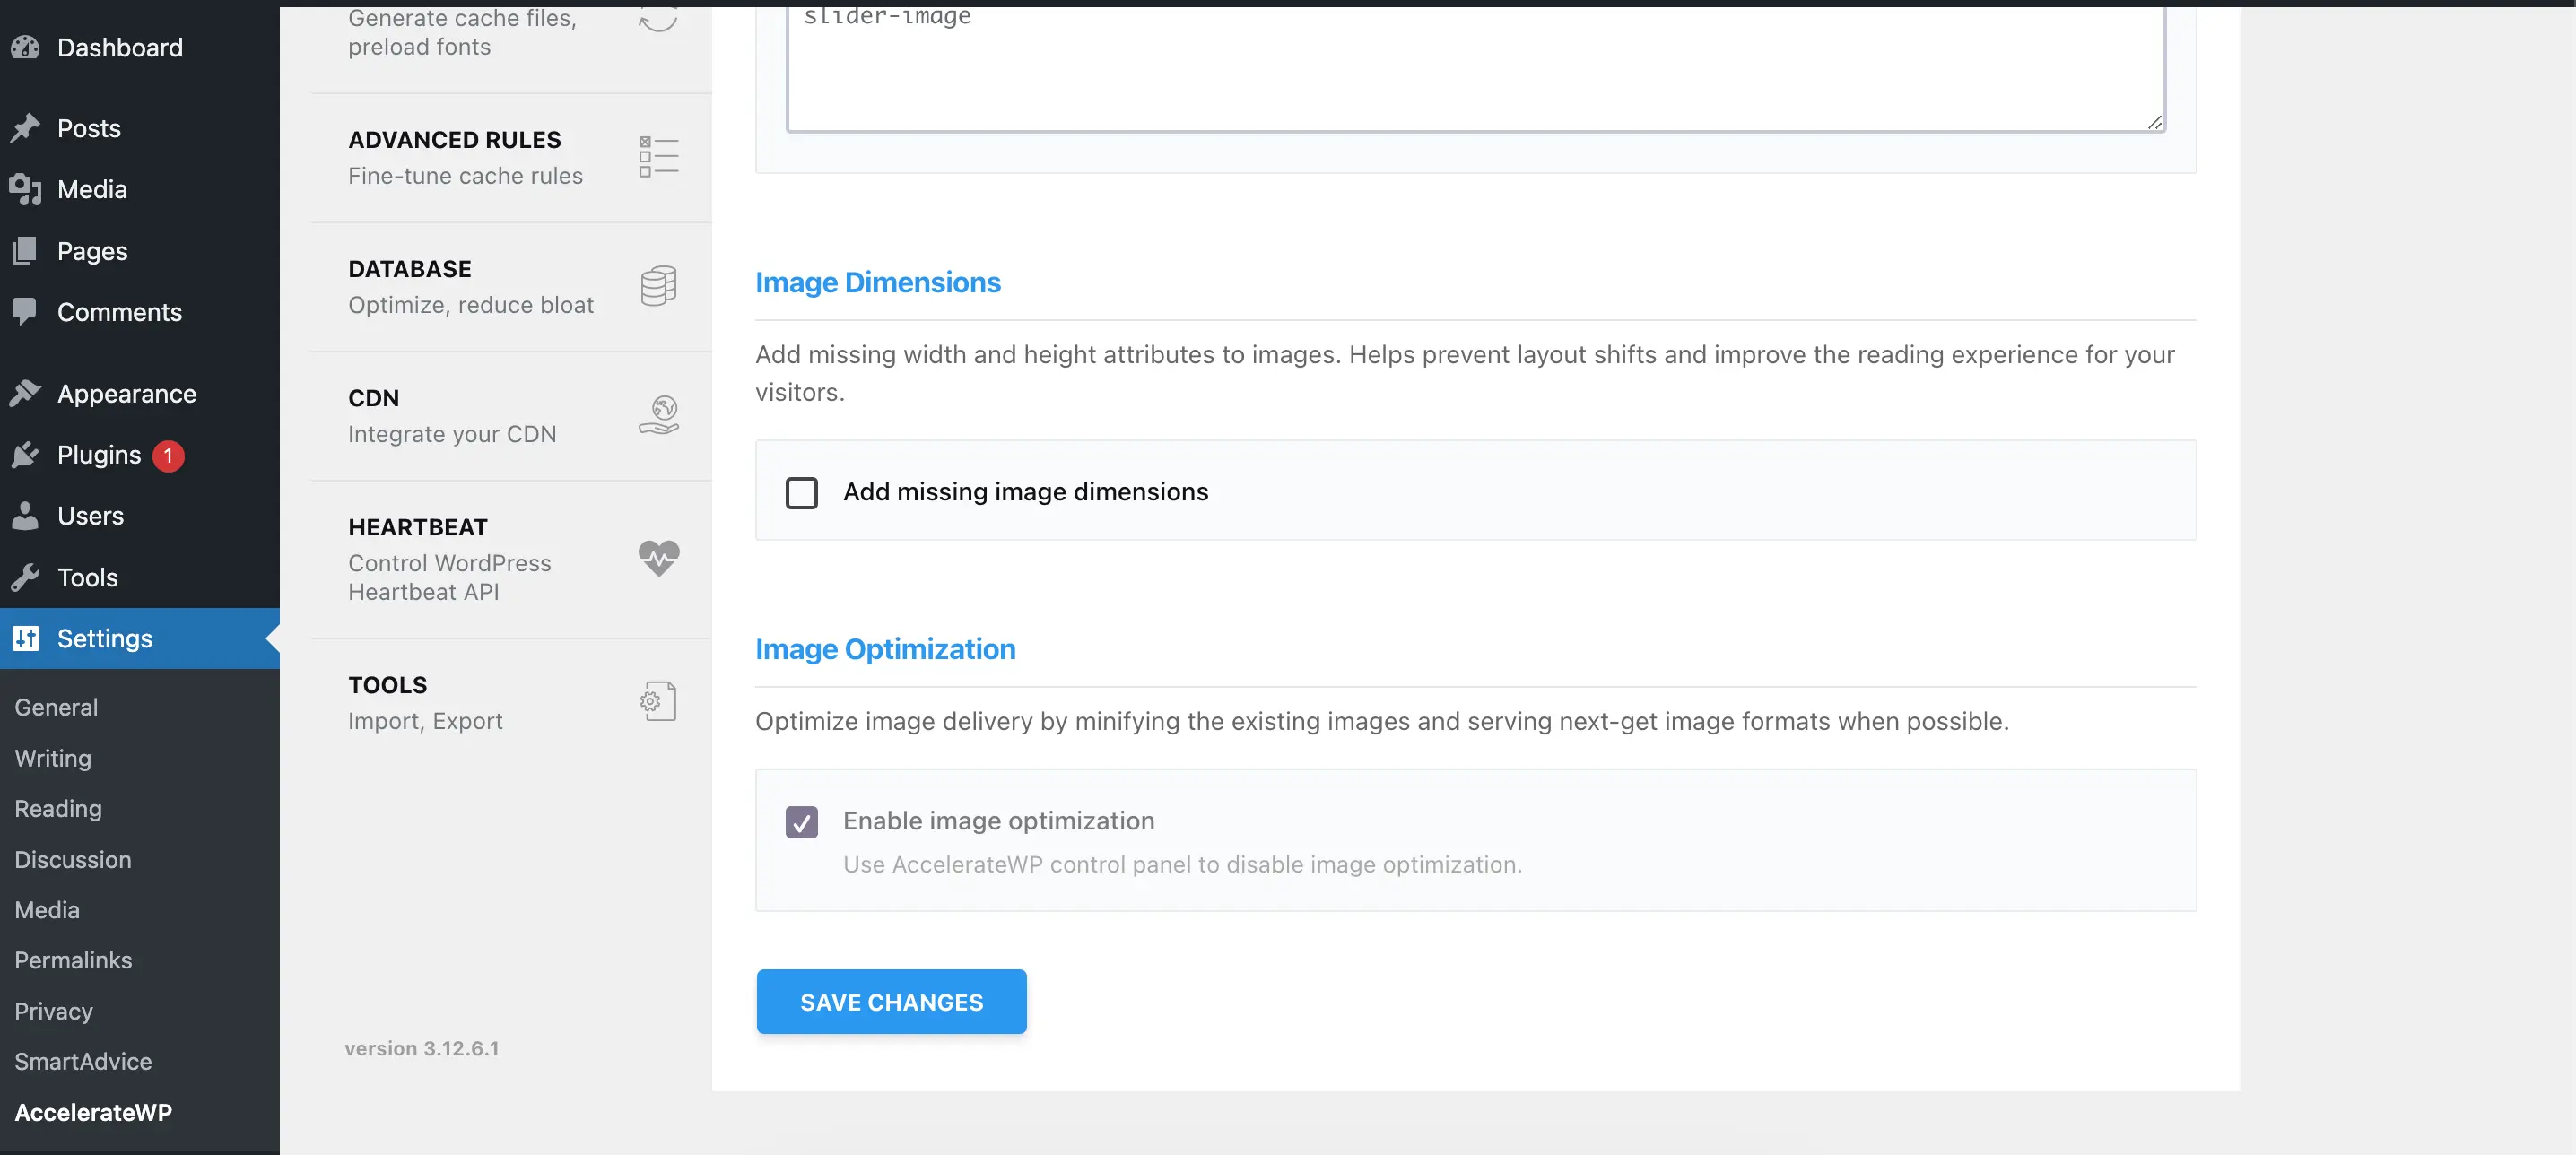
Image Dimensions
Add Missing Image Dimensions
Correct image dimensions help the browser to recognize page structure without delays, because the browser knows how much space is needed for the image.
Cases when image will not be affected by the Add Missing Image Dimensions:
- Images which have any attribute with name containing
*height*or*width* - Images which are part of the
<picture>tag - SVG images
- Image from external domains
Image Optimization
Optimize image delivery by minifying the existing images and serving next-gen image formats when possible.
Note
This feature can only be activated/deactivated in the AccelerateWP hosting panel interface or in the SmartAdvice WordPress plugin.
After activating the function, it will start searching for files in the WP_CONTENT_DIR/uploads folder in supported formats - jpg, jpeg, gif and png.
Each found file (except those already optimized) will be queued for optimization using CloudLinux SaaS.
In the WordPress admin interface, the number of images to optimize will be displayed at the top of the AccelerateWP settings screen.
After the file is successfully optimized, a notification will be sent to the special API of the site that the file is ready.
The original file will be copied to the backup folder:WP_CONTENT_DIR/accelerate-wp/images/backup/uploads/{relative_path_of_the_file}
Then it was replaced with an optimized one and added with an additional file in the webp format.
The image optimization function automatically activates the ability of the plugin to replace the original images with the WebP format if they are present in the file system.
When a new image is uploaded to your site using the WordPress functions/interface, it will be submitted for optimization with high priority.
After optimization of all images is completed, you will see the notification in the admin panel.
Restore images from backup folder
WP_CONTENT_DIR - path to your site's wp-content folder
Test before run (dry run):rsync -avnI WP_CONTENT_DIR/accelerate-wp/images/backup/uploads/ WP_CONTENT_DIR/uploads
Restore and override files from backup folder:rsync -avI WP_CONTENT_DIR/accelerate-wp/images/backup/uploads/ WP_CONTENT_DIR/uploads
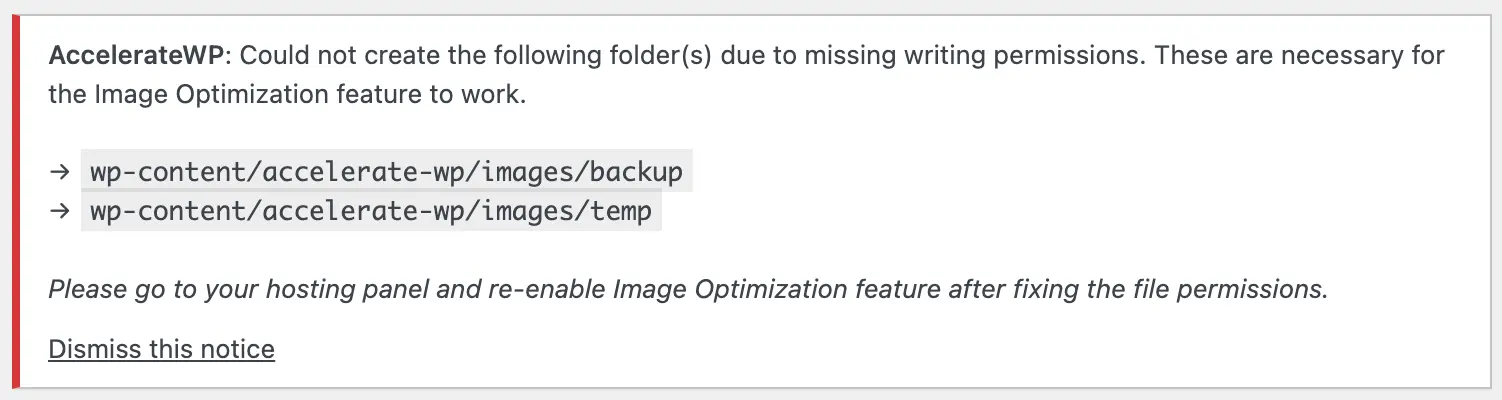
Troubleshooting
Wrong file permissions - Image optimization will not start and show an admin notice. You can try re-enabling the optimization feature again or create folders manually.
Database table cannot be created - Image optimization will not start and show an admin notice. You can try re-enabling the optimization feature or contact your system administrator.

Monthly quota exceeded - Your plan has reached the feature usage limit for current month. The plugin will show an admin notice and pause the image optimization until the start of the next month.

Authentication failed - The plugin will postpone the image optimization process and retry every 15 minutes. If the authentication is failing for more then 24 hours, the plugin will stop the process and show an admin notice. Contact your system administrator.

SaaS service not available - The plugin will show an admin notice, pause processing other jobs in the queue and retry every 5 minutes for the next hour and then every hour.

Some WebP images not loading on nginx
- Insert this block before the server directive, which creates the
$webp_suffixif the browser supports WebP:
map $http_accept $webp_suffix {
    default "";
    "~*webp" ".webp";
}
- Insert this block inside the server directive:
location ~* ^(/wp-content/.+)\.(png|jpe?g)$ {
    set $base $1;
    set $webp_uri $base$webp_suffix;
    set $webp_old_uri $base.$2$webp_suffix;
    set $root "<<FULL PATH OF WP-CONTENT PARENT>>";
    root $root;
    add_header Vary Accept;
    try_files $webp_uri $webp_old_uri $uri =404;
}
- Make sure to replace
<<FULL PATH OF WP-CONTENT PARENT>>with the actual absolute path to the wp-content folder, without the folder itself. Example:/home/john/public_html/.
Preload
Preload Cache
Usually, a page cache is created when this page is first visited. You can activate the preload page cache. It means that the cache for the page will be created when the page is created or updated.
If sitemap-based cache preloading is activated, a specified sitemap file will be used for preliminary cache generation.
Preload Links
Provides functionality to preload the HTML content of the hovered link for acceleration loading pages after click.
Prefetch DNS Requests
If your website uses external resources (e.g. Google fonts, YouTube video, etc.), AccelerateWP can preload these resources for accelerating loading pages. To activate preloading external URLs, provide a list of external URLs.
Preload Fonts
Accelerates the loading of fonts by the browser, informing the browser at the very beginning of the request about the full list of fonts to download
Advanced Rules
Advanced site caching settings. If you have specific pages that must be processed individually you can add a custom rule for them.
Never Cache URL(s)
Provide a list of URLs that cannot be cached.
Never Cache Cookies
Provide a list of Cookie files that cannot be cached.
Never Cache User Agent(s)
Provide a list of User Agent names that cannot be cached.
Always Purge URL(s)
You can specify URLs that will be deleted from the cache when any post or page will be updated.
Cache Query String(s)
By default AccelerateWP does not cache URLs with query strings, but in this option, you can specify GET-parameters that must be cached.
Database
Database optimization provides clearing database from expired and unused data.
Post Cleanup
Provides clearing posts revisions, autosaved drafts, and deleted posts from the trash. Be careful, you will not be able to restore this data after clearing it.
Comments Cleanup
Provides clearing spam and deleted comments from the trash. Be careful, you will not be able to restore this data after clearing it.
Transients Cleanup
Provides clearing temporary options for existing plugins and older unused options that keep after deleting plugins.
Database Cleanup
Provides table optimizations in your database server.
Automatic cleanup
Allows you to schedule periodic database cleanups.
Heartbeat
WordPress Heartbeat is a function of server polling that provides delivery data from server to browser periodically.
Reduce or disable Heartbeat activity
To control server loads you can activate the Control Heartbeat function and reduce or disable Heartbeat activity. You can manage Heartbeat activity separately for backend, frontend, and post-editing parts. Be careful, disabling Heartbeat can break plugins that use this functionality.
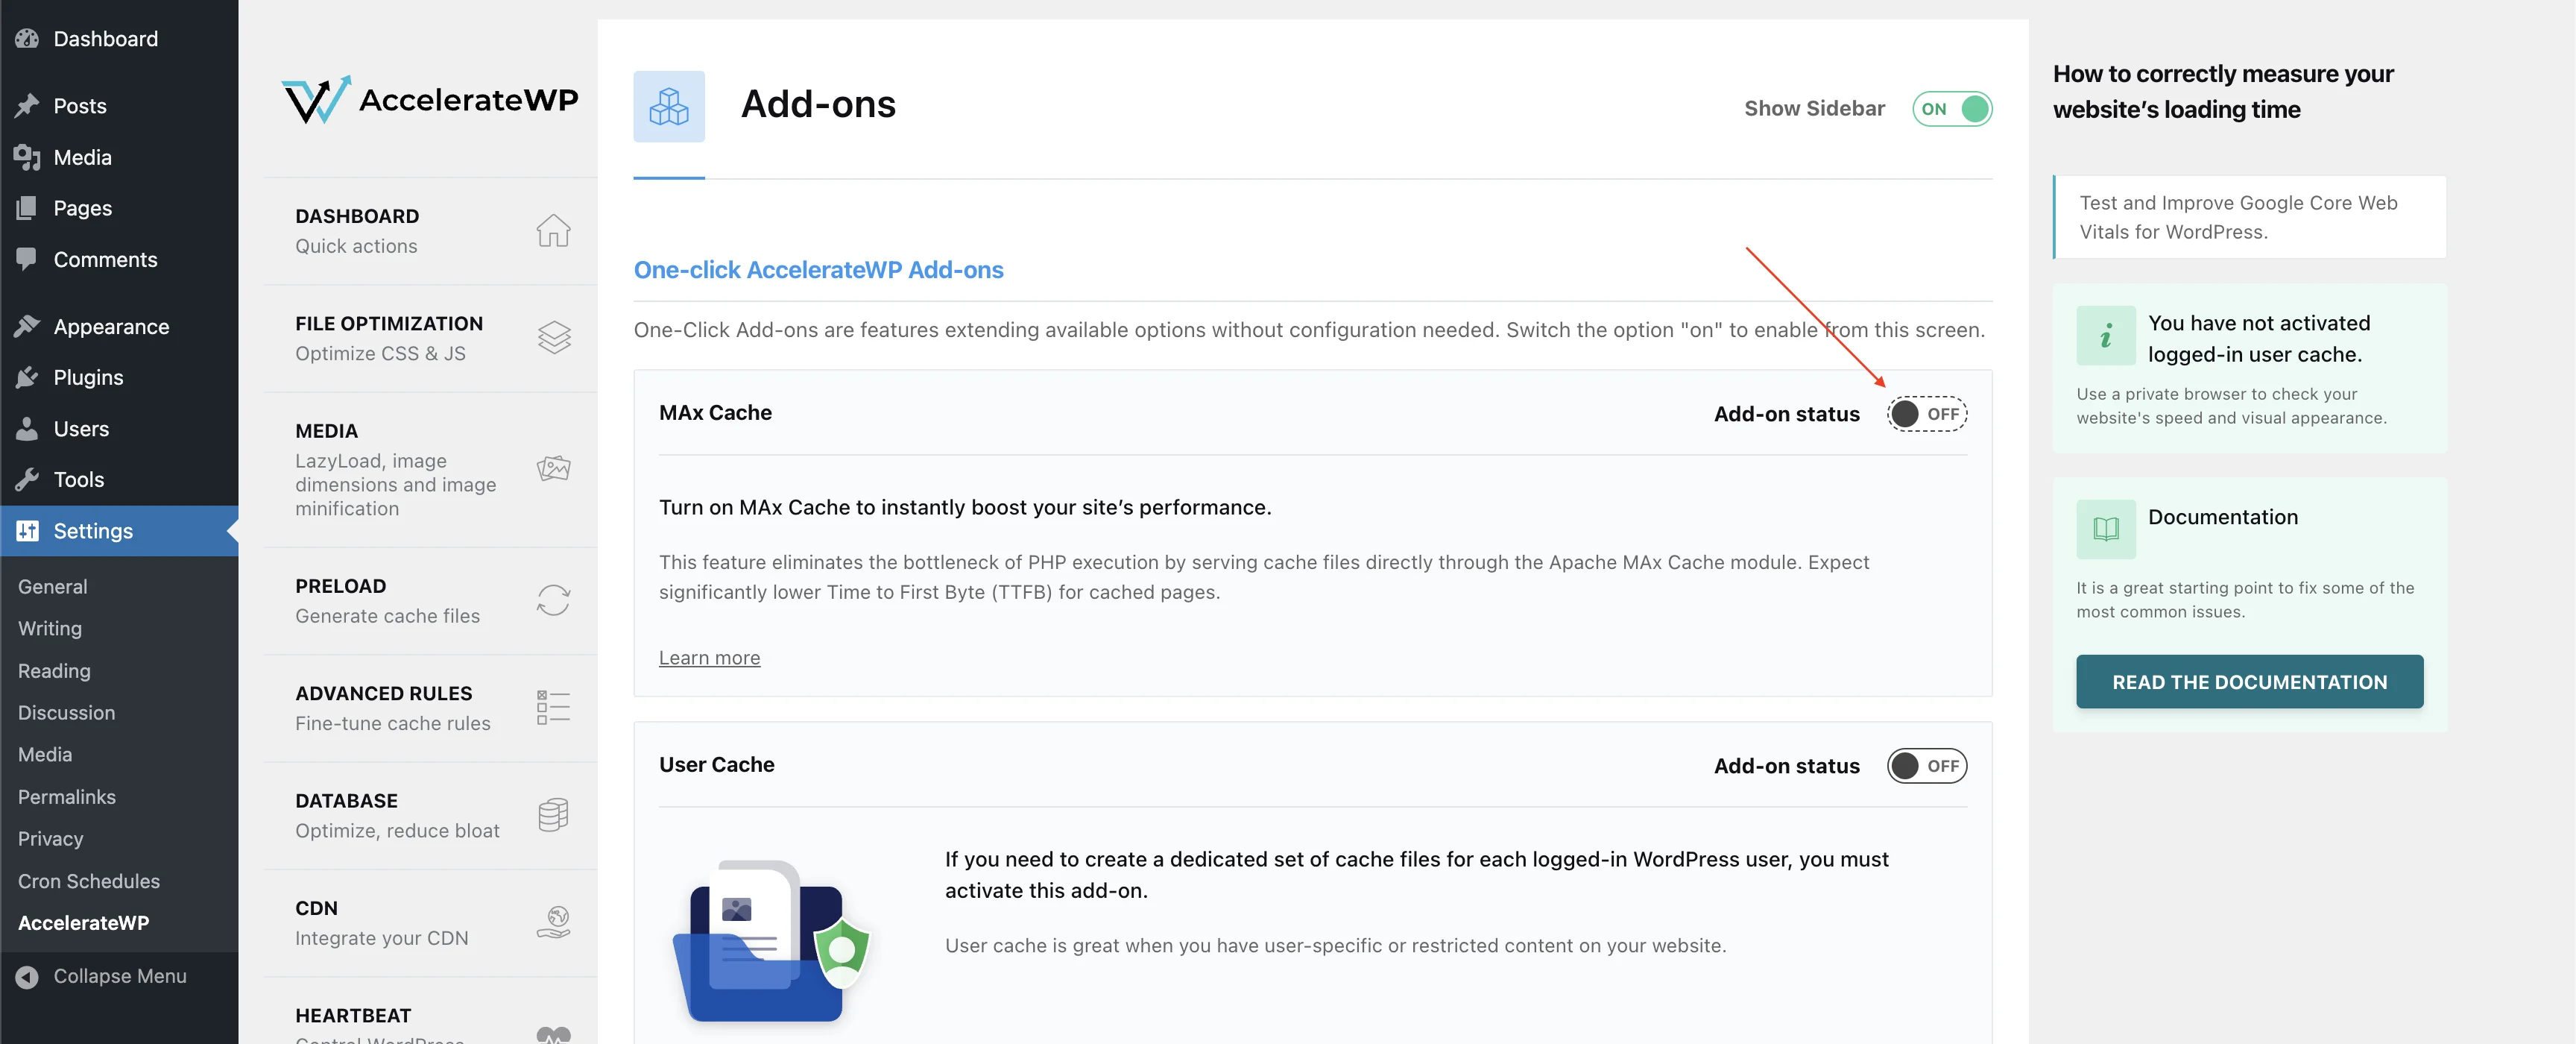
One-click AccelerateWP Add-ons
MaxCache activation steps
The MAx Cache feature requires AccelerateWP version 3.20.0.3-1.1-33 or higher. Please make sure you are using the latest version of the plugin.
Only available on the servers where MAx Cache Apache module is installed.
To turn on MAx Cache:
- In the WordPress Admin Dashboard, navigate to AccelerateWP -> Settings -> Add-Ons.
- Click on the toggle next to the MAx Cache feature to activate it.
- Directives for the Apache module "maxcache_module" will be added to .htaccess, which will automatically enable cache serving using Apache.
CDN
Note
When using AccelerateWP CDN, then the enabling/disabling can only be done in the hosting panel in the AccelerateWP interface.
Enabling AccelerateWP Content Delivery Network using Advice will automatically set up your AccelerateWP WordPress plugin.
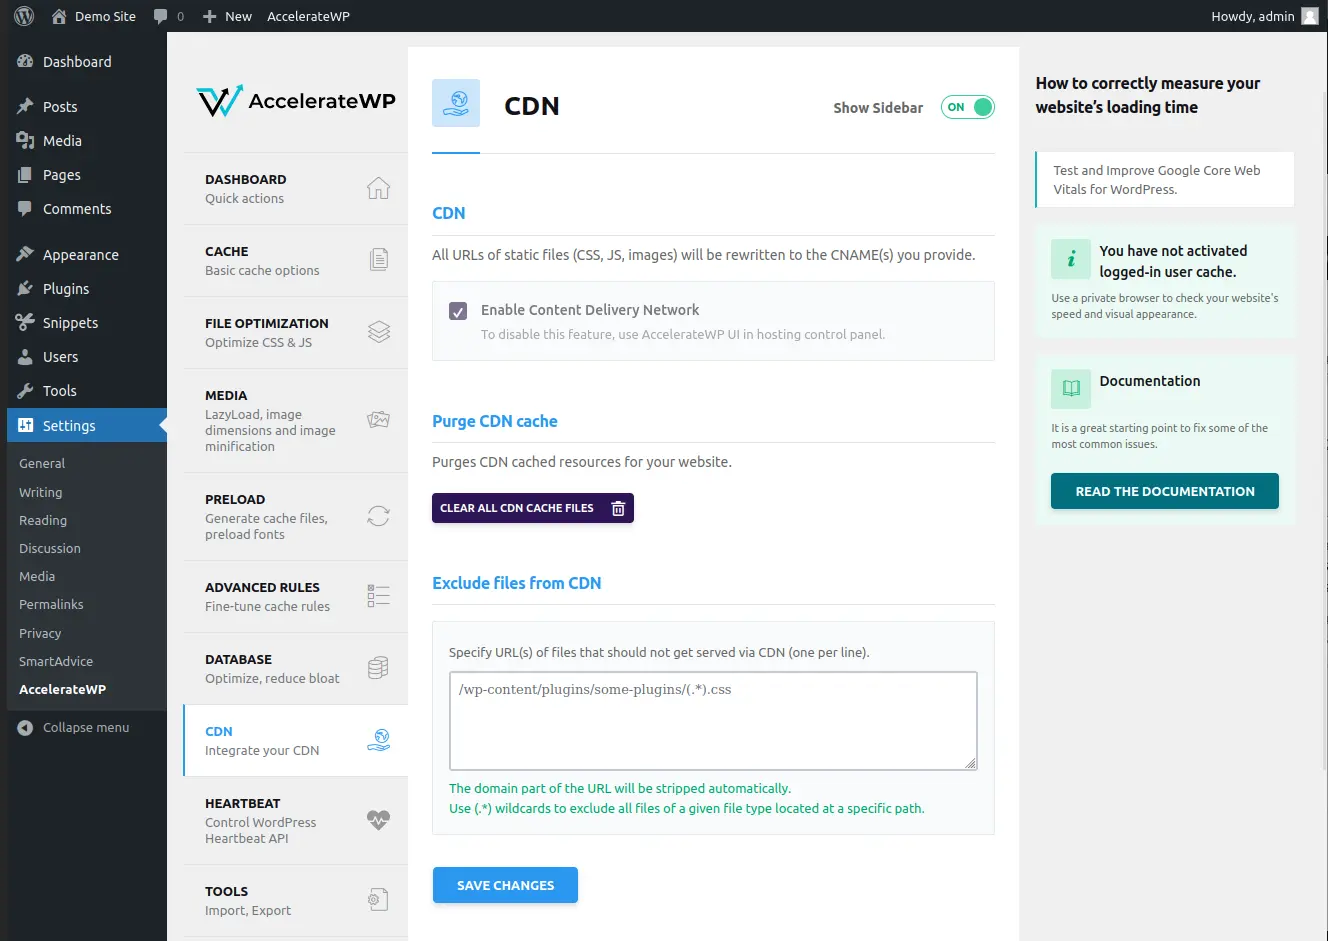
CDN stands for Content Delivery Network, the feature that simplifies and speeds up resources loading for your customers.
In order to start using 3rd party CDN, you need:
- Public website on the Internet with a valid domain name
- PullZone of CDN
To set up a CDN in the AccelerateWP you must register CDN zone and get pull zone configuration.
Go to the WP Admin of your WordPress site, open the settings of the AccelerateWP (Step 1) and select the CDN section (Step 2). Select the option: Enable Content Delivery Network (Step 3) and fill in the "CDN CNAME(s)" field with CDN pull zone address (Step 4).
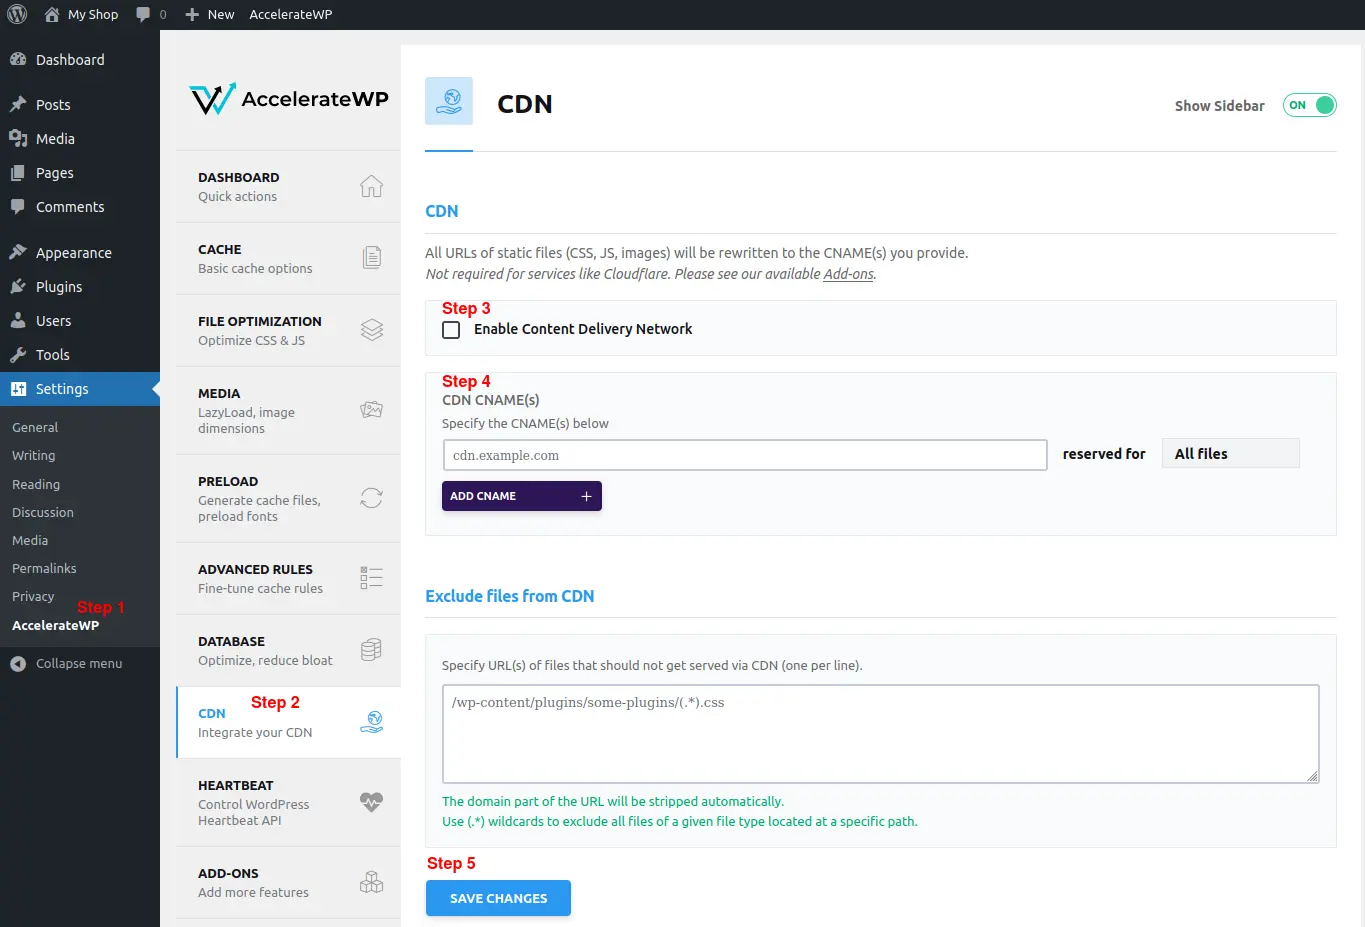
Click the "Save changes" button (Step 5).
In order to check CDN is working, open website in incognito mode with Developer Tools open in your browser. Go to the "Network" tab, find the "Domain" column, you should see the specified address in the CDN settings of the AccelerateWP plugin for your js/css/image files.
Tools
For backing up the settings, there is a function for exporting settings. To use it, click the Download settings button. When you need to restore settings, choose your saved settings file and click the Upload file and import settings button.
AccelerateWP Premium: Object caching feature
Note
Object caching is a premium feature which is currently in beta and available only for some hosters.
Unlike full page caching, this mechanism is not saving the whole page in cache, but stores database query results in additional storage for quick access. This mechanism is really helpful in case your site needs to process multiple pages per second as requests come in and may be helpful in case when full page caching cannot be used, e.g. on personalized pages.
The Object caching feature is recommended to use in the following:
- Websites used for extremely active exchange of information (forums, blogs, etc..)
- Websites with too many requests running at the same time
- Websites having important pages that cannot be cached entirely and exclude from the "whole page caching" due to any reason
In order to start working with Object caching feature, check if advice is available in the corresponding cell on the intersection of website and AccelerateWP Premium column.

And click the "Apply advice" button to activate the Object caching feature.
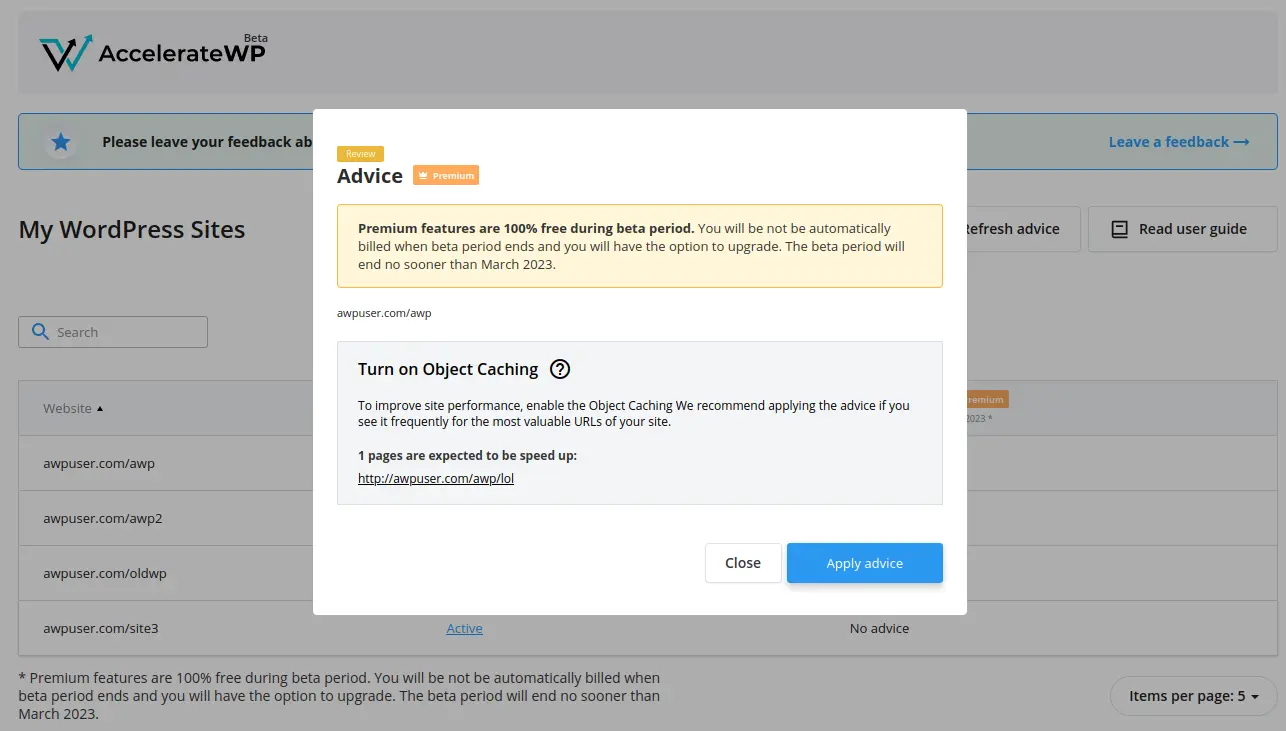
If you still would like to try the feature on the website where advice was not issued, click on the gear icon and enable the feature.
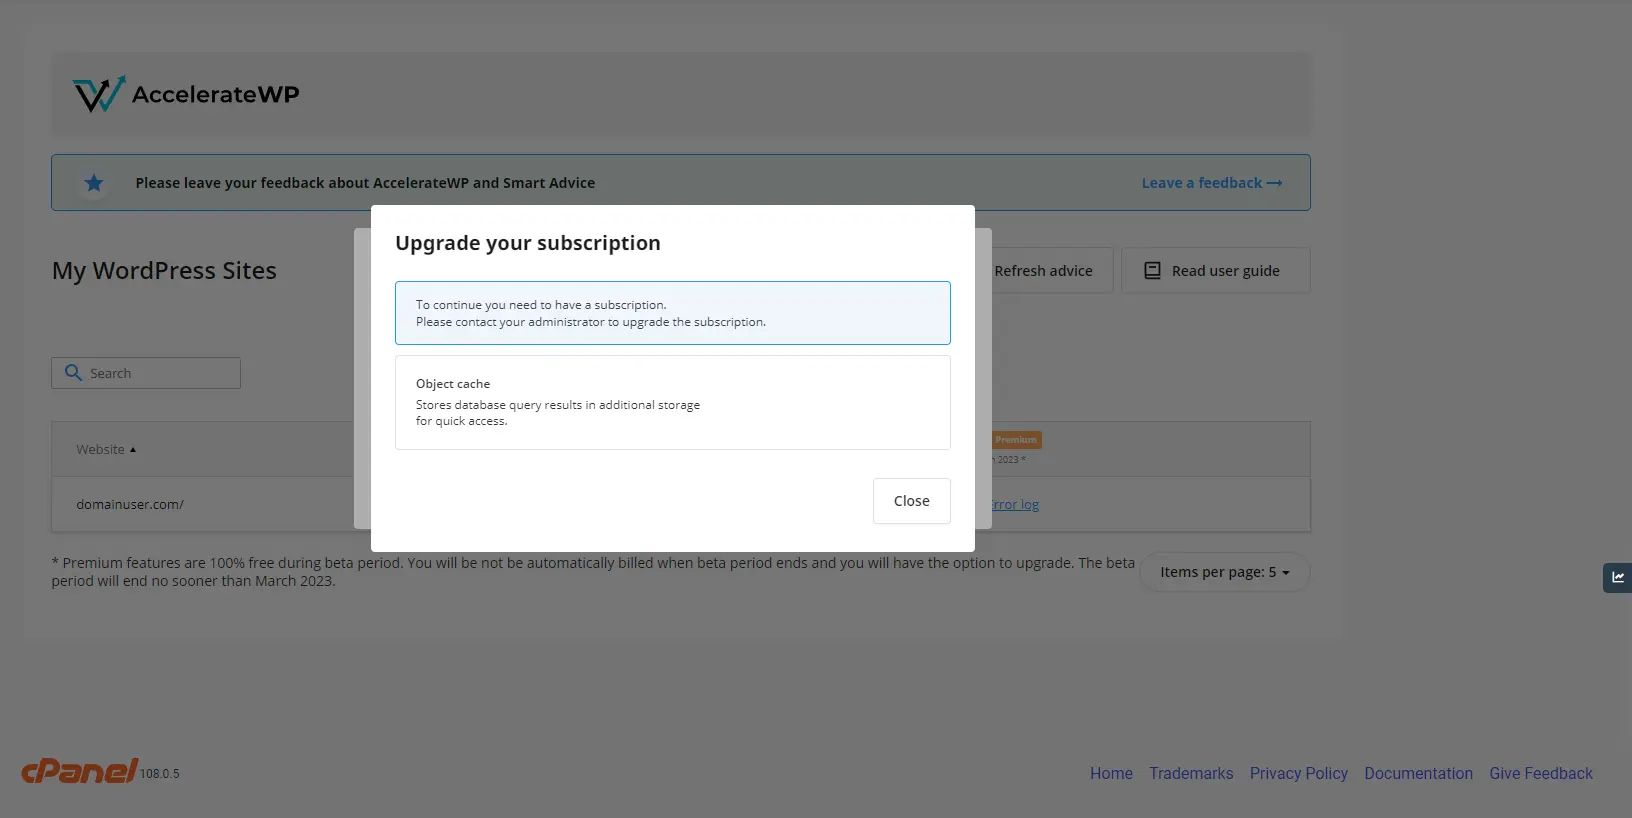
In case if you still don't have active Premium subscription, you will see the following window with link to the page where you can upgrade subscription.
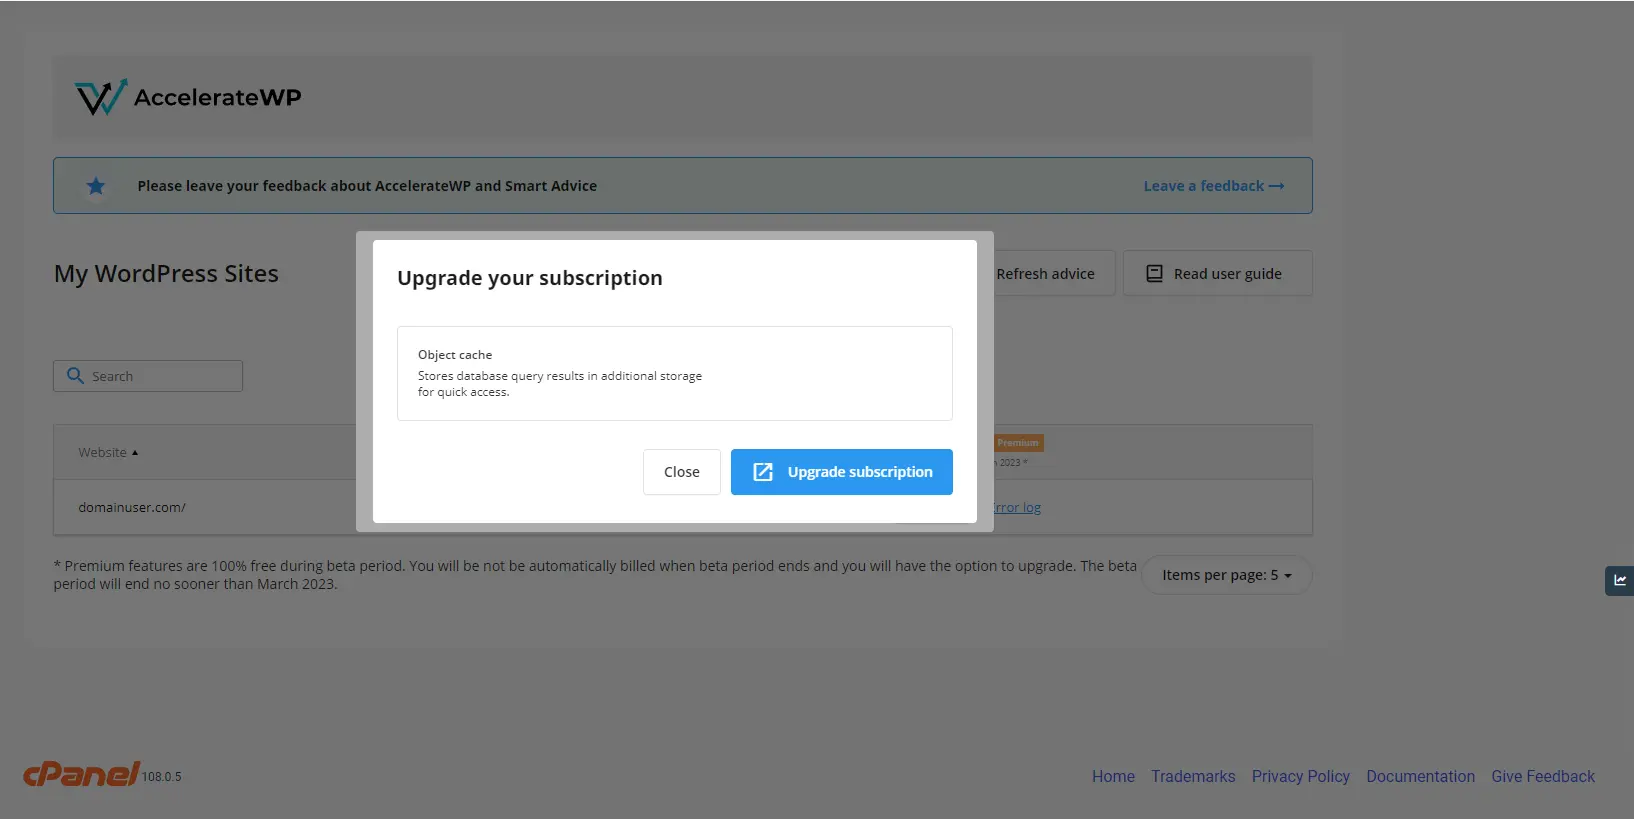
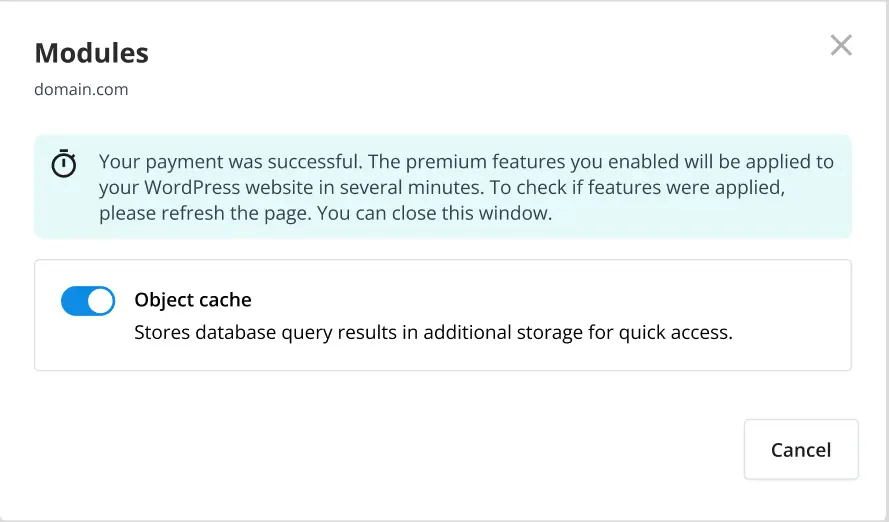
When upgrade link is clicked, you will see the billing interface opened in new browser window. Successful upgrade of your subscription will automatically close the billing window and start background upgrade process. Once your payment is processed, feature will be automatically installed on the website.
If you don't see any links, contact your hoster to upgrade your subscription manually.
If subscription is active, you will bypass the subscription window and proceed directly to the plugin installation.
After a couple of minutes, the redis instance will be configured, plugin will be installed and activated.
Close the window and see "Active" link in the corresponding cell of the table.
Object caching does not require any additional configuration.
Limitations
There are the following requirements to activate Object Caching:
- the website must use PHP version 7.2 or higher.
- the WordPress version must be 3.7 and higher.
- the other WordPress Caching plugins must not be installed.
- the Snuffleupagus must be turned off.
- the WordPress should not run in Multisite mode.
FAQ
What does "AccelerateWP is advice-driven" mean?
CloudLinux automatically tracks slow requests for the websites for the appropriate period of time and sometimes creates an advice to activate the specific feature for your website. When you see the Advice available link in the corresponding feature cell, it means that AccelerateWP decided that this feature will significantly improve the performance of your website. Otherwise you see the No advice note.
Click the Advice available link and push Apply advice button to automatically enable the feature.
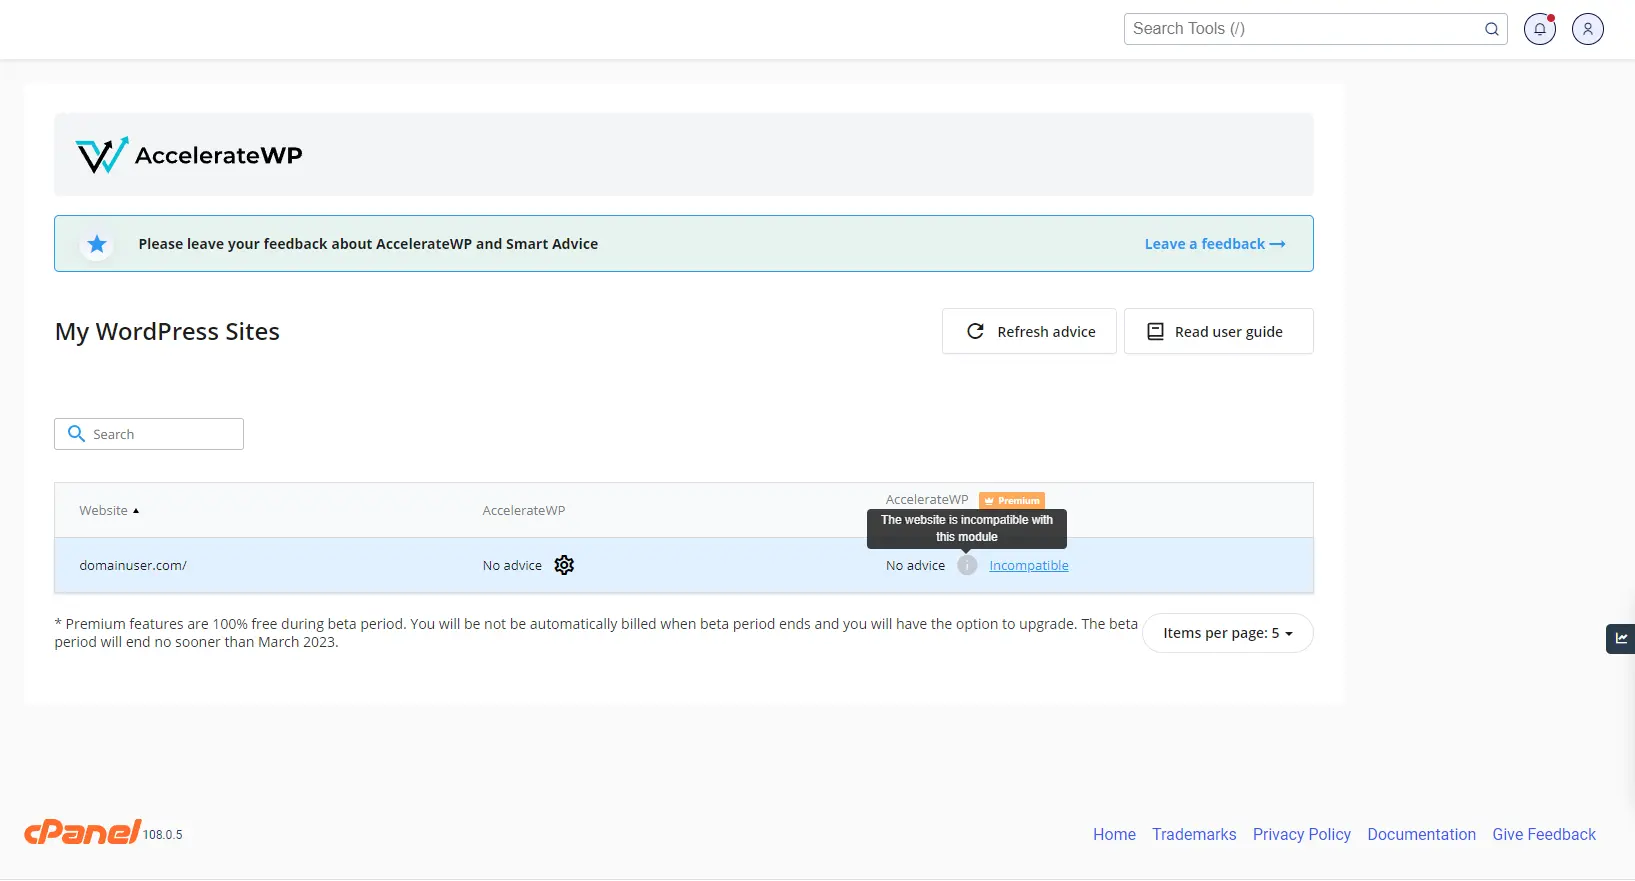
What should I do if I see both the "No advice" note and the "Incompatible" link?
Causes of the Incompatible note are always Limitations: AccelerateWP or AccelerateWP Premium related ones.
Each message has a small "how to", so you can try to fix them by yourself via control panel or WordPress Admin interface.

What should I do if I see the "Misconfiguration"?
The misconfiguration message can appear in the cases when optimization feature was activated, but AccelerateWP detects it as not working anymore.
The most frequent cases are:
- Redis process cannot be started for some period of time.
- Resolution: contact our support team for further investigation.
- WordPress Redis Object Cache plugin is disabled via WordPress Admin Gui/Plugins.
- Resolution: You can resolve it by yourself via the WordPress Admin Gui.
- Version of PHP was changed for website and it is no longer compatible with feature.
- Resolution: change website php version to the one which is compatible with optimization feature.
In all cases, please refer to the misconfiguration text, which has a small "how to", so you can try to fix them by yourself via control panel or WordPress Admin interface.
Feature activation starts, but fails with "post check issue"
Post check is a sanity check of your website to make sure that it is working properly after feature activation.
AccelerateWP expects website to:
- return http code 200 when downloading home page
- do not write any errors in logs
If you have some Post check issue after turning on the feature, you can leave them as disabled (in that case the engine reverts all changes). Or you can ignore the issue and continue working with the enabled Object Caching in order to manually check the source of the issue.
How to measure the speed of the website?
You can measure the speed of your website before turning On the Object Caching and after.
The popular tools:
Where the AccelerateWP tool log files are located?
Login via SSH, find in your home directory ~/.clwpos/main.log. Or you can open it using the control panel file manager.
I already use the WordPress Redis object cache plugin. Will the AccelerateWP be useful for me?
No, in the current version we suggest the same optimization as you already have. But we include other useful features in the next versions, so let’s stay in touch.
I already use the WordPress Redis object cache PRO plugin. Will the AccelerateWP be useful for me?
No, in the current version we suggest the same optimization as you already have. But we include other useful features in the next versions, so let’s stay in touch.
Why did my site's PageSpeed score decrease after enabling AccelerateWP?
AccelerateWP & mod_pagespeed:
- Enabling AccelerateWP activates the force gzip cache function when the cache is archived by the plugin, and Apache simply gives it as is to the user browser. In this case, the mod_pagespeed module cannot apply its optimizations, since it does not work with archives, but only with pure HTML.
- AccelerateWP does not activate all possible resource optimizations by default.
Because of this, the total score of the site by PageSpeed may be reduced. To improve the PageSpeed score, it is necessary to enable additional optimizations of AccelerateWP.
AccelerateWP with maximum settings for fast sites gives a similar PageSpeed score for mobile and an improved result for desktop. AccelerateWP with maximum settings for sites loading longer than 1 second always gives a better score than mod_pagespeed.
My subscription was upgraded, but feature was not installed automatically
This can be caused by several reasons. Either your website was detected to have malfunctions or there was an issue with environment when feature was installed (e.g. bad internet connectivity with WordPress market).
First, try to enable feature manually using AccelerateWP interface. Most likely you will find human-readable error message there.
If the issue persists, or you cannot resolve it yourself, contact your hoster and attach ~/.clwpos/main.log for further investigation.
End-user X-Ray plugin
The end-user X-Ray plugin can be installed and enabled by the server administrator via CloudLinux Manager.
How to manage the end-user X-Ray plugin
The web interface of the end-user X-Ray plugin is almost the same as the X-Ray administrator interface.
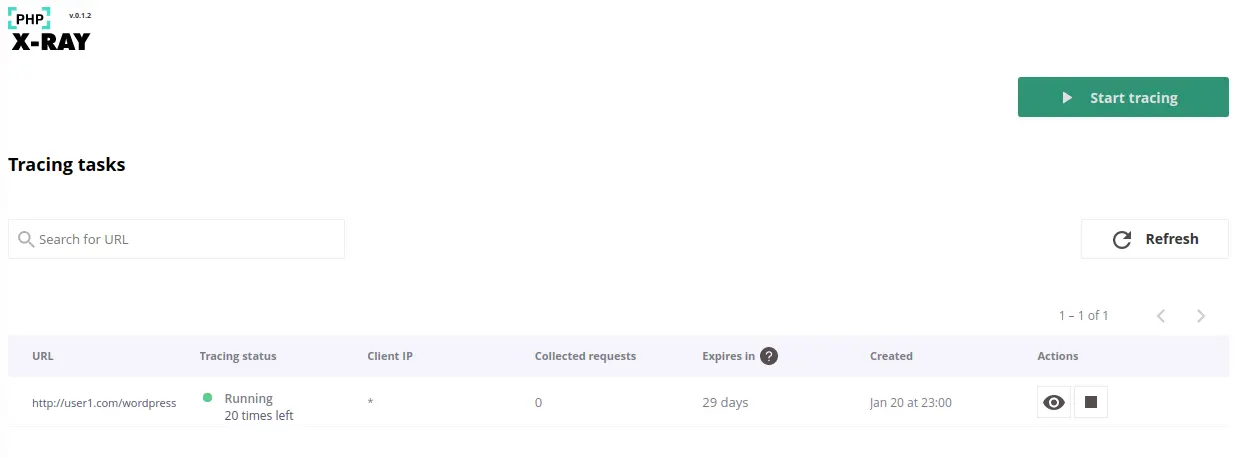
But there are some differences and they are described further.
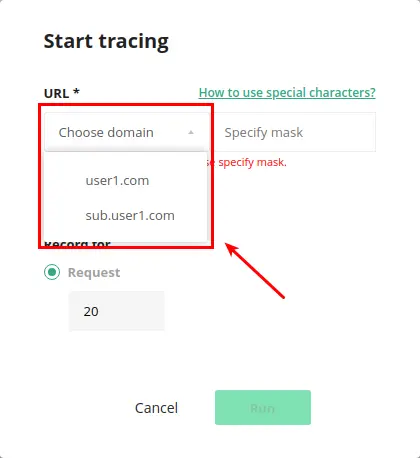
- End-users can create tasks only for their domains from the drop-down list:
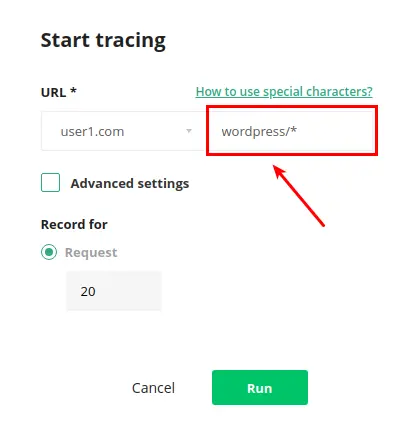
- To specify URL or wildcard, end-users should use the input field next to the domain:
Note
Tracing tasks created by an end-user will also be displayed in the administrator interface and administrators can manage the end-user's tasks the same way as they manage their own. At the same time, tasks created by the administrator or other end-users will not be displayed in the UI of the current user.
End-user X-Ray plugin limitations
The end-user X-Ray plugin does not support creating continuous tasks.
The administrator and the end-user can’t run the tracing task for the same Domain/URL at the same time. Once the administrator started a specific tracing task, the end-user will not be able to duplicate it. And the same is true for the administrators – they will just see the running task for the specific domain and see the notification that they're trying to create a tracing task with a duplicated URL.
If continuous tracing is enabled for the domain, the end-user will not be able to create a new task for this domain because the same rule works - it will be a duplicate of the existing tracing tasks. The next warning will appear:
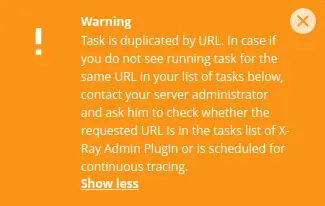
To solve this, the existing running tasks for the same Domain/URL should be stopped or completed. You can find more details about this in the FAQ.
SmartAdvice Plugin
Overview
SmartAdvice Plugin is a WordPress Must Use Plugin that displays the available advise for the site, which can be activated/deactivated from the WordPress admin panel. Installing and uninstalling the plugin is an automatic process, depending on the available advise for the site.
Requirements
- PHP version 5.6 or higher
- WordPress version 5.0 or higher
Managing Advice via SmartAdvice Plugin
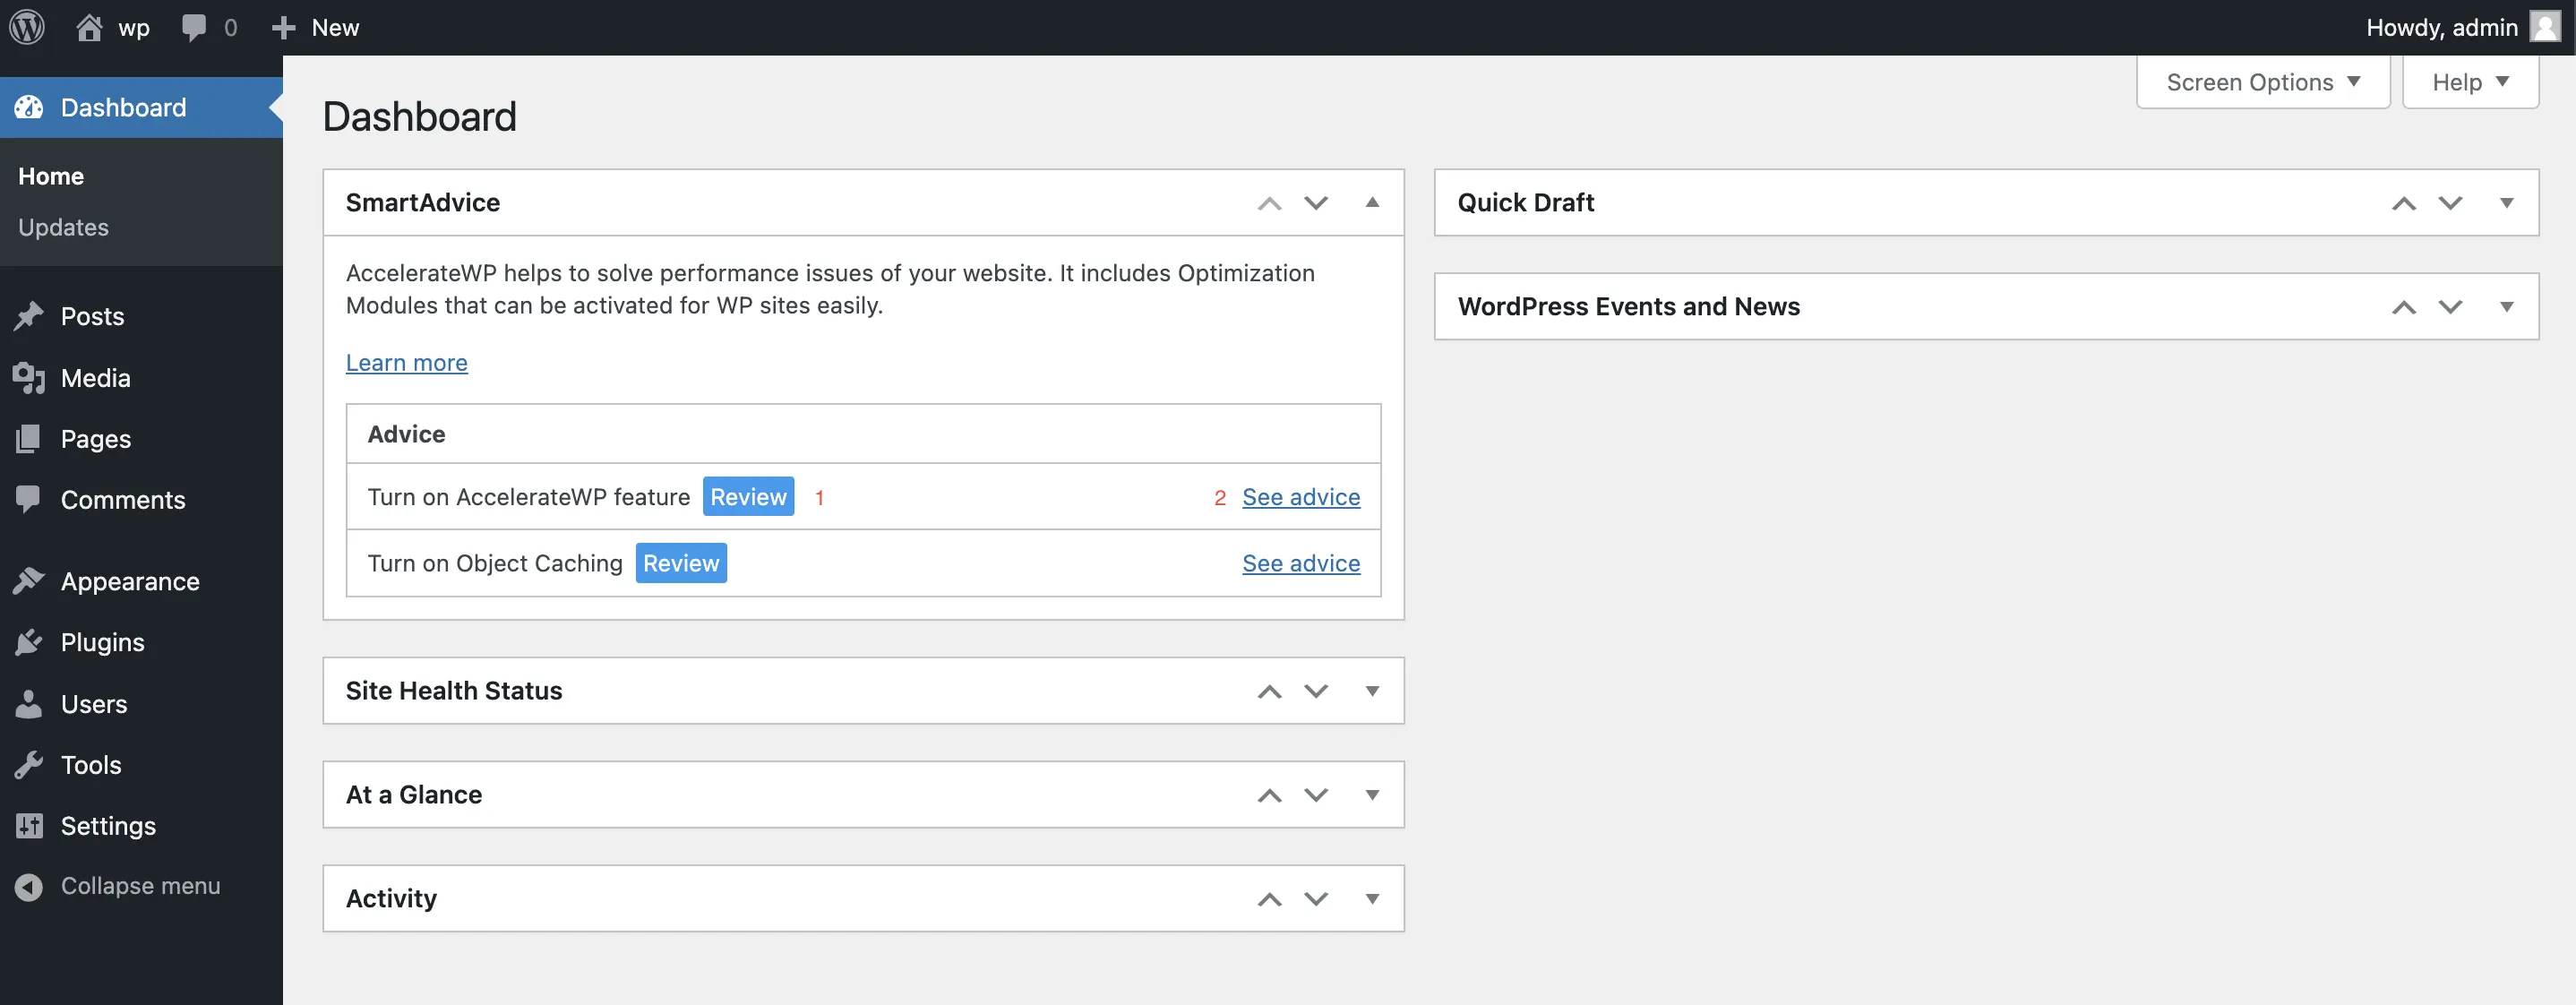
If there is available advice, a widget will be displayed in the Dashboard of the WordPress site. The table displays a list of advice, their status (1) and the ability to go to their settings (2). Click See advice (2) to go to the detailed information of the advice.
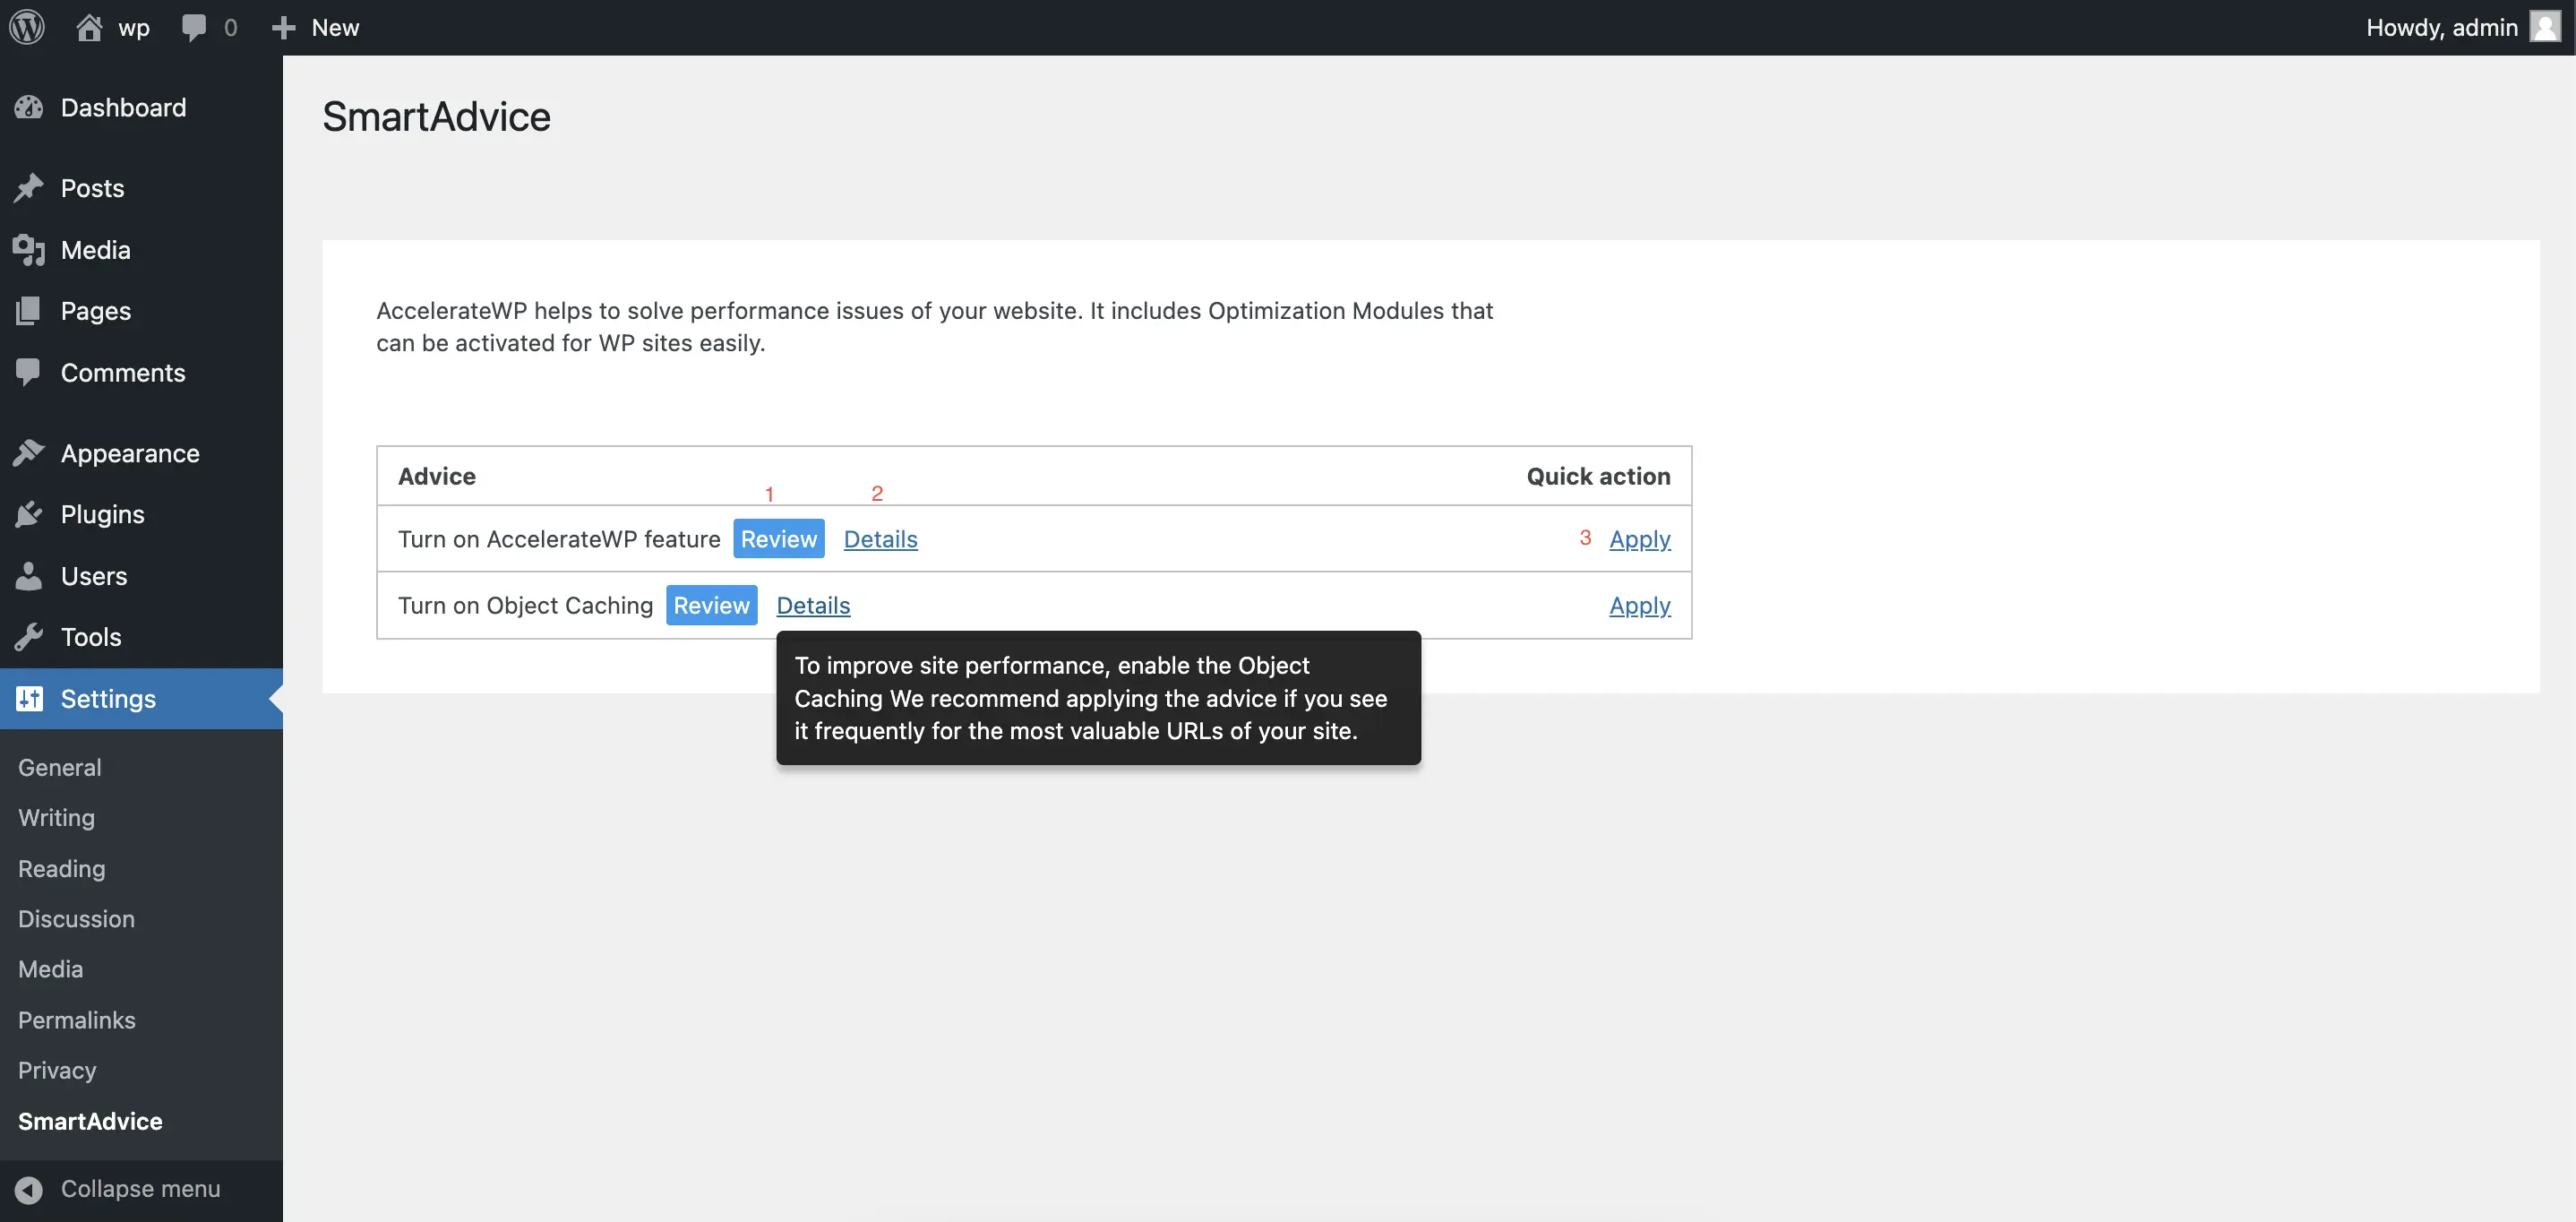
On the plugin page, you can see detailed information on each Advice (2), get acquainted with their statuses (1) and apply them to automatically improve the website (3).
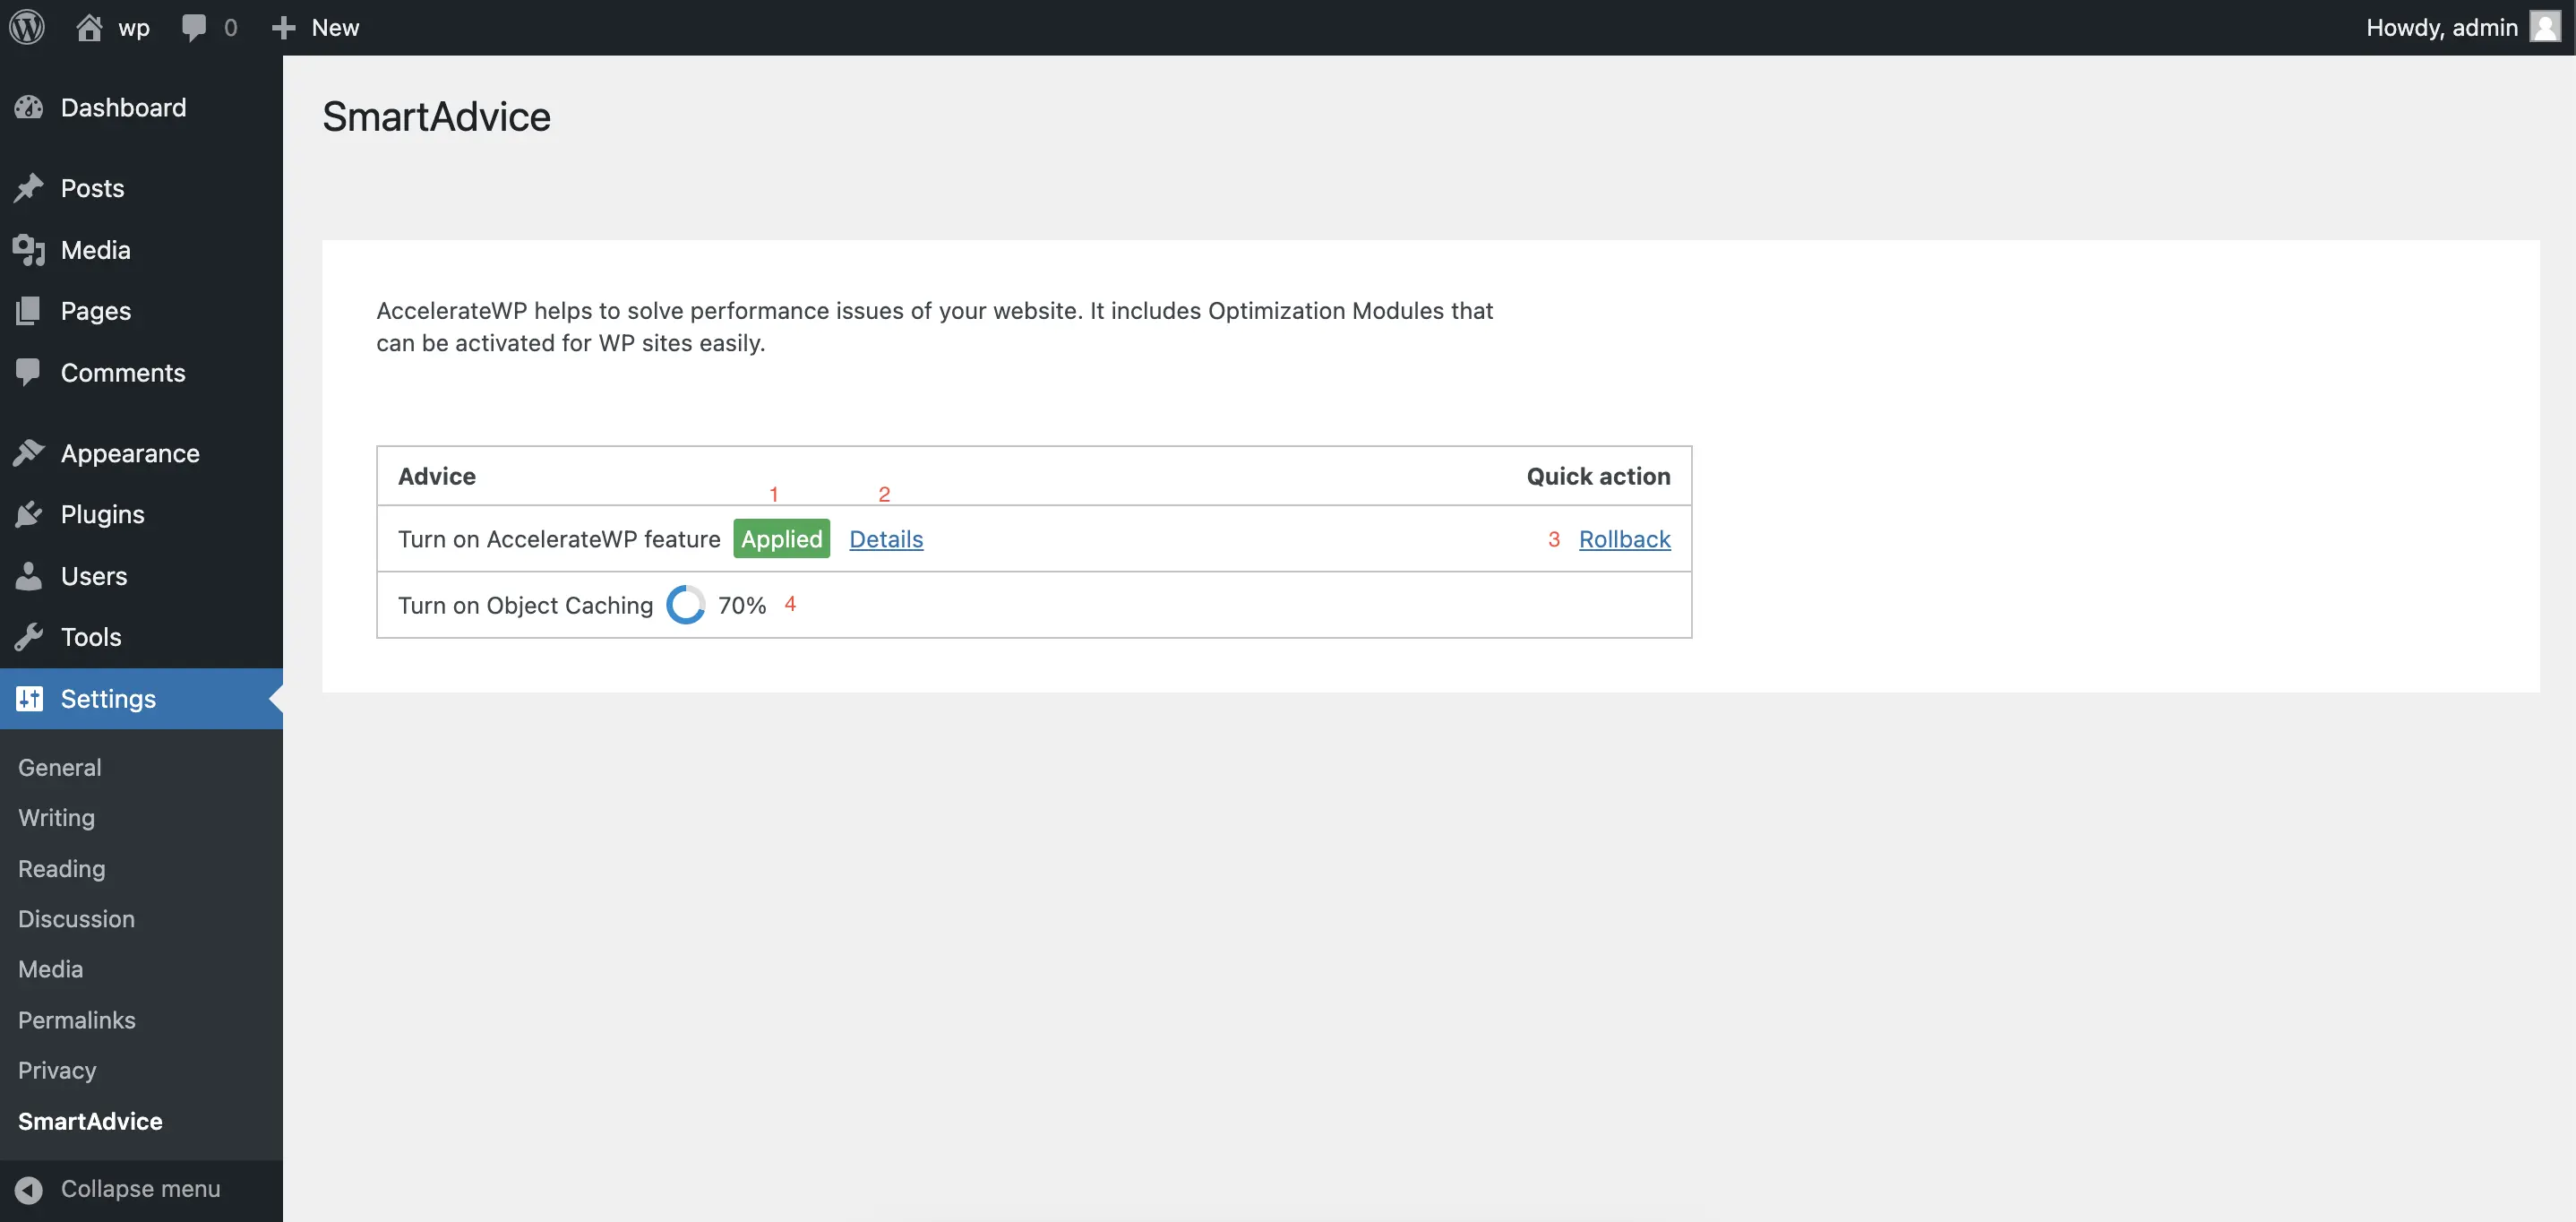
Advice in the "Applied"(1) status can be deactivated using the "Rollback"(3) button. Advice that is in the process of applying or rolling back, displays the percentage of progress (4).
Note
Advice activation may take some time.
If the application of Advice caused an error, you would be notified.
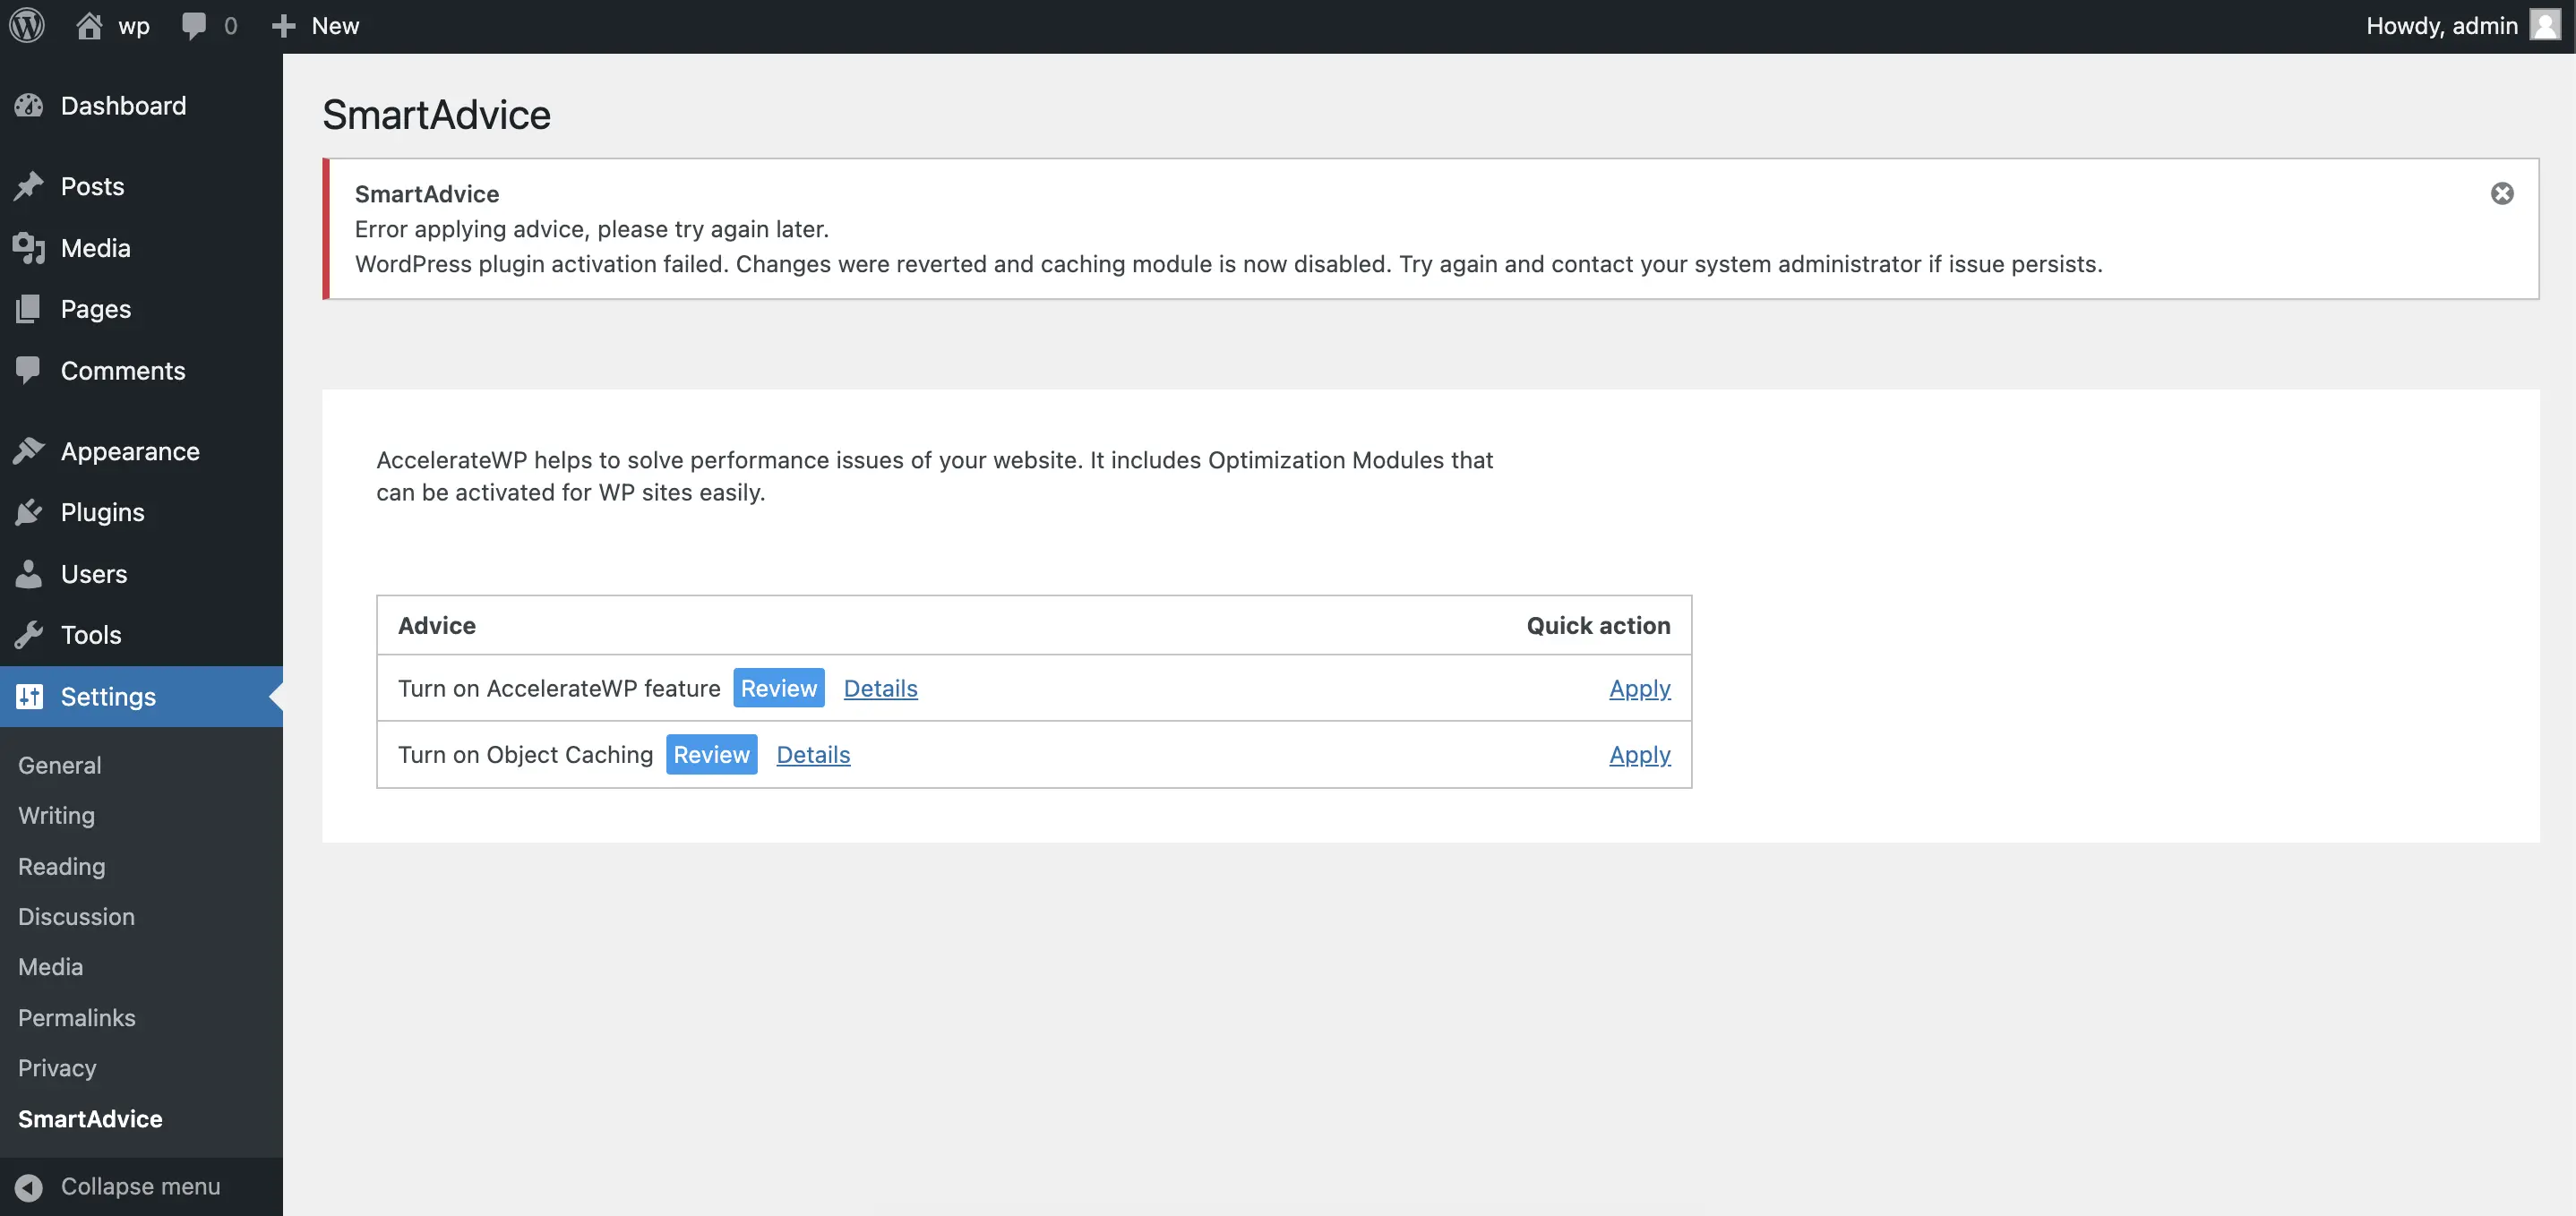
Please contact our Support team if you are unable to resolve the issue yourself.
PHP Selector
Overview
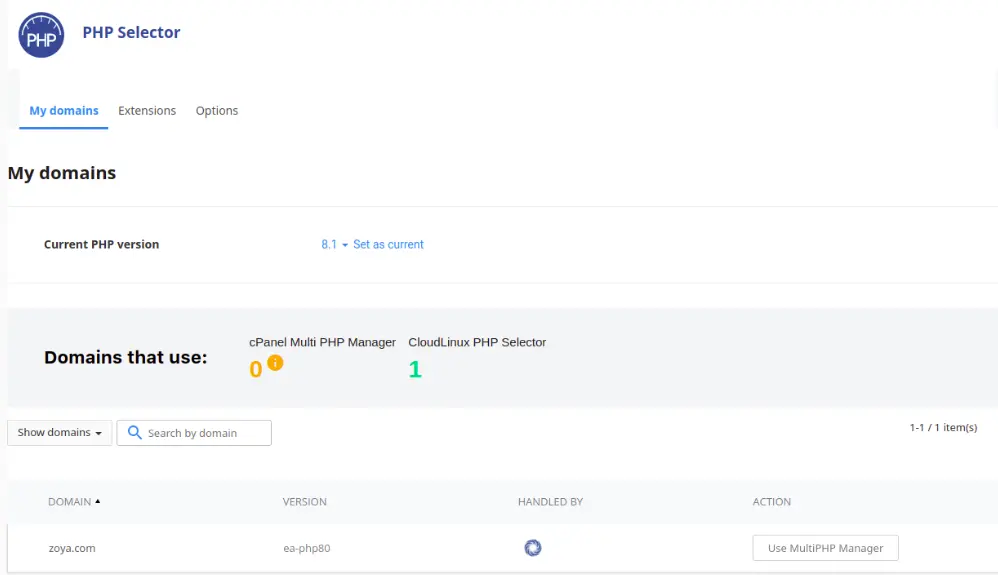
To manager PHP versions and modules for user domains find “ Select PHP selector “

There are several tabs in PHP selector plugin:
My domains tab gives the ability to set default PHP version and monitor which settings need to be done to manage domain php version by CloudLinux PHP selector. Selected version will be applied for all user domains.
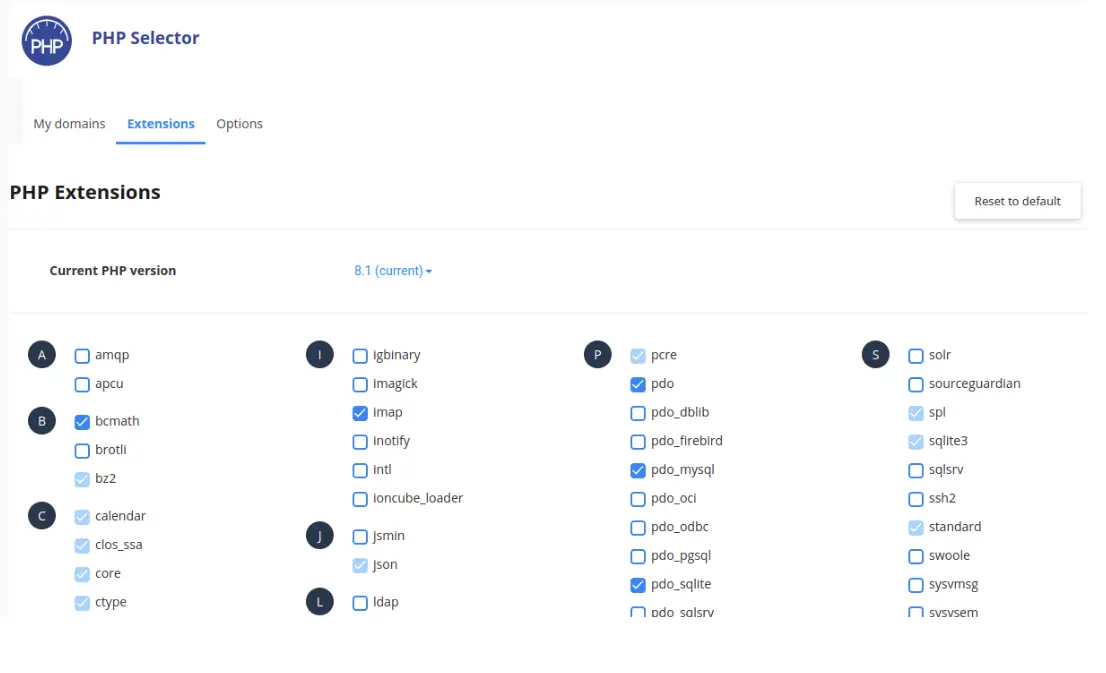
Extensions tab gives the ability to manage extensions for selected PHP version.
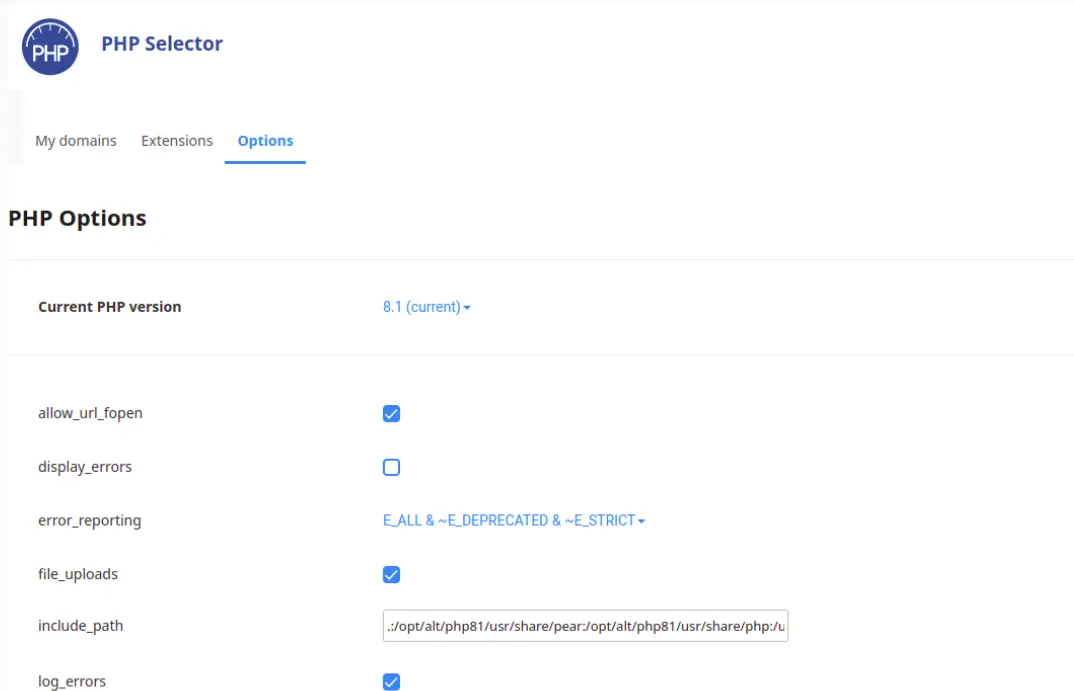
Options tab gives the ability to manage extensions for selected PHP version.
NodeJS/Python Selectors
Since CloudLinux Manager version 7.11.0-1 added support of NodeJS/Python selectors. Detailed instructions of how yo use them can be found by the links below:
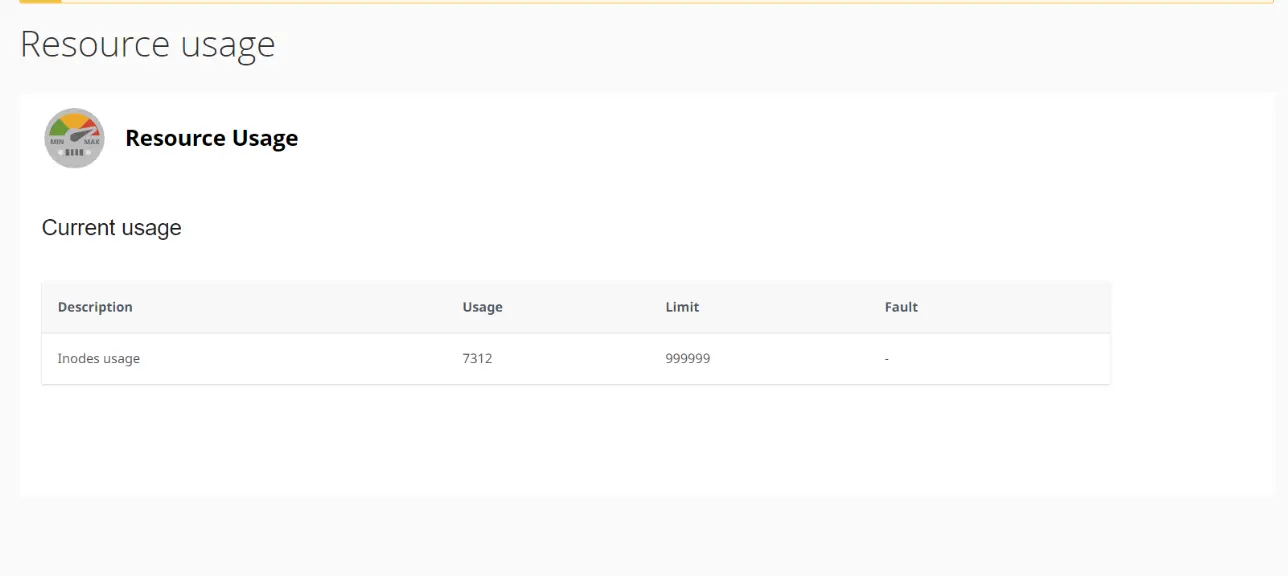
Resource Usage client plugin
Since CloudLinux Manager version 7.11.0-1 added support of Resource Usage client plugin.
Note:
Because the CloudLinux OS Solo does not support LVE, customer can only see the Inodes usage. Follow this documentation to setup Inodes limits