Installation
Hardware Compatibility
CloudLinux OS supports all the hardware supported by RHEL/CentOS/AlmaLinux, with few exceptions. Exceptions are usually hardware that require binary drivers, and that doesn't have any open source alternatives.
Note
CloudLinux OS does not support ARM-based CPUs (e.g. Graviton).
Warning
In cases where your server hardware is incompatible with any version of RHEL/CentOS/AlmaLinux and CloudLinux OS or our components - we will not be able to provide assistance in adding such hardware support or solving possible issues related to such installation.
Note
Replacing the server hardware affects specifications and support for such hardware from CloudLinux OS end. It is most likely that the CloudLinux OS will stop working if you replace any hardware component on the server.
Example: the same HDD/SSD/NVMe model will have a new UUID and CloudLinux OS is mapped to old UUID which break the boot procedure.
In this case, we are not responsible for the CloudLinux OS operation and cannot assist you in restoring the server or adapting CloudLinux OS installation to the new hardware.
There are some incompatible devices with CL6:
| Device | Binary Driver | Source |
| B110i Smart Array RAID controller | hpahcisr | https://h10032.www1.hp.com/ctg/Manual/c01754456 |
| B120i/B320i Smart Array SATA RAID Controller | hpvsa | https://www8.hp.com/h20195/v2/GetPDF.aspx/c04168333.pdf |
| SanDisk DAS Cache | https://www.dell.com/en-us/work/learn/server-technology-components-caching |
With RHEL8 (CloudLinux OS 8/CloudLinux OS 7 Hybrid), some devices are no longer supported. You can check the entire list here: Hardware enablement considerations in adopting RHEL 8
Software Compatibility
ZFS
CloudLinux 8+ provides limited support for ZFS, to the same degree as other RHEL-like distributions. More precisely, that means:
- CloudLinux doesn't ship any prebuilt packages of
kmod-zfsorzfs-dkms, etc. But it doesn't restrict customers from using packages built by the OpenZFS Team as they are known to be compatible and work fine on CloudLinux and AlmaLinux. In fact, we know that some of our customers are already using them for quite some time.- The most recent CloudLinux conversion script (
cldeploy) does not prevent the conversion of the system withzfsmodules loaded
- The most recent CloudLinux conversion script (
- CloudLinux tries to keep kABI mostly compatible with RHEL's, so in case ZFS works with the RHEL-like kernel, but not with a similar CloudLinux one, we will accept tickets to fix that
- Because ZFS is known to have some lag in adapting to kernel changes, we consider it the customer's responsibility to test the upgradeability of the environment to the most recent kernels and ZFS versions before upgrading the entire fleet.
- Most CloudLinux features, like CageFS, should work fine with ZFS-backed mount points, and if not, we will try our best to provide fixes according to severity and demand
CloudLinux features known to not work with ZFS:
- LVE IO Limits (as well as generic cgroups limits) don't work because the ZFS data path bypasses some of the kernel's internals. See related upstream tickets 1, 2, 3. There is also an ongoing attempt to implement per-dataset IO limits on the ZFS side.
Getting License
You will need a valid activation key - trial or paid - to be able to use your CloudLinux OS Solo server.
Getting Trial License
The trial activation key can be used to convert your server to CloudLinux OS.
Note
The trial license subscription will work for 30 days.
If you have any issues getting activation key or if you have any questions regarding using your trial subscription – contact sales@cloudlinux.com and we will help.
To get the activation key:
- Register with CloudLinux Network: https://cln.cloudlinux.com/console/register/customer (skip it if you already registered)
- You will receive an email with activation link
- Login at https://cln.cloudlinux.com/console/auth/login
- Choose the appropriate CloudLinux edition that fits your needs.
- Click on
Get Trial Activation Key.
You will get a key that looks like: 12314-d34463a182fede4f4d7e140f1841bcf2.
Converting existing servers
Sometimes it is required to convert already existing servers with CentOS or AlmaLinux and make them CloudLinux OS.
It is easy to convert your existing installation through the cldeploy script. The process takes a few minutes and replaces just a handful of RPMs.
Unlike Fresh installation, converting immediately requires a CloudLinux OS license. Please refer to the guide to get an activation key.
Requirements
Currently supported OS for conversion:
- CentOS 7
- AlmaLinux OS 8, AlmaLinux OS 9
- RockyLinux (installation only, no uninstall option)
Unsupported OS for conversion:
- CentOS 8
- CentOS Stream
Supported control panels:
- cPanel (Documentation)
- Plesk
- DirectAdmin
- CyberPanel (Documentation)
- InterWorx (Documentation)
- Webuzo (Documentation)
Other control panels:
Control panels not mentioned in the list of supported panels have native integration or integration done by the developer of the panel. We cannot guarantee the stability or correct operation of CloudLinux components on such panels.
Warning:
Some CloudLinux components may not be supported by the control panel itself or the control panel can have its own analog of such a component. You can verify this information when reviewing the system requirements for installing a specific CloudLinux component.
Note: CentOS 8 is EOL
CentOS 8 reached End Of Life (EOL) on December 31st, 2021. If you would like to convert from CentOS 8 to CloudLinux OS 8, do the following:
- Convert CentOS 8 to AlmaLinux 8 using almalinux-deploy
- Convert AlmaLinux 8 to CloudLinux 8 using cldeploy
Downloading and running conversion script
Key-based activation
If you want to use your activation key for activation, run the following commands:
yum install wget -y
wget https://repo.cloudlinux.com/cloudlinux/sources/cln/cldeploy
bash cldeploy -k ACTIVATION_KEY
Where ACTIVATION_KEY is the one that you got on previous step. Your CloudLinux OS edition will be detected automatically based on the ACTIVATION_KEY.
IP-based activation
If your reseller provides you with an IP-based license, run the following commands:
To convert server into the CloudLinux OS Shared edition:
sh cldeploy -i
To convert server into the CloudLinux OS Admin edition:
sh cldeploy -i --to-admin-edition
Next steps
After successful conversion, reboot your system by running the following command:
reboot
Once you reboot - your server should be running with CloudLinux OS LVE kernel.
You may check the booted kernel with the following command:
uname -r
Note
If after rebooting you do not see the CloudLinux kernel (the kernel has the abbreviation LVE in its name) then please consider check our knowledge base or contact support.
Note
SELinux is not supported on CloudLinux OS 6 and 7. SELinux is supported on CloudLinux OS 8+, but might not work or be compatible with control panels and various components.
Note
At the end of conversion from CentOS 7.x to CloudLinux OS Shared 7, the cldeploy script converts CloudLinux OS Shared 7 to CloudLinux OS Shared 7 Hybrid.
Automatic hybridization will be performed for the AMD processors with the following CPU families:
- Zen / Zen+ / Zen 2 / Zen 3
- Hygon Dhyana
Automatic hybridization may be skipped by passing extra option '--no-force-hybridize'. See also advanced options for cldeploy.
Minor version step-down
If you are attempting to convert an AlmaLinux machine of a minor OS version higher than the most recent CloudLinux minor version, you won't be able to perform a standard conversion, since the required packages will be missing.
E.g. if the AlmaLinux OS 8.8 has already become publicly accessible, but the latest CloudLinux OS release is still 8.7, a standard conversion will not be possible.
This situation typically occurs after a new AlmaLinux release and persists for several weeks.
If you cannot wait until the corresponding CloudLinux release, you have an option of performing a step-down conversion, in which cldeploy will install the previous CloudLinux OS minor version on your system.
For instance, AlmaLinux 8.8 can be converted to CloudLinux 8.7 in such a scenario.
Note
At the moment, the step-down conversion is only supported on systems with no panel, cPanel or Plesk.
Note
When performing a step-down conversion, cldeploy will add MySQL and MariaDB RPM packages to the Yum exclude list, in order to avoid downgrading them to CloudLinux-modified versions.
Not doing so would risk rendering the databases non-functional, since MySQL explicitly does not support minor-version downgrades of its packages.
If you want to update these packages on a step-down converted system, make sure to exclude/disable the CloudLinux package repositories while doing so.
The cldeploy script will automatically detect the latest available CloudLinux version and, depending on the result, will either proceed normally or perform the step-down conversion.
Updating systems from a step-down conversion
Once the previously missing minor CloudLinux release becomes available, you will likely want to upgrade to it from a step-down conversion.
To do so, you need to do the following:
- Install the newest available
cloudlinux-releasepackage over the previous one.- This will replace the AlmaLinux and CloudLinux package repository configuration files that were modified by cldeploy step-down conversion.
- Make sure the new files replace the old ones - check for presence of
.rpmnewfiles in /etc/yum.repos.d/. If there are, replace old files with them.
- Update the system normally.
- If you encounter problems with updating MySQL or MariaDB packages, make sure the automatically created excludes were removed from
/etc/yum.confand/or/etc/dnf/dnf.conf.
Troubleshooting
If you receive any troubles during the conversion process, please feel free to search our knowledge base or contact our support and attach the conversion log (/var/log/cldeploy.log).
How to enable secure boot for CloudLinux 9
Overview
CloudLinux 9 uses a non-modified AlmaLinux 9 kernel.
To make secure boot work with CloudLinux's kernel module you need to enroll the CloudLinux secure boot key to your server.
This procedure shows how to do it
Requirements
- UEFI support
- mokutil package installed
- Access to server's BIOS options menu and boot screen
**Note!**
Starting from kernel 5.14.0-362.8.1.el9_3 and kmod_lve-2.1-20 the secure boot is available without importing CloudLinux key.
Procedure
- Download CloudLinux key:
wget https://repo.cloudlinux.com/cloudlinux/SECURE-BOOT-KEY-cloudlinux-kmod.der - Import the key:When prompted, enter a password of your choice. This password will be used when enrolling the key into the MOK list.
mokutil --import SECURE-BOOT-KEY-cloudlinux-kmod.der - Reboot server. Upon rebooting, the "Shim UEFI key management" screen appears. Press any key withing 10 seconds to proceed.
- Enroll the key:
Select
Enroll MOK
Select
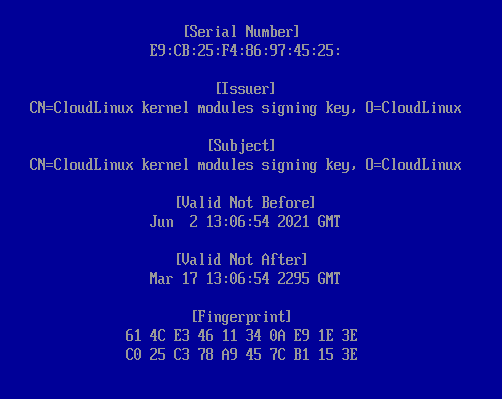
View key 0
Make sure that CloudLinux's Secure Boot Key information is displayed\
Press the Esc key when you are finished
Select
Continueon the screen from Step 2 It will ask "Enrol the key(s)?".
SelectYes/OK
Enter the password you used for importing the key (point 2.ii)

Select
Reboot(Older versions may sayContinue boot)
Now you can enable Secure Boot in BIOS options menu
Useful Commands
mokutil --sb-state(to check current Secure Boot state);mokutil --list-enrolled(to show list of enrolled keys).
If you wish to remove the CloudLinux key from the MOK list, follow the instructions below
Warning
Do not delete the key when secure boot is enabled - server will be unable to boot
- Disable Secure Boot
mokutil --delete SECURE-BOOT-KEY-cloudlinux-kmod.dermokutil --list-delete(to check the key to be deleted)- Reboot the system and go through the MOK management process to complete the deletion from the MOK list.
Technical Details: cldeploy
By its design, CloudLinux OS Shared is very close to the upstream operating system - RHEL. This makes the conversion process relatively straightforward, requiring just one reboot.
Installation Process
Here's what the cldeploy script does when you run it:
- Backups the original repository settings into
/etc/cl-convert-saved. - Backups RHEL system ID into
/etc/cl-convert-saved(RHEL systems only). - Installs CloudLinux repository settings & imports CloudLinux RPM key.
- Replaces redhat/centos-release/almalinux-release, redhat-release-notes, redhat-logos with CloudLinux versions.
- Removes cpuspeed RPM (as it conflicts with CloudLinux limits).
- Reinstall CloudLinux version of rhnlib/rhnplugin.
- Checks for binary kernel modules, finds replacement if needed.
- Detects OVH servers and fixes mkinitrd and possible boot issues.
- Detects Linode servers and fixes grub issues.
- Checks if LES is installed.
- Checks that
/etc/fstabhas correct/dev/root - Checks for EFI and performs the necessary configuration.
- Installs CloudLinux kernel, lve-utils, liblve, lve-stats RPMs.
- Installs CloudLinux Manager for the supported control panels.
- Installs mod_hostinglimits Apache module *:
- RPM install for supported control panels;
- On Plesk, replaces psa-mod_fcgid* with mod_fcgid;
- Perform CustomBuild tool execution for DirectAdmin.
Uninstallation Process
Here's what the cldeploy script does if you run it to uninstall CloudLinux:
- Restores CentOS/AlmaLinux repositories, and almalinux-release/centos-release/release-notes/logos.
- Removes lve, mod_hostinglimits, lve-stats, lvemanager packages.
- mod_hostinglimits RPM is removed.
Note
cldeploy doesn't remove the kernel to prevent condition when server has no kernels and wouldn't boot. Instead, script provide the instructions on how you could remove it manually later, when it is safe to do so.
On cPanel servers, rebuild of Apache with EasyApache will complete the conversion back, but doesn't have to be performed immediately. * On DirectAdmin servers, rebuild of Apache with custombuild will complete the conversion back, but doesn't have to be performed immediately.
More information is also available here: Uninstall CloudLinux.
Installing new servers
All CloudLinux OS editions may be installed using one ISO and source.
Downloading ISO
You can download the latest CloudLinux OS ISO and use it to install CloudLinux OS on your server:
CloudLinux OS 9
- x86_64 version: https://www.repo.cloudlinux.com/cloudlinux/9/iso/x86_64/
CloudLinux OS 8
- x86_64 version: https://www.repo.cloudlinux.com/cloudlinux/8/iso/x86_64/
CloudLinux OS 7
- x86_64 version: https://repo.cloudlinux.com/cloudlinux/7/iso/x86_64/
CloudLinux OS 6
- x86_64 version: https://repo.cloudlinux.com/cloudlinux/6/iso/x86_64/
- i386 version: https://repo.cloudlinux.com/cloudlinux/6/iso/i386/
There are multiple ISO types available:
CloudLinux-*-boot.iso- this ISO is made specifically for network installation and does not contain any packages inside.CloudLinux-*-dvd1.iso- this one contains all packages from network installation repository, so you can set up any possible configuration without network access.CloudLinux-*-minimal.iso- this one contains only minimal set of packages to set up light server without GUI and Development tools.
Installing using the Graphical User Interface
The graphical installation interface is the preferred method of manually installing CloudLinux OS. It allows you to have full control over all available settings, including disk partitioning and storage configuration.
The graphical mode is used by default when you boot the system from the local media. Mount and boot the image, then follow the steps.
Language Selection
The first screen displayed is the language selection page.
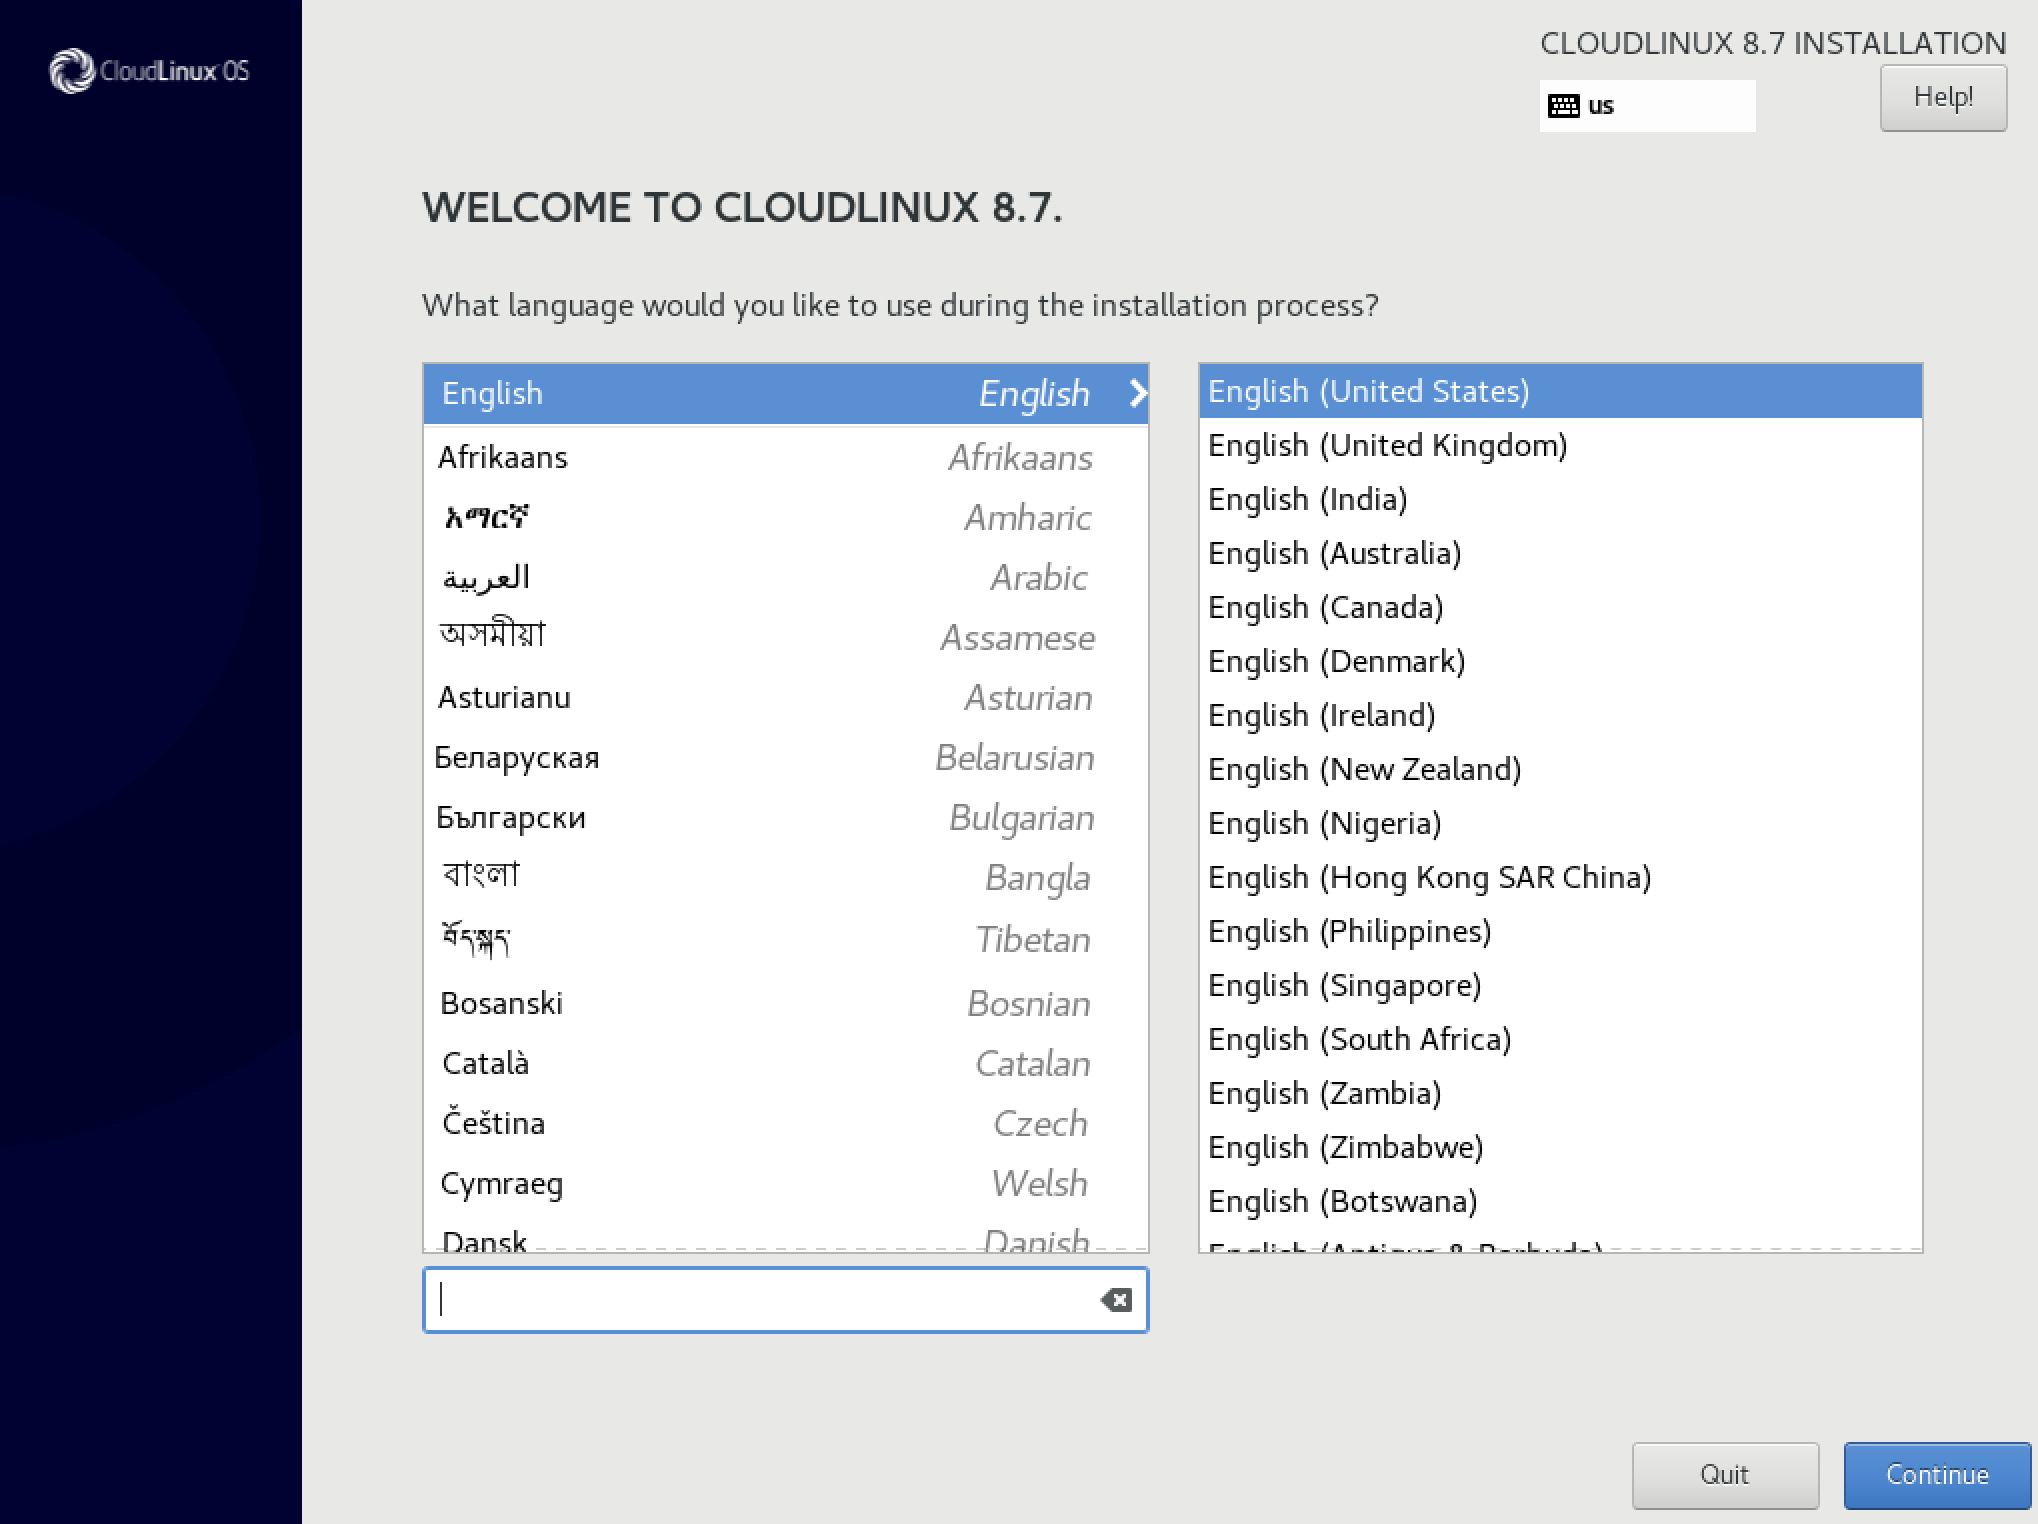
First, find your preferred language in the left column and than select locale in the right one. Selected language will be used during installation and also as a default language of the installed system.
After you select your language and locale, click Continue to confirm your selection and proceed to the Installation Summary.
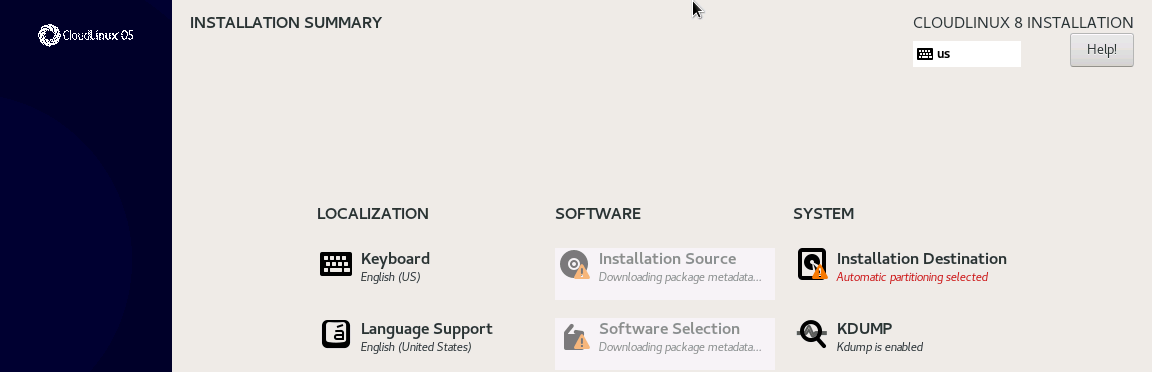
Installation Summary
The Installation summary screen is the main dashboard of your installation parameters. Most of the options which can be configured during the installation can be accessed from here.
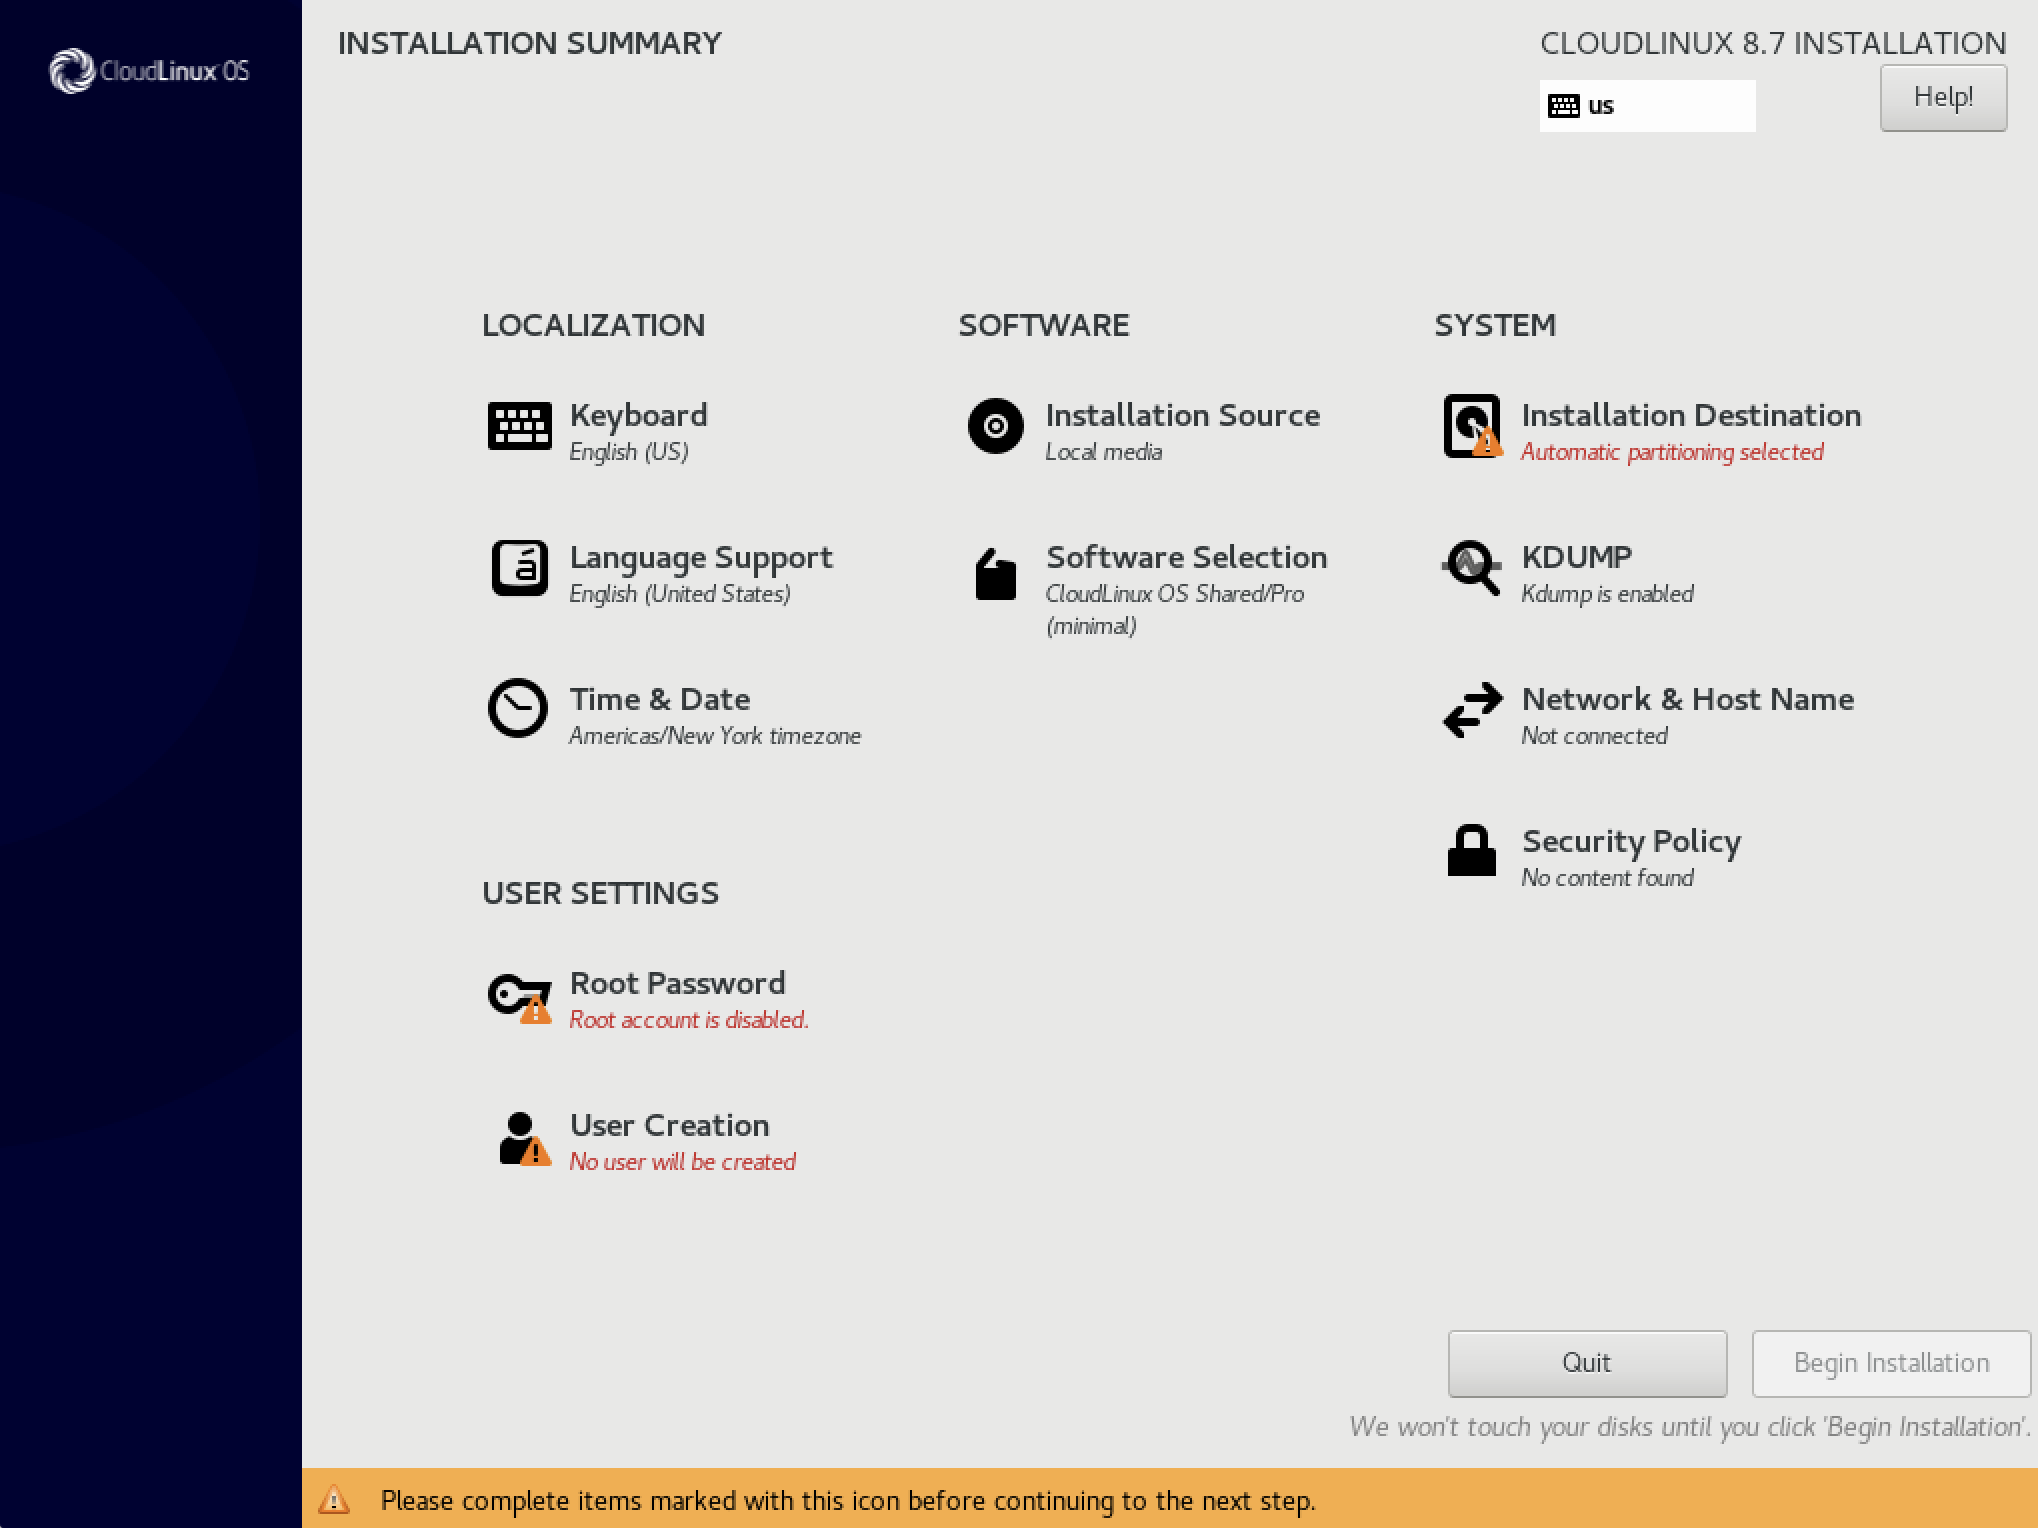
The summary screen displays links to other configuration screens, those links can be in several different states, which are graphically indicated:
Grayed out link means that the installer is currently updating this sections. Please wait a little before accessing this section.
A warning symbol next to an icon means that a screen requires your attention before you start the installation.
Links without warning symbol mean that screen does not require your attention. You can still change your settings in these screens, but it is not required to start installation.
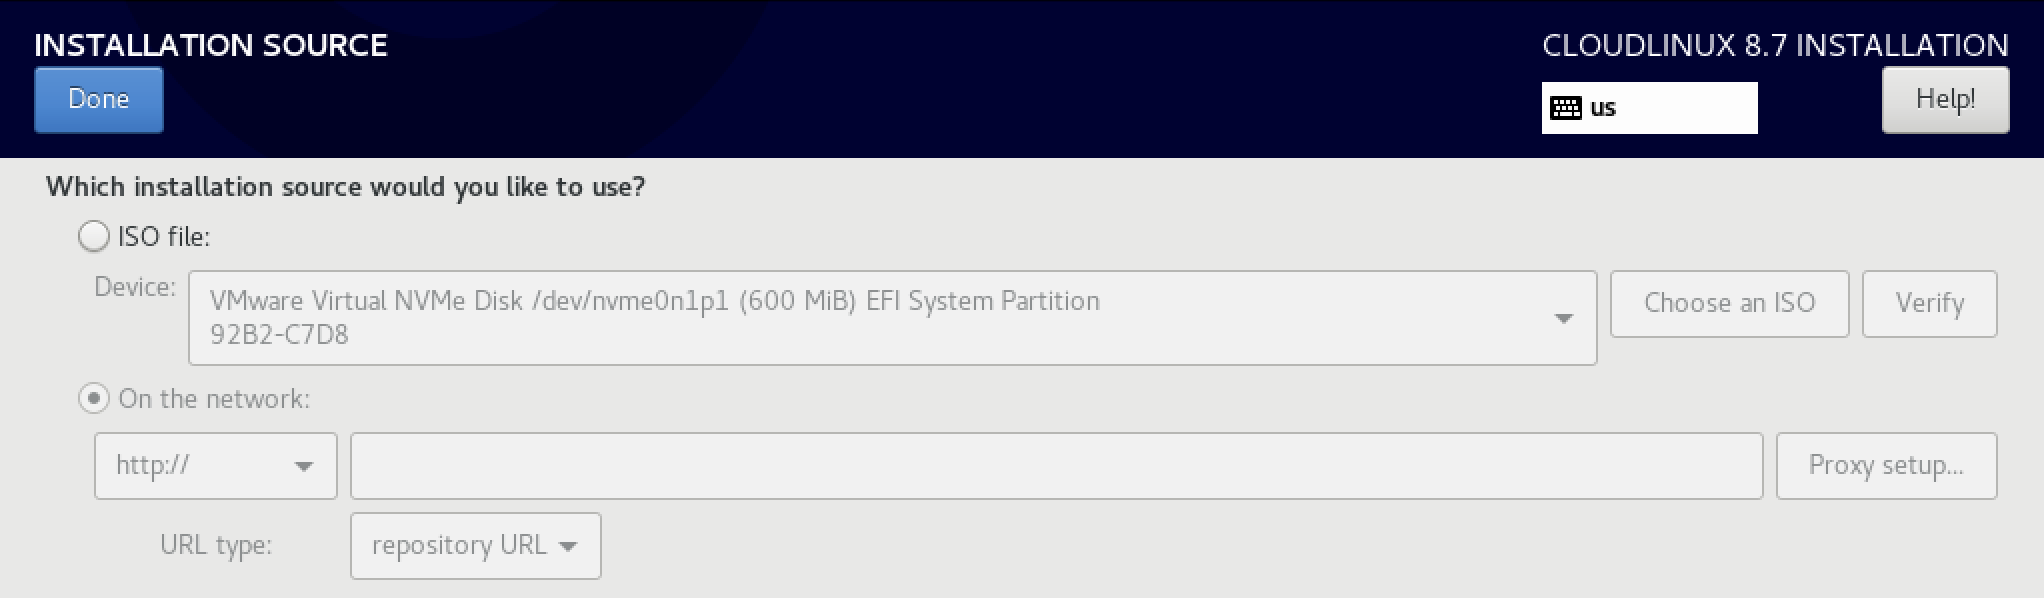
Choosing the Installation Source
The first thing that you should define is where the system will be installed from. There are basically two options:
- ISO file
- On the network
On the Network Source
Use this option to download packages to be installed from a network location. This is the preferred way as you automatically receive all critical bug fixes that may affect installation.
Note
Most likely your network is not configured by default, so you can see the URL configuration field greyed out, like on the screenshot below. Please refer to the Network Configuration screen first to set up a network connection.
The correct installation URL for CloudLinux OS is
https://repo.cloudlinux.com/cloudlinux/8/BaseOS/x86_64/kickstart/
Type in installation URL in the corresponding field, configure proxy if needed and press the Done button.

ISO File Source
This option is primary used as an alternative when you don't have internet connection on a target server. It is only available if you downloaded Minimal or DVD ISO which contains some bundled packages in.

Tick the ISO file checkbox and press the Done button.
Next Steps
After clicking Done, you will be redirected to the Installation Summary screen where Installation source and Software Selection links will be greyed and the Downloading package metadata message wll be shown.
Please hold on while that message disappears and proceed to the Software Selection section.
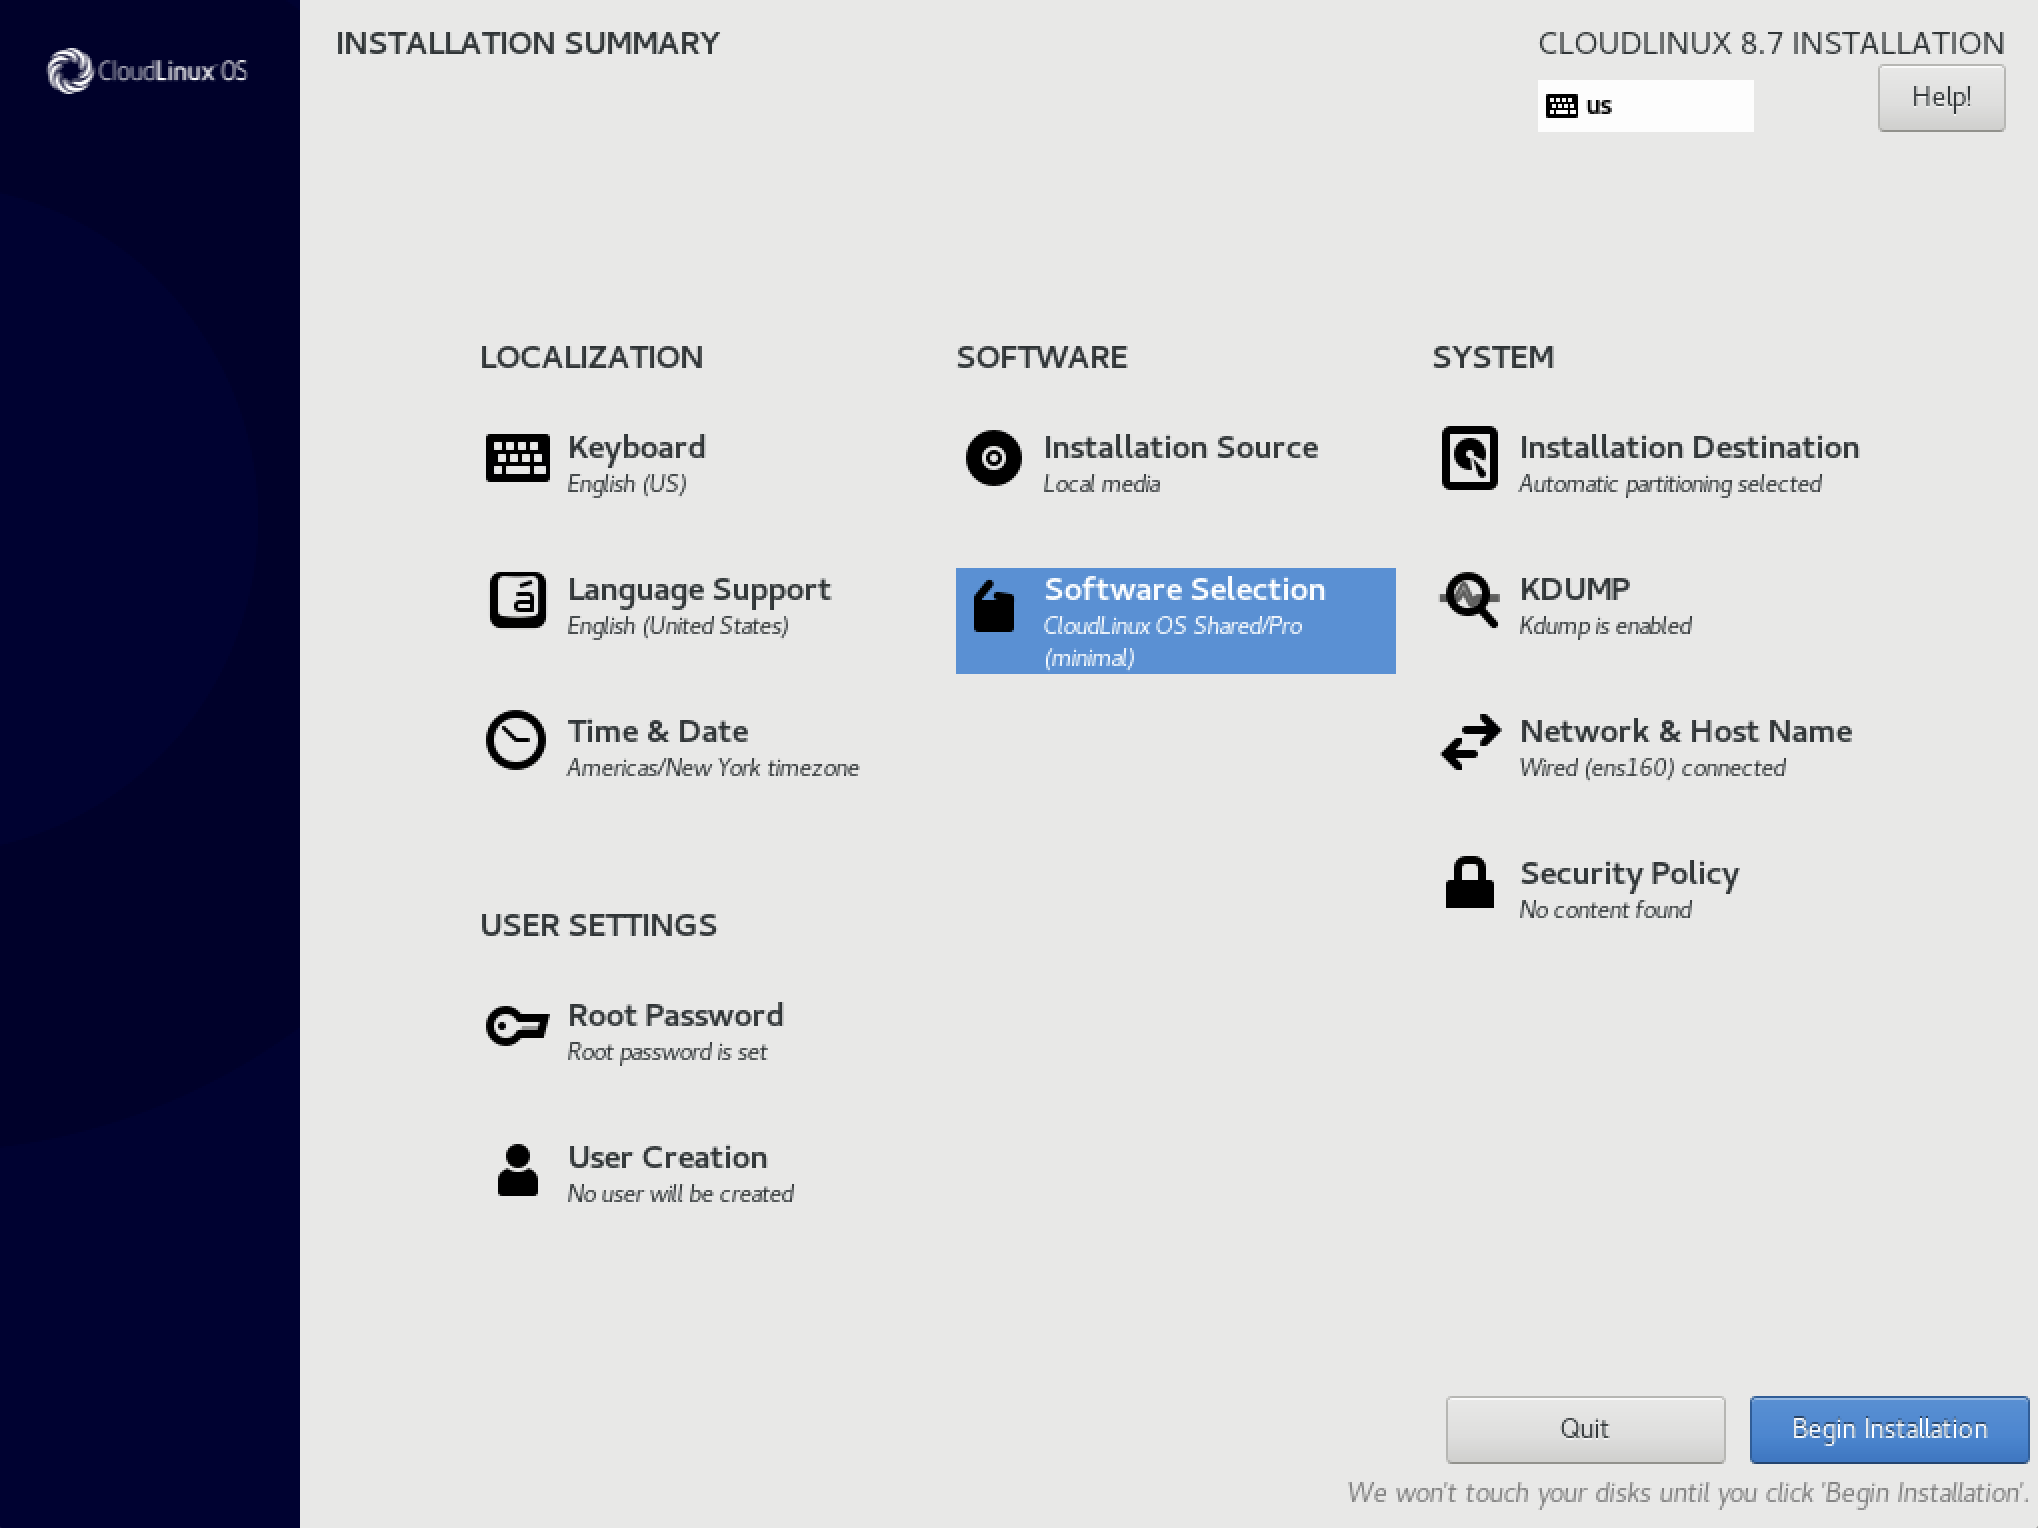
Software Selection
The Software Selection screen allows you to choose a Base Environment and Add-ons. These options control which software packages will be installed on your system during the installation process.
This screen is only available if Installation Source is properly configured and only after the installer has downloaded package metadata from the source.
It is not possible to select specific packages during a manual installation, you can only select pre-defined environments and add-ons.
You should choose the CloudLinux edition that matches your license on this stage: 
The available options are:
- to install CloudLinux OS Shared or Shared Pro, choose the
CloudLinux OS Shared/Pro (minimal)environment on the left of the screen. - to install CloudLinux OS Admin, choose the
CloudLinux OS Admin (minimal)environment on the left of the screen. - to install CloudLinux OS Solo, choose the
CloudLinux OS Solo (minimal)environment on the left of the screen.
Then, on the right side of the screen, select one or more add-ons which you want to install by ticking the check boxes next to each add-on.
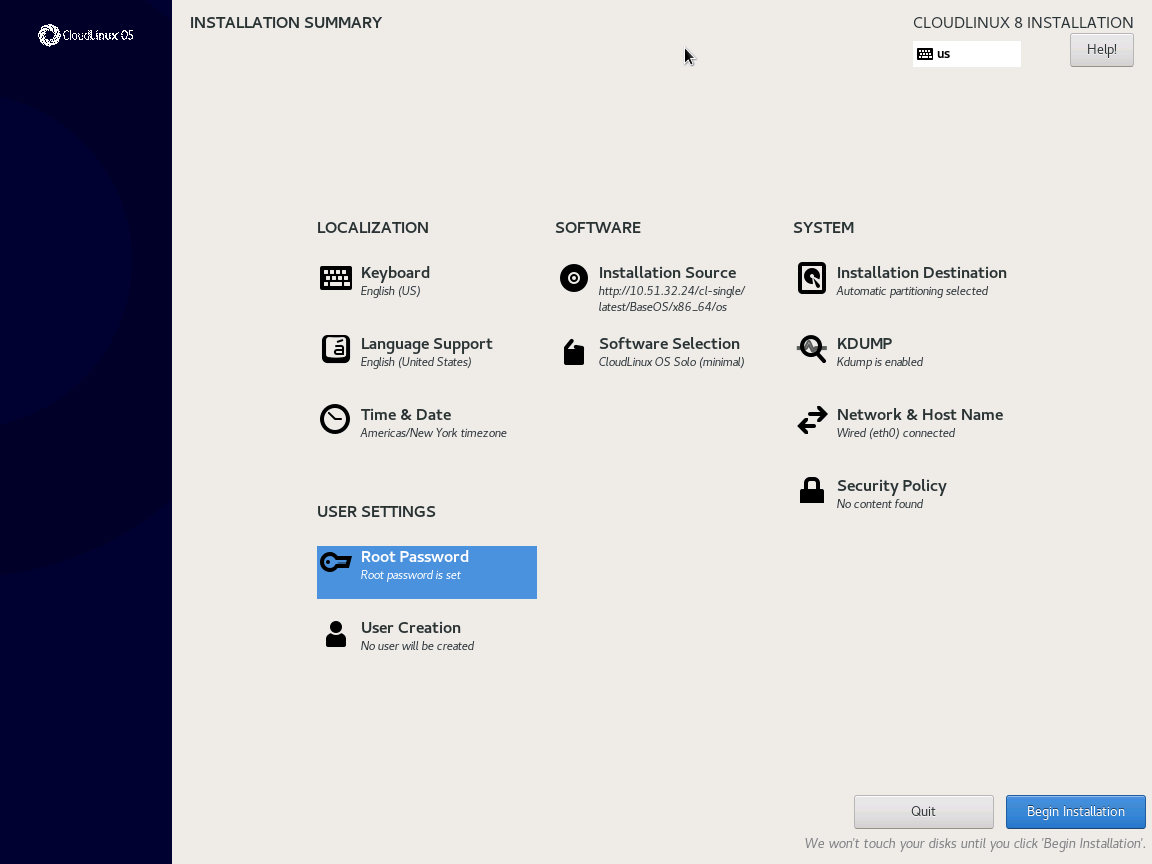
Final Preparations
Installation is almost done, all you need to do is to configure your installation target using the Installation Destination menu and create your Root Password.
Doing that, the Begin installation button becomes blue, so click it.
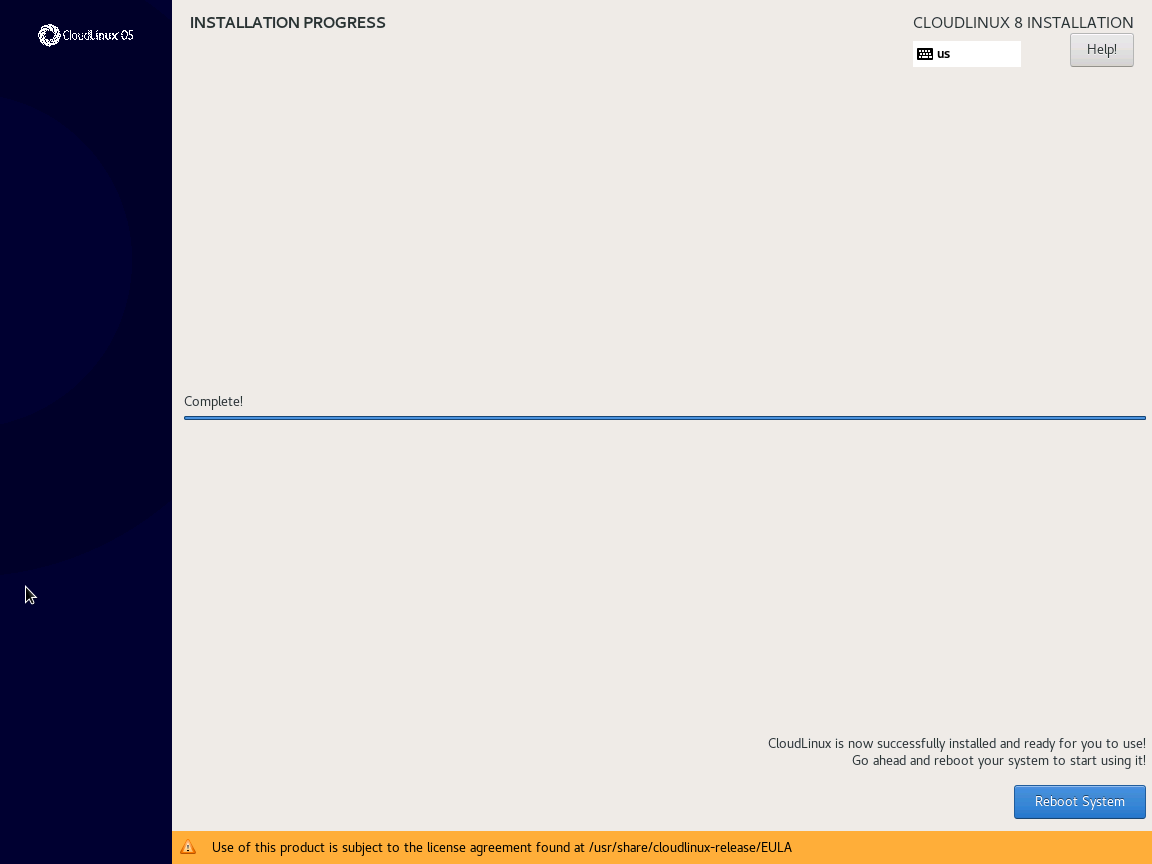
After this point, the installation process actually starts and changes are being made to your selected disks. It is not possible to go back to the Installation Summary and change any settings configured there; if you need to do so, you must wait for the installation process to finish, reboot your system, log in and change your settings on the installed system.
The bottom of the screen shows a progress bar and a message informing you of the current progress of the installation. When the installation finishes, you can press the Finish installation button to reboot your computer and log in to your newly installed system.
Warning
Before you finish the installation and reboot, either remove the media which you used to start the installation, or make sure that your system tries to boot from the hard drive before trying removable media. Otherwise, your computer will start the installer again instead of the installed system.
Next Steps
Reboot your system, login and check EULA which is located in the /usr/share/cloudlinux-release/EULA.
Next, activate your installation in order to get updates.
License Activation
To register your CloudLinux OS server with CloudLinux Network using activation key, run the following command:
yum install rhn-setup
/usr/sbin/rhnreg_ks --activationkey=<activation key>
Where <activation key> is like 1231-2b48feedf5b5a0e0609ae028d9275c93
If you have IP based license, use the clnreg_ks command instead:
yum install rhn-setup
/usr/sbin/clnreg_ks --force
Cloud Provider Images (CloudLinux OS Shared only)
- OpenStack QEMU/KVM
- VMware
- Google Cloud Engine
- Amazon Web Services
- Alibaba Cloud
- Xen
- CloudLinux Azure Images
CloudLinux Azure Images
We build and release CloudLinux 7.9 and CloudLinux 8.6 for Azure and upload to the Mircosoft Azure Community Galleries.
Images are built in both types Azure supports: gen1 (BIOS based) and gen2 (UEFI based). CloudLinux Images could be found in the following regions: West Europe, Germany West Central, Southeast Asia, East US, West US 2. A publisher of CloudLinux Images in Azure is cloudlinux. Community gallery name is cloudlinux-cbc76afd-63bc-4f6e-b801-65bd2f1ab0a0.
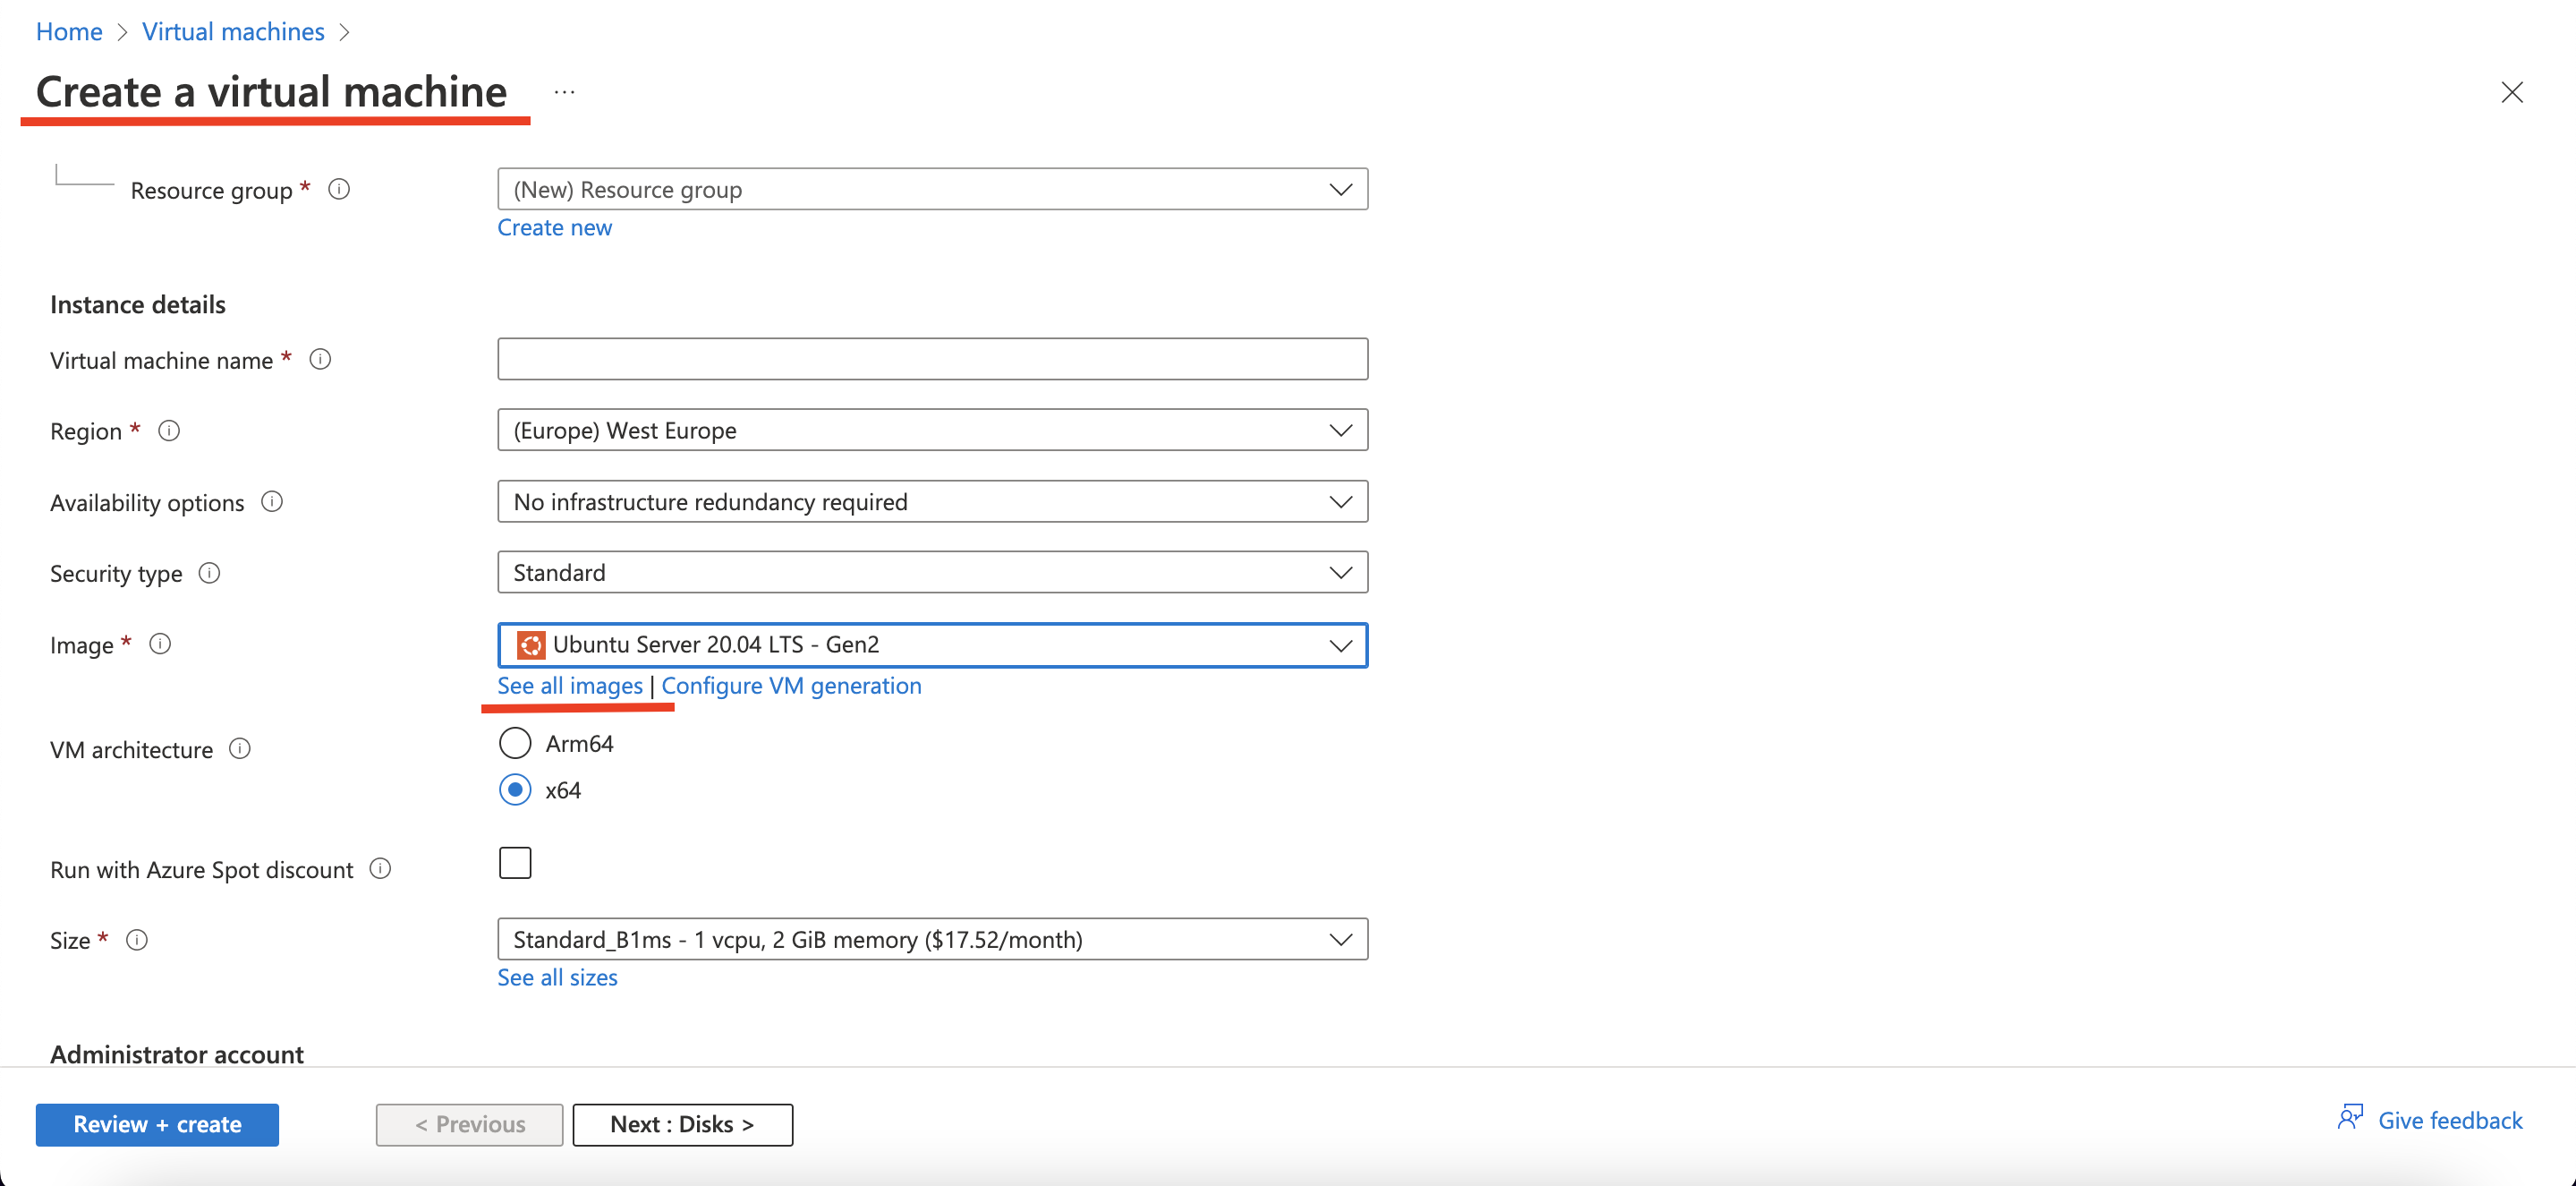
How to use CloudLinux Image in Azure:
- When creating Virtual Machine, while choosing what OS should be used, click See al images.
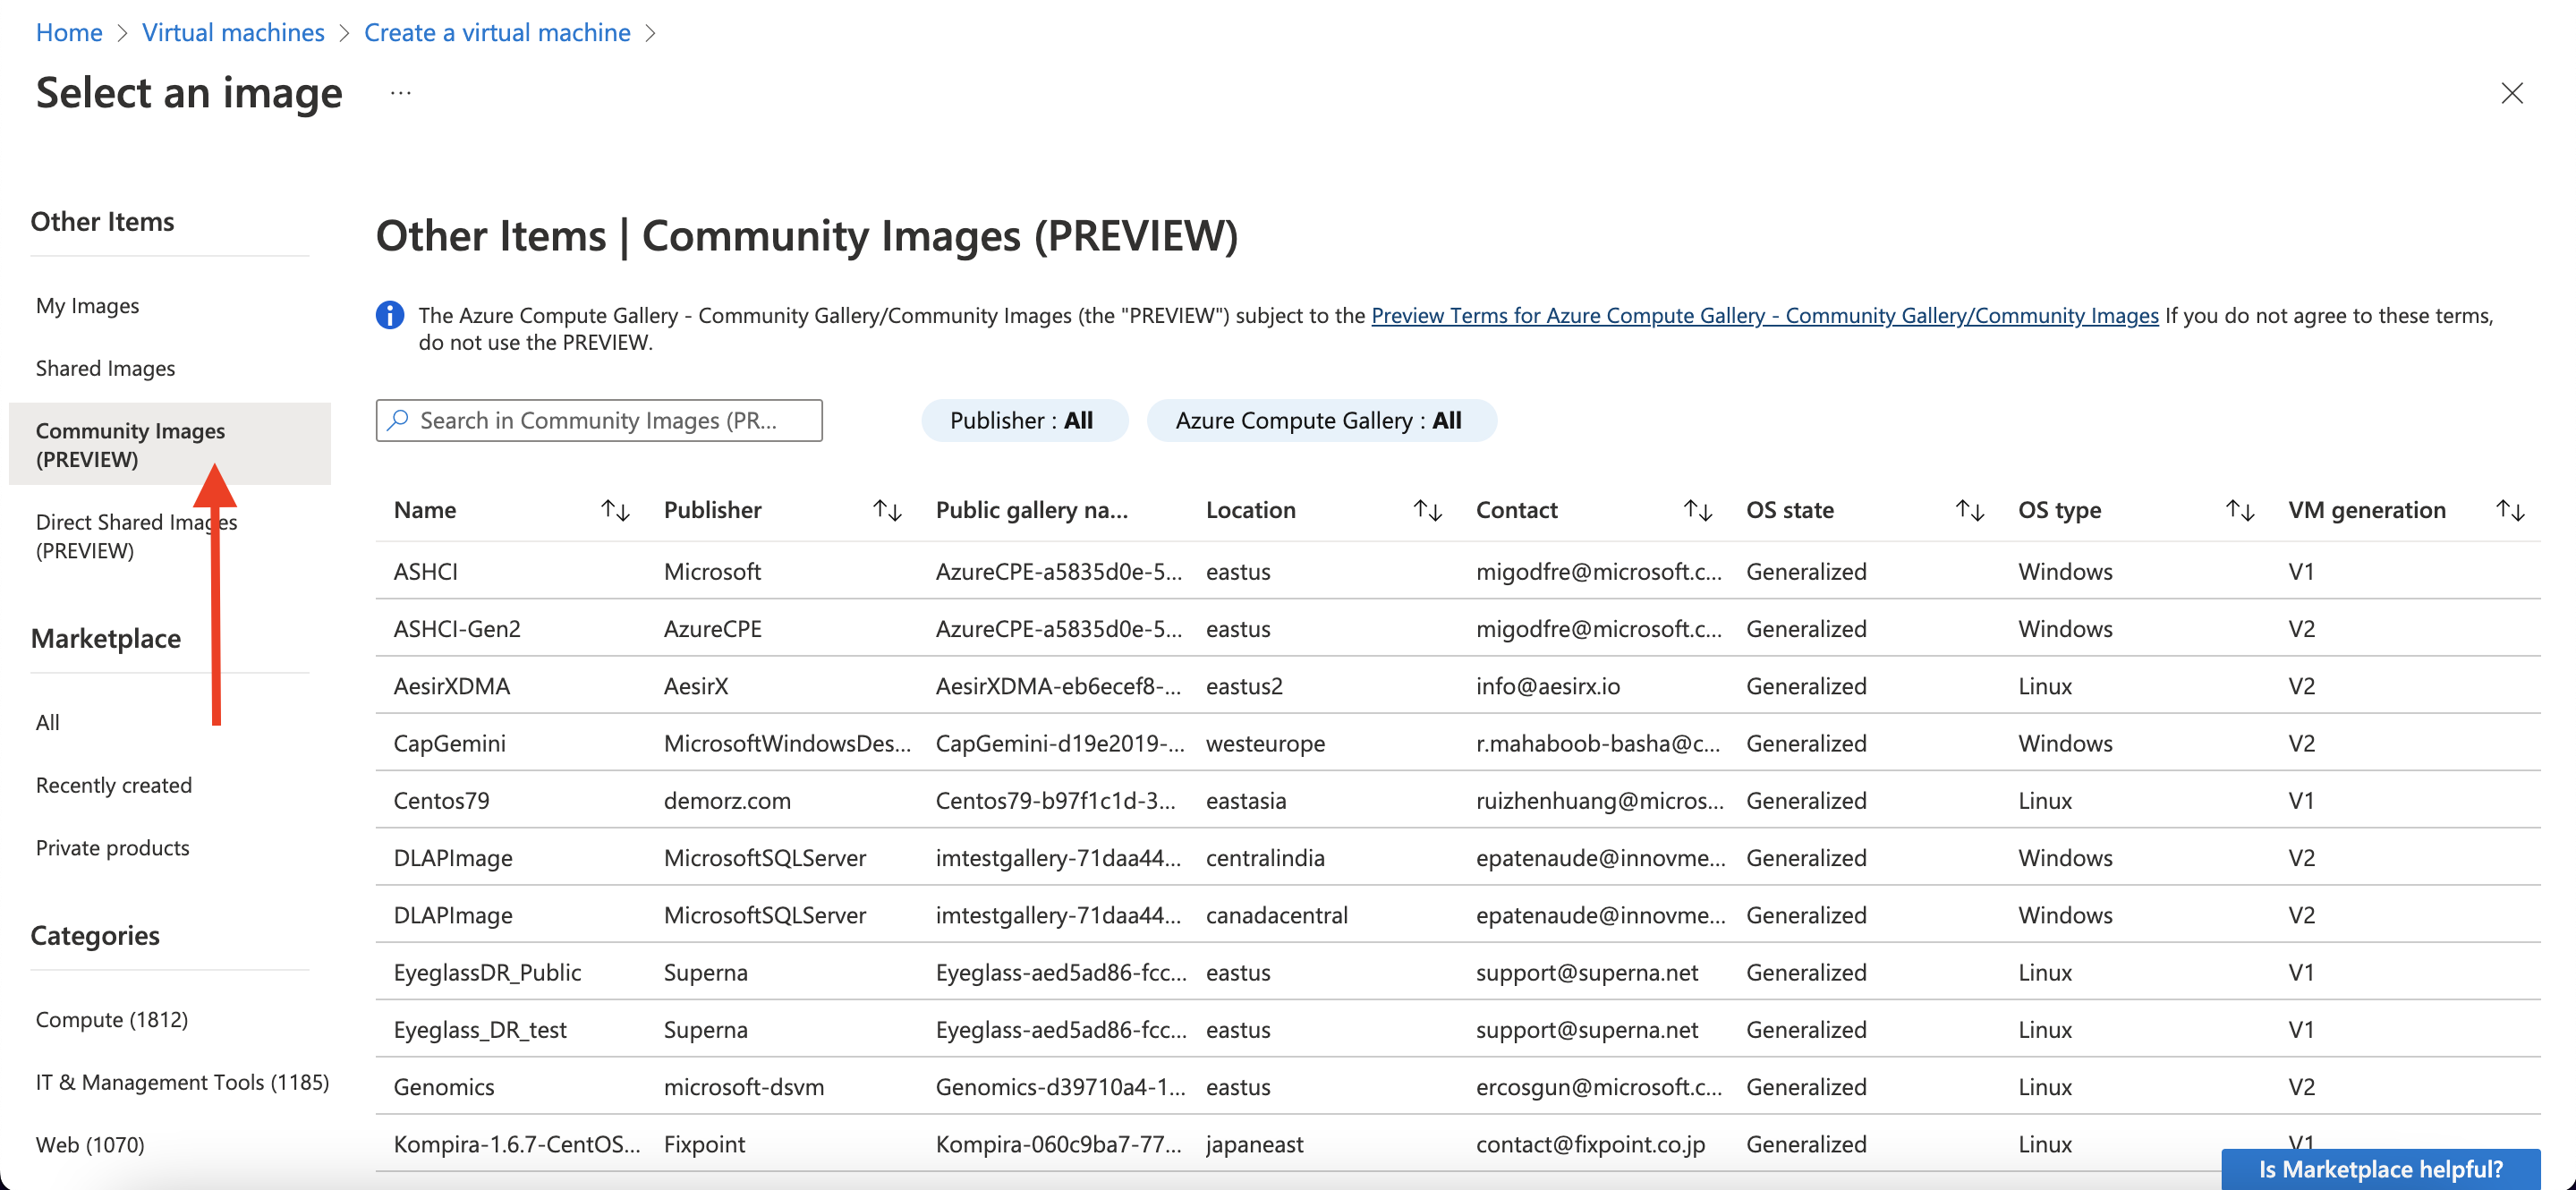
- Switch from Marketplace to Community images.
- Search by typing cloudlinux or filter by Publisher which is also cloudlinux or Azure Compute Gallery which is cloudlinux-cbc76afd-63bc-4f6e-b801-65bd2f1ab0a0.
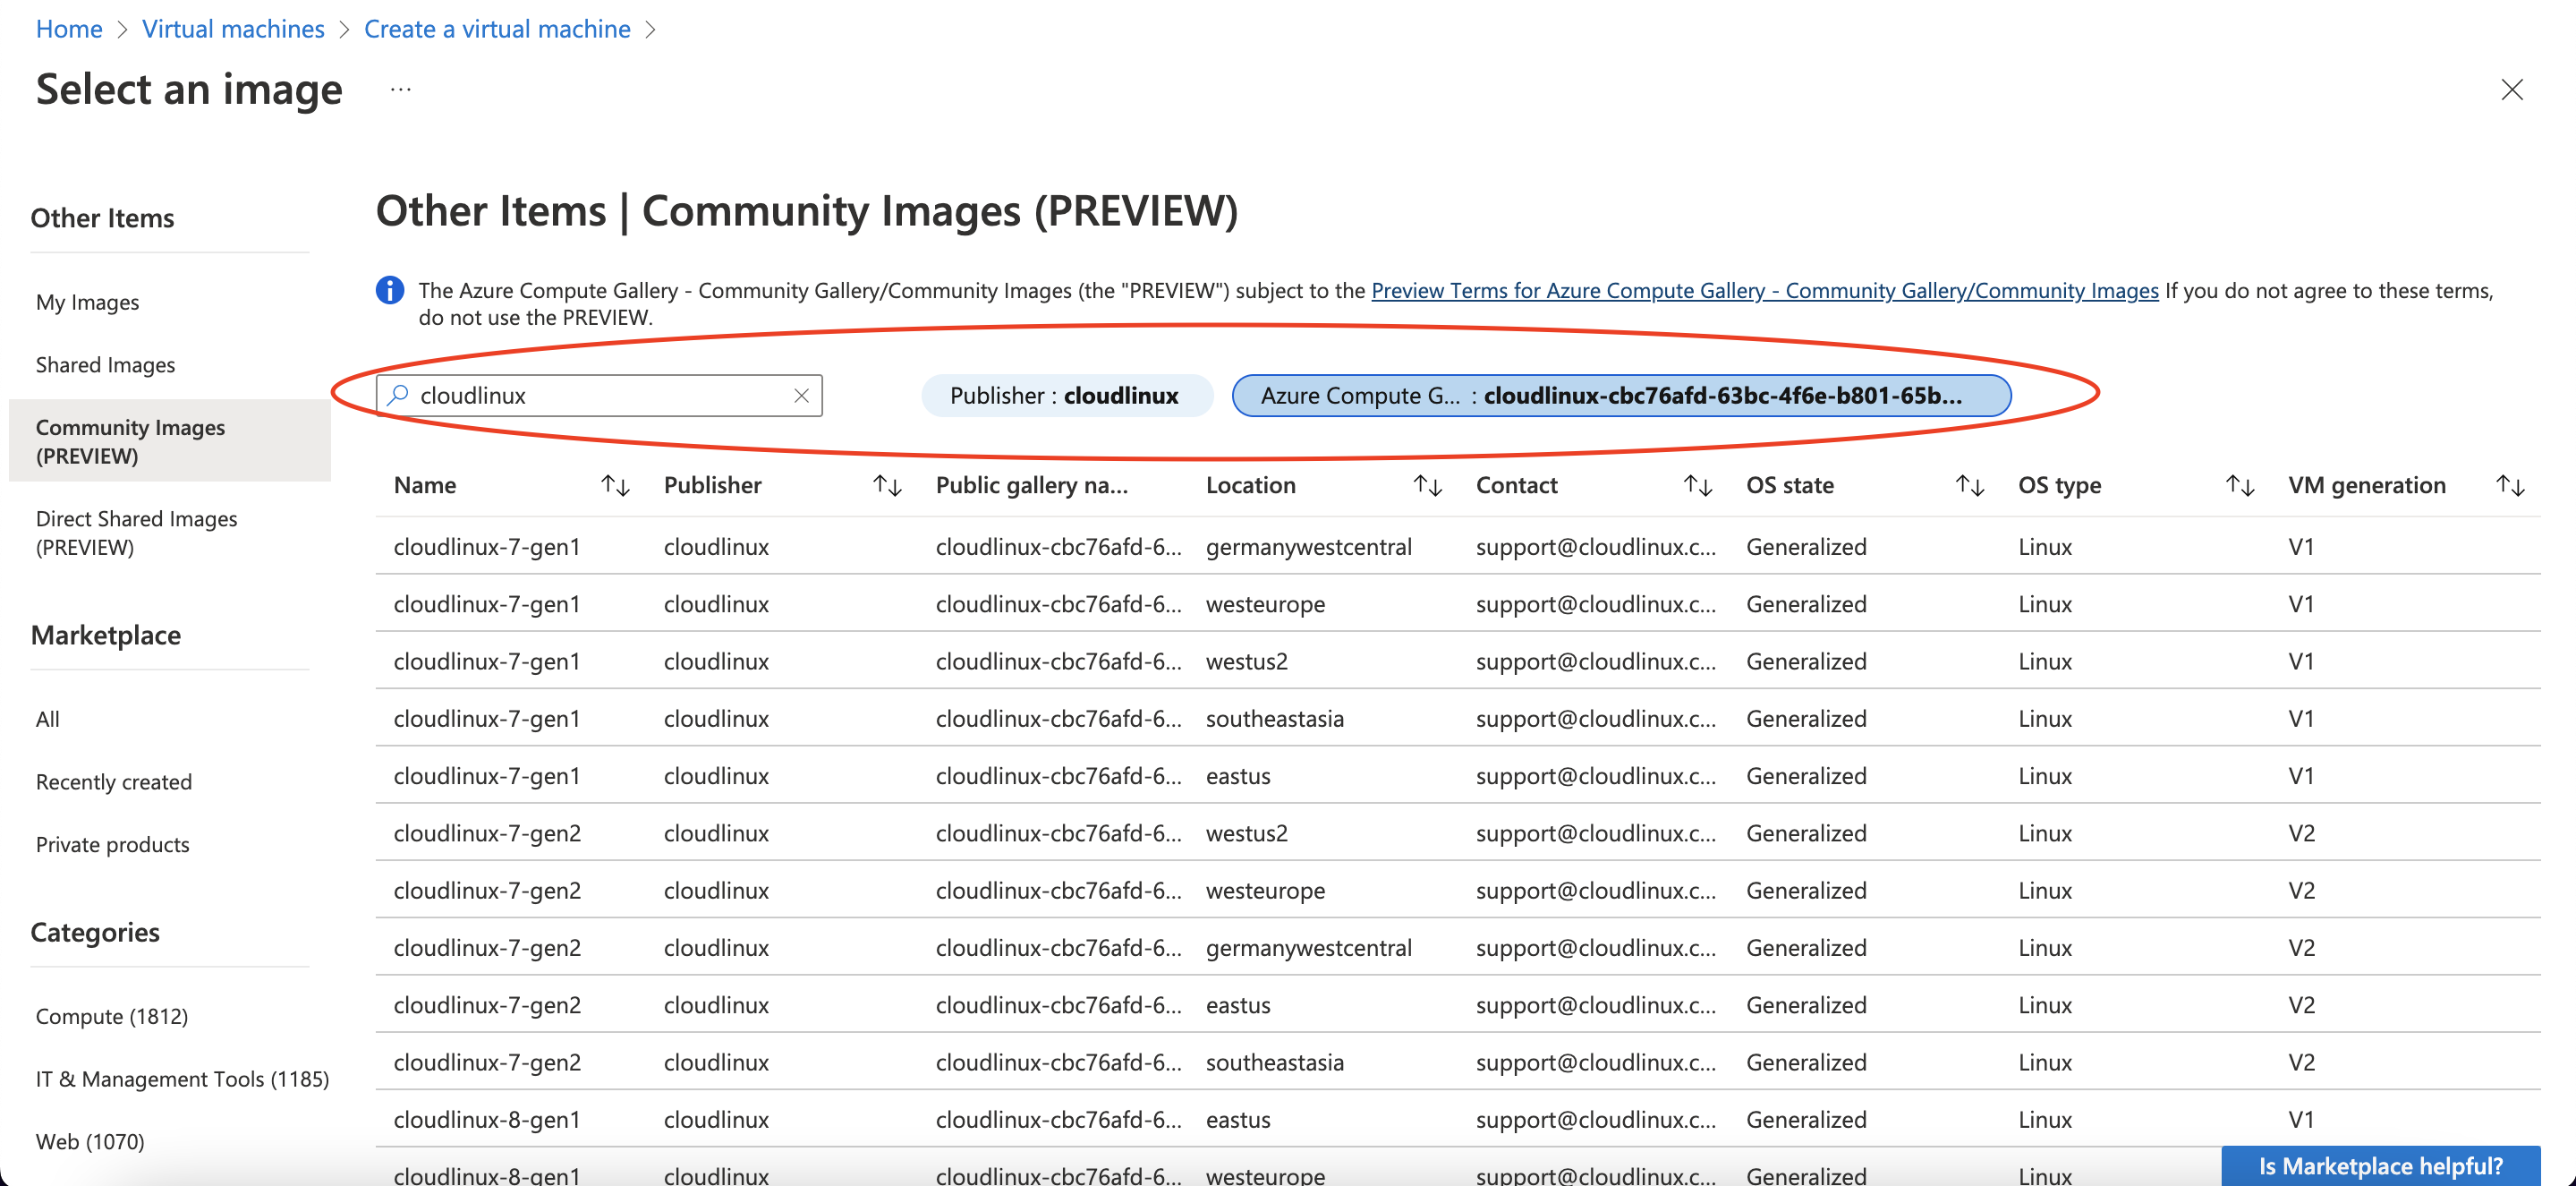
- Choose a suitable image. Check that the Publisher of the selected images is cloudlinux and Public Gallery Name is cloudlinux-cbc76afd-63bc-4f6e-b801-65bd2f1ab0a0.
Xen Images
Note
We do not provide Xen images of CloudLinux OS Shared anymore, use ISO images instead
Provider-specific guidelines (CloudLinux OS Shared only)
AWS
CloudLinux OS Shared image list can be found here.
If you are going to use CloudLinux OS Shared with cPanel image, you may find useful the following article.
H-Sphere
Note
For H-Sphere 3.5+ Please note, that CageFS and PHP Selector are not supported for H-Sphere
Requirements
- CloudLinux OS Shared with liblve 0.8 or later.
- Apache 2.2.x or 1.3.
- mod_suexec should be enabled.
To achieve optimal performance, we recommend to convert from mod_fastcgi to mod_fcgid.
There is no need to install mod_hostinglimits – it comes built in with H-Sphere. Once you load kernel from CloudLinux OS Shared with liblve 0.8 or later – it will get enabled.
You can check if LVE is enabled by running:
ps aux | grep httpd | grep DLIBLVE
If you see no output, it means that Apache didn't pick up LVE. Try checking file /hsphere/shared/scripts/apache-get-env.sh
The following lines should be there:
if [ -e /usr/lib64/liblve.so.0 -o -e /usr/lib/liblve.so.0 ]; then
APENV_DSSL="$APENV_DSSL -DLIBLVE"
fi
If those strings are absent, you should add it, after:
else
APENV_DSSL='-DSSL'
fi
###
and before:
# this is used by apacheGetEnv.pm perl module
if [ "$1" = 'show' ] ; then
set | egrep "^APENV_"
fi
strings.
Restart Apache afterward.
Note
Don't forget to convert from mod_fastcgi to mod_fcgid.
Converting from mod_fastcgi to mod_fcgid
To achieve the best results in productivity and stability we recommend converting from mod_fastcgi to mod_fcgid.
Note
H-Sphere 3.6.3+
- Download our fcgi.conf file:
wget -O /hsphere/local/config/httpd2/fcgi.conf https://repo.cloudlinux.com/cloudlinux/sources/mod_fcgid-hsphere/fcgi.conf
- Edit
~httpd2/conf/extra/httpd-hostinglimits.confto the following state:
######
LoadModule hostinglimits_module /hsphere/shared/apache2/modules/mod_hostinglimits.so

<IfModule mod_hostinglimits.c>
SkipErrors Off
AllowedHandlers cgi-script %php% fcgid-script application/x-miva-compiled
DenyHandlers hs-php5-script hs-php53-script hs-php54-script
Include /hsphere/local/config/httpd2/fcgi.conf

</IfModule>
#######
- Go to
P.Servers > web server [Config]and be sure to have enabled:apache_version=2apache_mpm=preforkapache_fastcgiapache_fcgidPHP version/mode: php_fastcgi*
Note
*No changes needed to httpd.conf.tmpl.custom or usermodule.phpmode as this version provides its own mod_fcgid.
Older versions of H-Sphere
- Compile mod_fcgid module:
yum install gcc liblve-devel zlib-devel openssl-devel
wget https://apache.osuosl.org//httpd/mod_fcgid/mod_fcgid-2.3.9.tar.gz
tar zxvf mod_fcgid-2.3.9.tar.gz
cd mod_fcgid-2.3.9/
APXS=/hsphere/shared/apache2/bin/apxs ./configure.apxs
make
mv modules/fcgid/.libs/mod_fcgid.so /hsphere/shared/apache2/modules
- Download and apply patch https://repo.cloudlinux.com/cloudlinux/sources/mod_fcgid-hsphere/usemodule.phpmode.patch to
/hsphere/local/config/scripts/usemodule.phpmode:
wget https://repo.cloudlinux.com/cloudlinux/sources/mod_fcgid-hsphere/usemodule.phpmode.patch
patch /hsphere/local/config/scripts/usemodule.phpmode usemodule.phpmode.patch
- If
/hsphere/local/config/httpd2/httpd.conf.tmpl.customdoes not exists – create it:
cp -rp /hsphere/local/config/httpd2/httpd.conf.tmpl /hsphere/local/config/httpd2/httpd.conf.tmpl.custom
Download and apply patch https://repo.cloudlinux.com/cloudlinux/sources/mod_fcgid-hsphere/httpd.conf.tmpl.patch to the /hsphere/local/config/httpd2/httpd.conf.tmpl.custom:
wget https://repo.cloudlinux.com/cloudlinux/sources/mod_fcgid-hsphere/httpd.conf.tmpl.patch
patch --fuzz=3 /hsphere/local/config/httpd2/httpd.conf.tmpl.cusom  httpd.conf.tmpl.patch
- Download pre-defined config file https://repo.cloudlinux.com/cloudlinux/sources/mod_fcgid-hsphere/fcgi.conf to
/hsphere/local/config/httpd2:
wget -O /hsphere/local/config/httpd2/fcgi.conf https://repo.cloudlinux.com/cloudlinux/sources/mod_fcgid-hsphere/fcgi.conf
- Download our wrapper file https://repo.cloudlinux.com/cloudlinux/sources/mod_fcgid-hsphere/php-wrapper into
/hsphere/shared/php5/bin/and make it executable:
wget -O /hsphere/shared/php5/bin/php-wrapper https://repo.cloudlinux.com/cloudlinux/sources/mod_fcgid-hsphere/php-wrapper
chmod 755 /hsphere/shared/php5/bin/php-wrapper
- Change permissions for
/hsphere/local/hometo 755:
chmod 755 /hsphere/local/home
- Edit
~httpd2/conf/extra/httpd-hostinglimits.confand add DenyHandlers, so section will look like:
<IfModule mod_hostinglimits.c>
SkipErrors Off
AllowedHandlers cgi-script %php% fcgid-script application/x-miva-compiled
DenyHandlers hs-php5-script hs-php53-script hs-php54-script
</IfModule>
- Configure physical server from H-Sphere admin > E.Manager > P.Servers > server_name [parameters] icon, settings should be:
apache_version = 2
apacha_fastcgi = yes
apache_status = yes
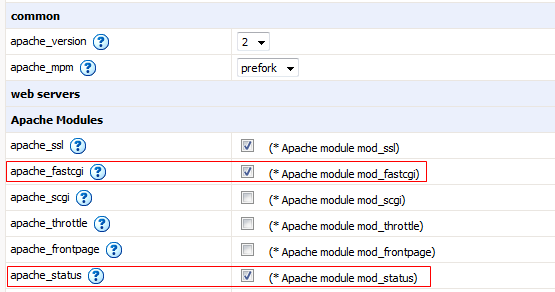
- Set PHP configuration to:
php_libphp5 enabled but not default
php_fastcgi5 enabled and is default
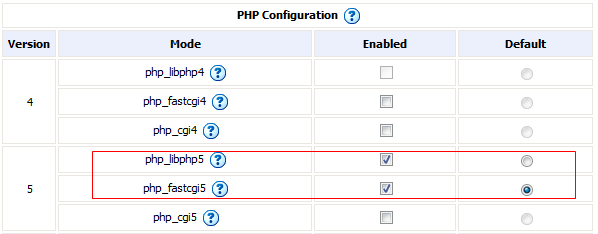
Other options could be configured according to personal needs.
When done - click SUBMIT to apply changes.
Note
After updating H-Sphere software on web server with CloudLinux OS Shared you need to re-apply step 2 (patch usemodule.phpmode) and restart apache with /hsphere/shared/scripts/apache-restart script.
DigitalOcean
How to make CloudLinux OS Shared work on DigitalOcean:
DigitalOcean doesn't support custom kernels. The droplet (VM) always runs DigitalOcean's kernel. CloudLinux OS Shared requires its own kernel. To enable CloudLinux OS Shared work on DigitalOcean droplets, we provide ability to boot into CloudLinux OS Shared kernel using kexec functionality.
How does this work:
- cldeploy script checks for presence of
/etc/digitalocean. If the file detected, we assume that this is DigitalOcean droplet; kexec-toolsare installed;kexecscript will be created in/etc/rc.d/init.d/and set to run right afterrc.sysinit.
When executed, script /etc/rc.d/init.d/kexec detects the latest installed CloudLinux OS Shared kernel, and loads that kernel.
If the system cannot boot into CloudLinux OS Shared kernel (due to any reason), subsequent reboot will skip kexec, allow droplet to boot into DigitalOceans' kernel.
To disable booting into Cloudlinux OS Shared kernel, run:
chkconfig --del kexec
To re-enable booting into CloudLinux OS Shared kernel, run:
chkconfig --add kexec
Adding CloudLinux OS Shared image to DigitalOcean
Custom images are Linux distributions that have been modified to fit the specific needs of DigitalOcean users. You can find some basics of importing a custom CloudLinux OS Shared image below.
Importing custom images to DigitalOcean is free, as you are only charged for the storage of your image. To save money, you can easily import your image, start a Droplet from your image, and delete the image, so you don’t incur any storage costs.
Below, we will describe how to add a qcow2 (QEMU/KVM) CloudLinux OS Shared image as a custom image. You can find more information on image options at https://www.digitalocean.com/docs/images/custom-images/overview/
- To choose the right image, navigate to https://download.cloudlinux.com/cloudlinux/images/#kvm-tab. Several different images are available for download (with and without a control panel).
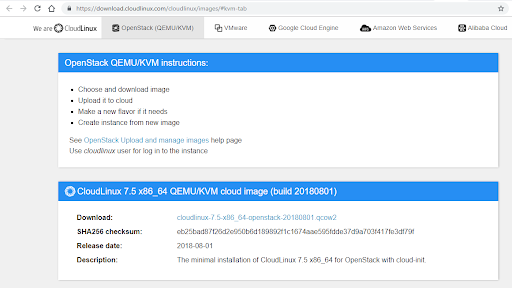
- Copy the link for the image you are going to use and log into cloud.digitalocean.com.
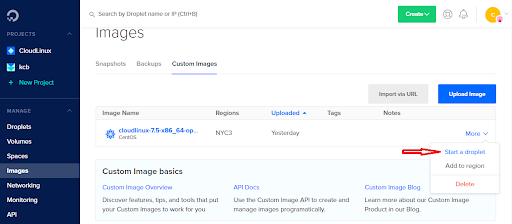
Click Images on the left of the screen and then choose Custom Images. Click the Import via URL button and paste the CloudLinux OS Shared image link.
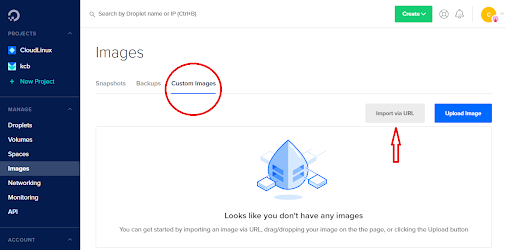
There are several options here, but the most important is Choose a datacenter region, i.e. which datacenter region your Droplets should be created in for this image.
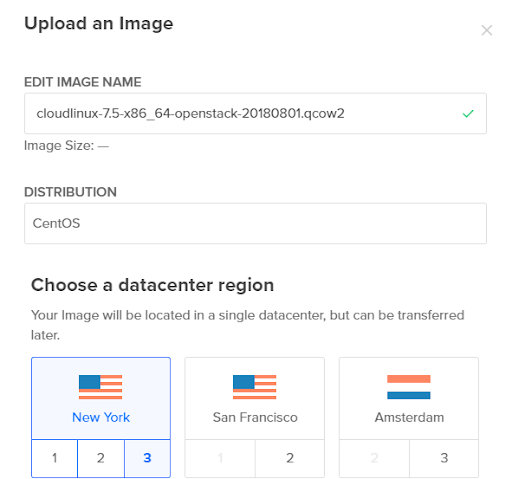
Click the Upload Image button and wait until the image is successfully uploaded.
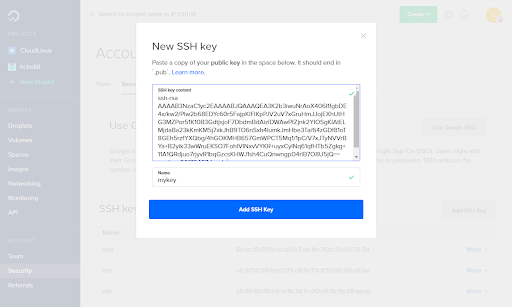
- Add your public key to access your droplets using key-based authentication: navigate to the Security sidebar menu and click the Add SSH Key button.
You can find more information about creating/adding SSH keys in this article.
You will then be able to start a CloudLinux OS Shared Droplet using the image.
Note
Your Droplet will be created in the same datacenter that your custom image resides in.
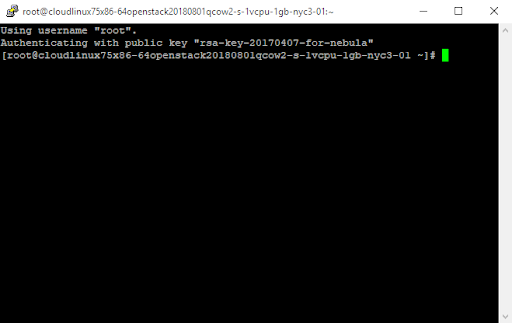
- Now, use your preferred SSH client software to connect to your Droplet. You can find more information on SSH client setup here.
Linode
Warning
If you are installing CloudLinux OS Shared 8, please make sure you’ve read https://www.linode.com/community/questions/19397/i-just-upgraded-my-centos-8-linode-and-now-it-wont-boot-how-do-i-fix-this-proble
CloudLinux OS Shared on Linode KVM
To install CloudLinux OS Shared 7 on Linode KVM server you should perform the following steps:
Deploy CL to your Linode following the steps from this section.
Install grub on your system:
yum install grub2
- Add to
/etc/default/grubthe following parameters:
GRUB_TIMEOUT=10
GRUB_CMDLINE_LINUX="console=ttyS0,19200n8"
GRUB_DISABLE_LINUX_UUID=true
GRUB_SERIAL_COMMAND="serial --speed=19200 --unit=0 --word=8 --parity=no --stop=1"
- Update grub config:
grub2-mkconfig -o /boot/grub/grub.cfg
Edit your Linode profile, change the boot settings to
GRUB 2.Reboot your Linode.
After reboot you will have fully operational CloudLinux OS Shared 7 system and can proceed with other configuration you need.
CloudLinux OS Shared on Linode Xen
To install CloudLinux OS Shared 7 on Linode Xen please perform the following steps:
Deploy CL to your Linode following the steps from this section.
Create the file
/boot/grub/menu.lstwith the following content:
timeout 5
title CloudLinux 7.1, $KVERSION
root (hd0)
kernel /boot/vmlinuz-$KVERSION root=/dev/xvda1 ro quiet
initrd /boot/initramfs-$KVERSION.img
where $KVERSION is the version of the installed CloudLinux OS Shared 7 kernel.
Note
You will need to update /boot/grub/menu.lst manually after every kernel update.
Switch boot settings to
pv-grub-x86_64and switch offAuto-configure networkingin Linode settings.Reboot your Linode.
In case if you will migrate to KVM later you will need only switch the boot settings to GRUB 2.
Virtuozzo and OpenVZ
Virtuozzo 7 and OpenVZ 7
To use CloudLinux Shared Pro in Virtuozzo container, please update the next packages to the specified versions (or higher):
- alt-php-ssa-0.3-4
- alt-php-xray-0.5-8
- cloudlinux-linksafe-1-5.2
- accelerate-wp-1.0-11
- lvemanager-7.7.5-2
- alt-python27-cllib-3.2.32-1
- pam_lve-0.4-3
- lve-wrappers-0.7.7-1
- lve-utils-6.4.3-1
- cagefs-7.5.1-1
- liblve-2.1-11
- tuned-profiles-cloudlinux-0.2-3
Available Functionality
- Lsapi
- AccelerateWP
- Hardened PHP
- Website monitoring and Slow Site Analyzer
- X-Ray
- CageFS
- PHP Selector
- Wizard
- Dashboard
- Python Selector
- Node.js Selector
Requirements
- Virtuozzo 7 as server system
- Virtuozzo container with CloudLinux Shared Pro 8
- cloudlinux-updates-testing repo is enabled (+
yum clean all)
How to install
- Prepare Virtuozzo container with ostemplate almalinux-8-x86_64
- Enter to the container
- Install cPanel:
cd /home && curl -o latest -L https://securedownloads.cpanel.net/latest && sh latest
- Download and start cldeploy:
wget https://repo.cloudlinux.com/cloudlinux/sources/cln/cldeploy
chmod 775  cldeploy
./cldeploy -k SHARED_PRO_CLN_KEY_HERE --testing-repo
- You don't need to restart the container after the cldeploy script finished execution.
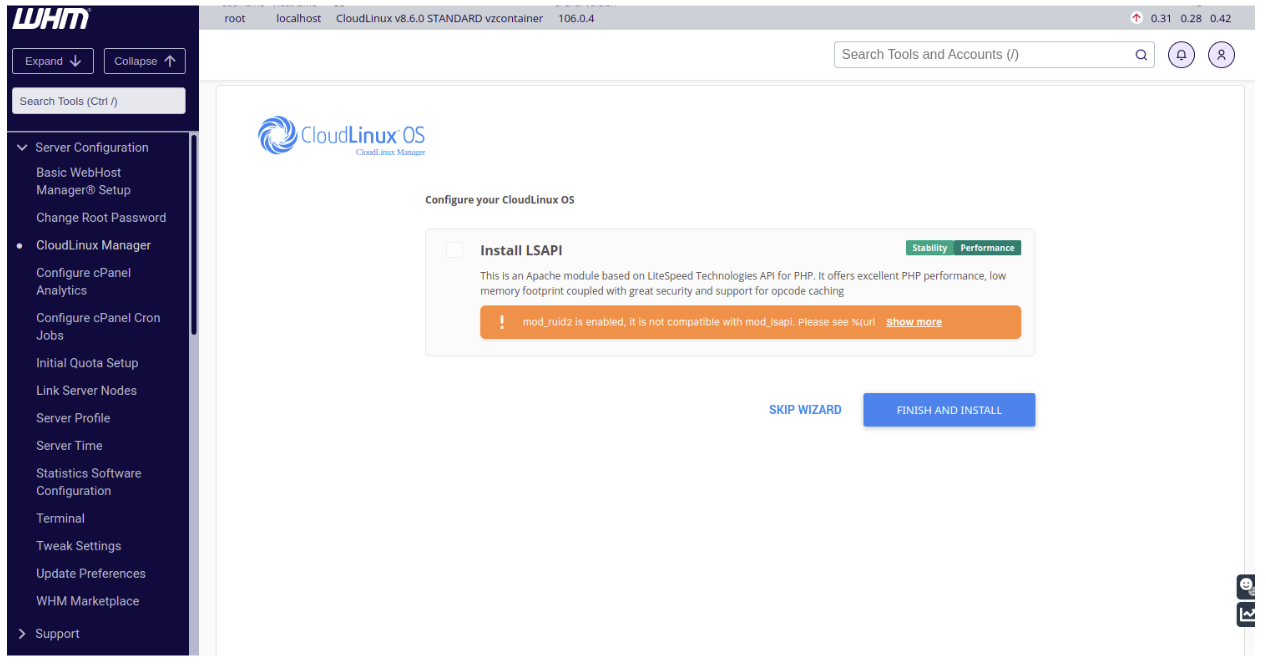
CloudLinux Wizard
Wizard is a tool to set up CloudLinux OS components.
In the current version only the lsapi module can be installed.
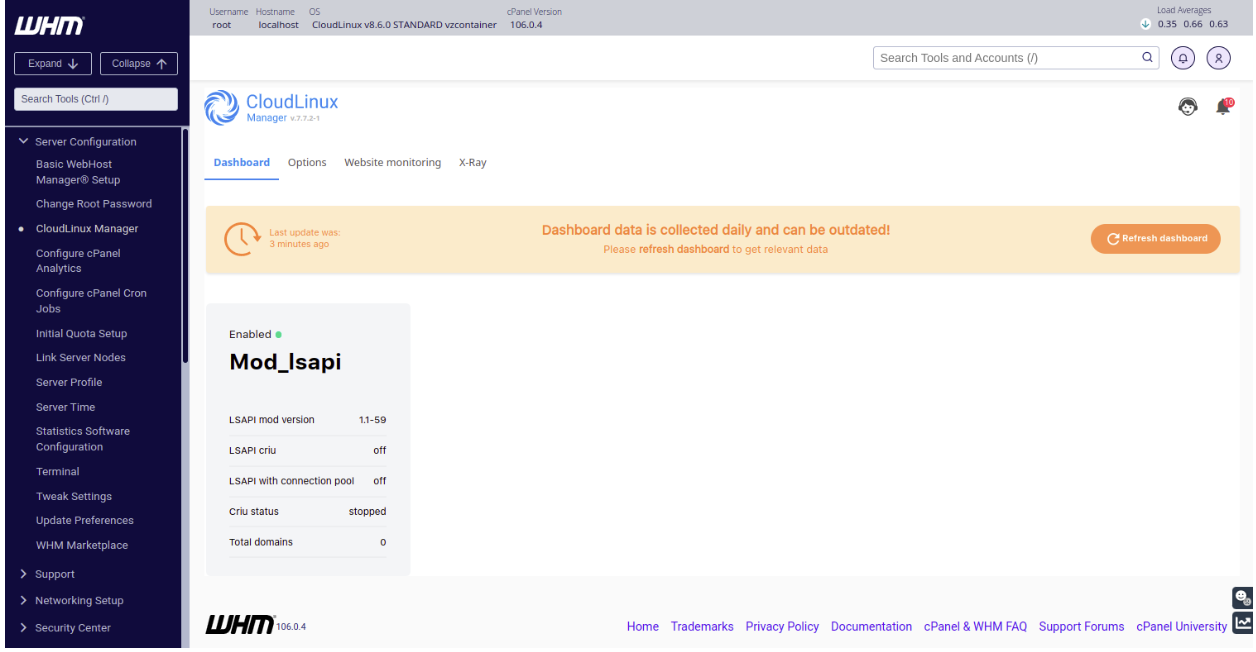
Dashboard
CloudLinux OS Shared dashboard provides a quick overview of statistics and all administrative information for server administrators.
In the current version only statistics about the lsapi module is available.
Lsapi
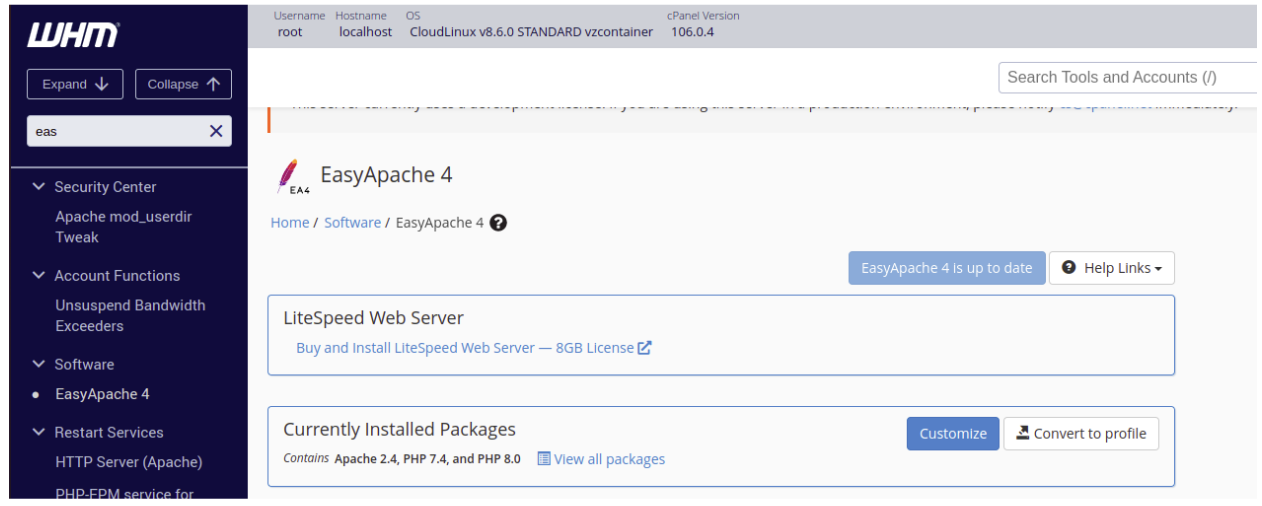
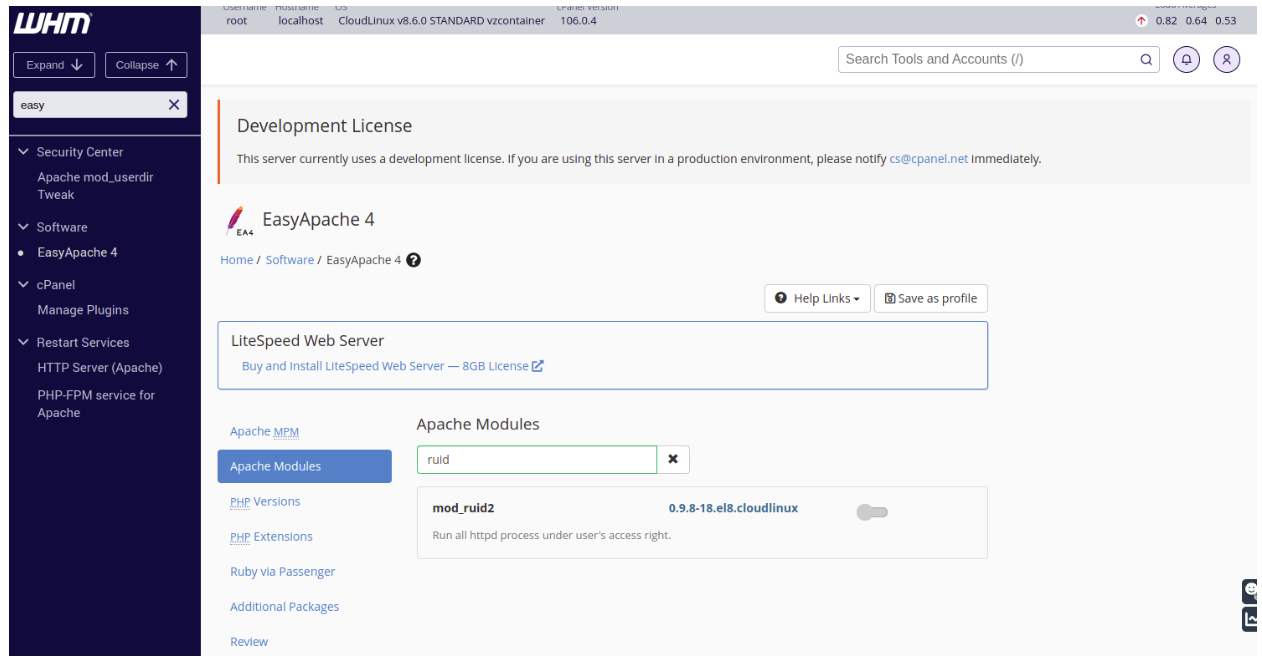
To install Lsapi via CloudLinux Wizard, please turn off mod_ruid2 in EasyApache 4 -> Apache Modules.
Note
For EasyApache select Currently Installed Packages.
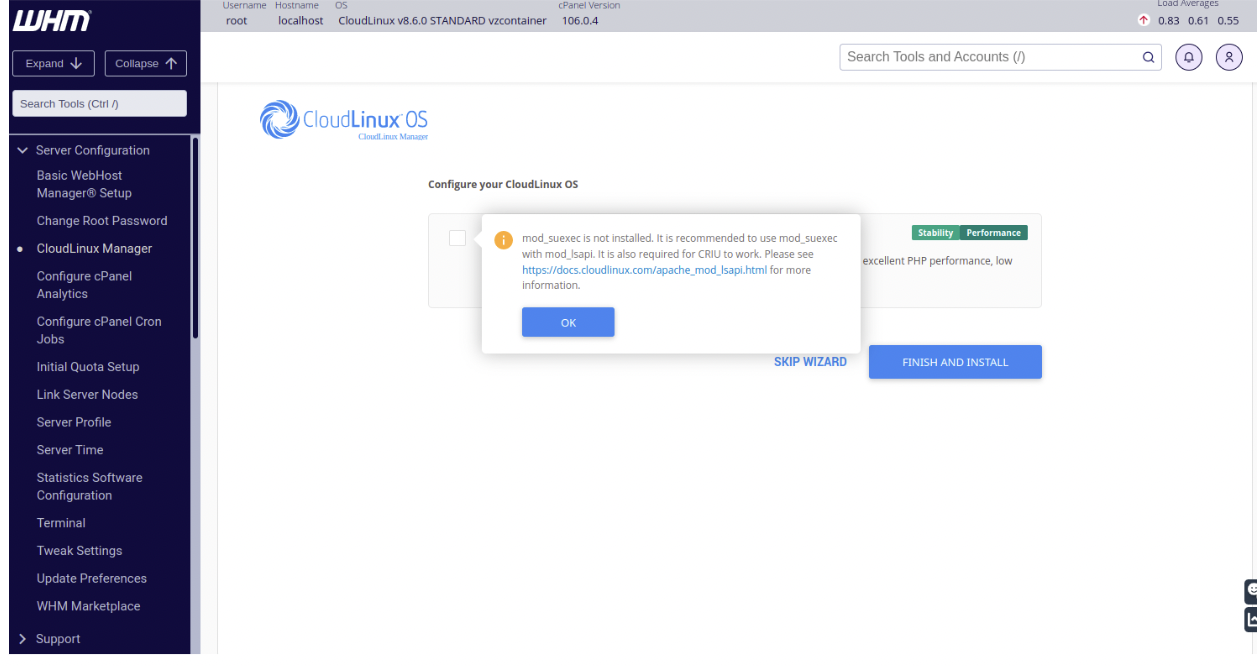
Note
Currently mod_suexec is not available in containers and will be released in future versions. Just ignore this message, click "ok" and continue installing lsapi via the Wizard.
You can find the complete lsapi documentation here.
AccelerateWP
If you'd like to try Smart Advice and AccelerateWP you should participate in the Beta tester program. To become a beta tester, please send your request at our Beta program page with the signup form here. Once you submit the request, we will send you a confirmation email with program details, terms of use, and installation instructions.
All additional information can be found here.
CageFS
You can find CageFS documentation here.
Attention!
Kernel config variables are not available for the Virtuozzo container!
PHP Selector
How to install
- To install via SSH, update your packages in the container:
yum update alt-python27-cllib pam_lve lve-wrappers lve-utils liblve tuned-profiles-cloudlinux lvemanager - The following commands can be executed via SSH or via CloudLinux Wizard Via SSH:Via CloudLinux Wizard (cPanel only):
yum install cagefs
yum groupinstall alt-php
cagefsctl –init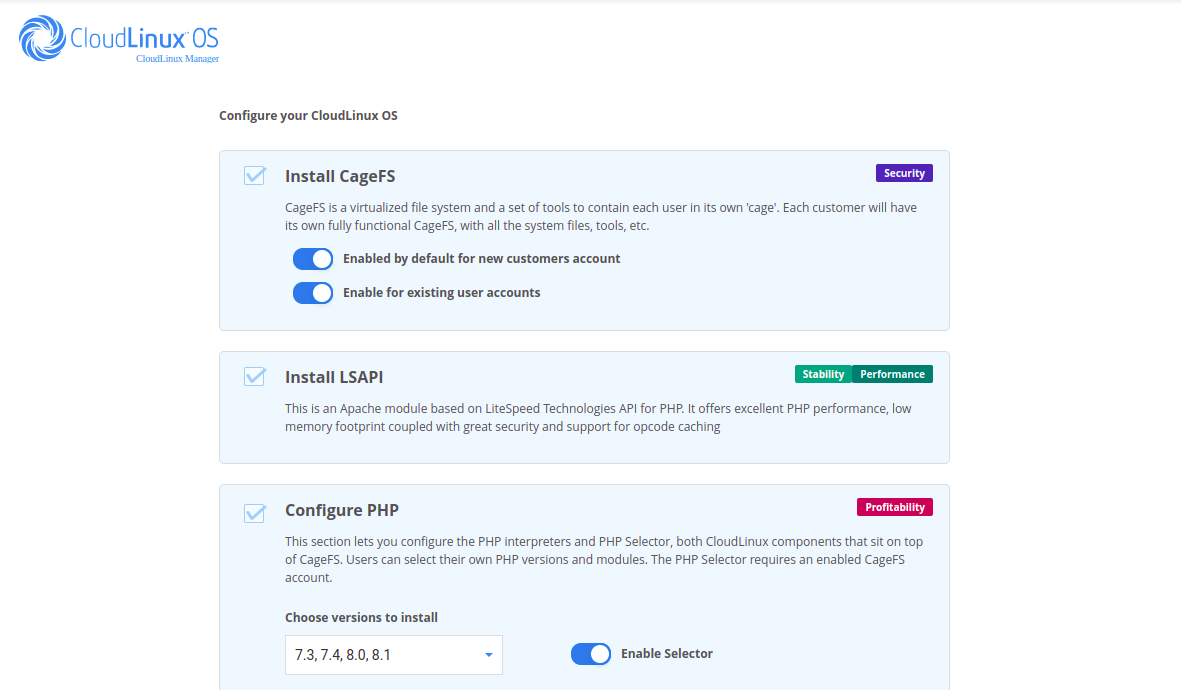
- Make sure compatible handlers are installed: Via SSH:Or
yum install ea-apache24-mod_suexec
yum install ea-apache24-mod_suphp
Install lsapi
It's also possible to install via CloudLinux Wizard:
Themod_suexecandmod_suphpcan be installed via cPanel EasyApache4 installation tool. - Make sure users are enabled in the CageFS:
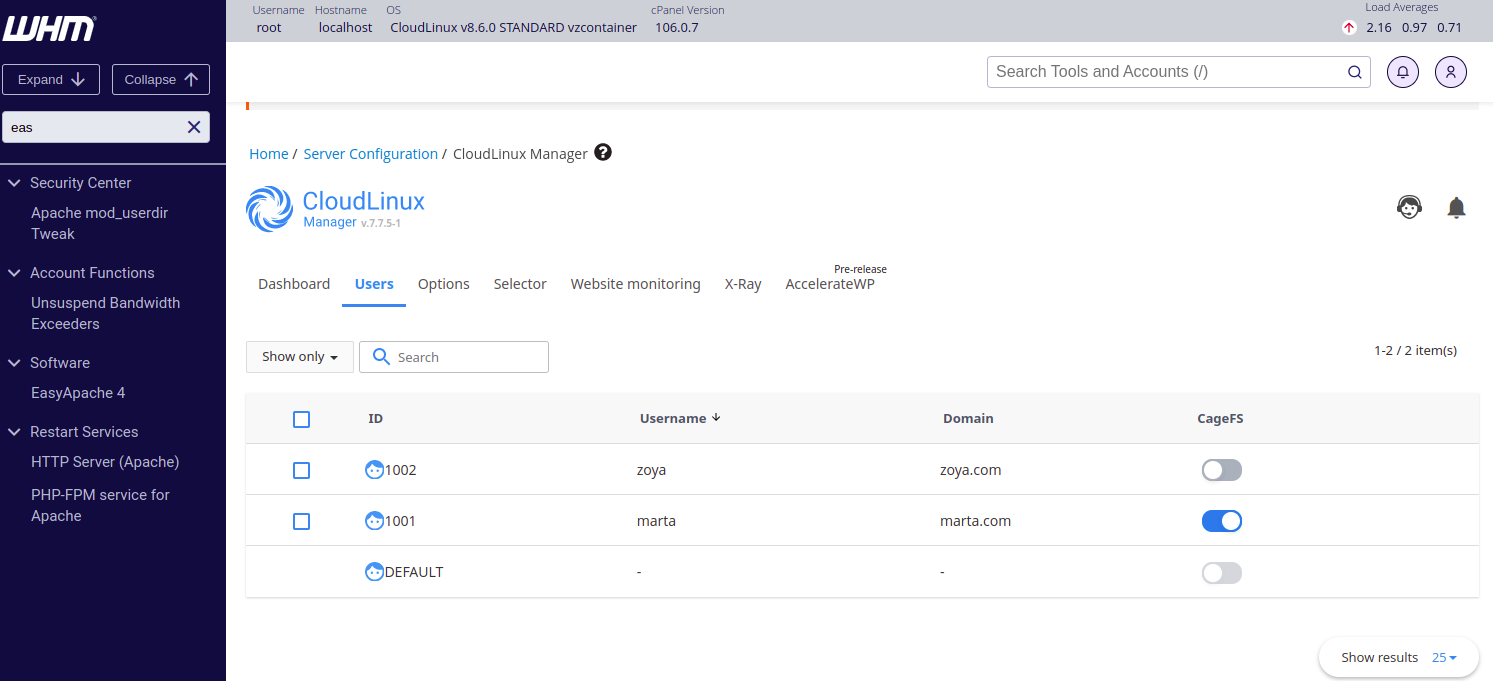
Useful links:
Python Selector
Python Selector for Virtuozzo is available starting from the following packages version:
- lve-2.1-14
- alt-python27-cllib-3.2.47-1
- lvemanager-7.8.8-1
- cagefs-7.5.5-1
Please update or install the packages mentioned above using the following command:
yum update lve alt-python27-cllib lvemanager cagefs --enablerepo=cloudlinux-updates-testing
The installation of Python Selector is available via CloudLinux Wizard. Aslo, the information about manual installation can be found here.
Information about working with Python Selector via GUI can be found here.
Node.js Selector
Node.js Selector for Virtuozzo is available starting from the following packages version:
- lve-2.1-14
- alt-python27-cllib-3.2.47-1
- lvemanager-7.8.8-1
- cagefs-7.5.5-1
Please update or install the packages mentioned above using the following command:
yum update lve alt-python27-cllib lvemanager cagefs --enablerepo=cloudlinux-updates-testing
Installation for cPanel
To use Node.js Selector, install Node.js packages by running the following command:
yum groupinstall alt-nodejs
CloudLinux OS Shared 7 supports both ea-ruby24-mod_passenger and ea-ruby27-mod_passenger.
Note
The ea-apache24-mod-alt-passenger is deprecated in favor of ea-ruby24-mod_passenger and ea-ruby27-mod_passenger.
General Information
General information can be found here.
Requirements
Information about Requirements can be found here.
Limitations
Information about limitations can be found here.
If during Node.js Selector usage on cPanel servers you get "ENOMEM npm ERR! errno-12" error, try to increase Memory limit in cPanel WHM → Server Configuration → Tweak Settings → System → Max cPanel process memory, then restart cPanel service with the following command to apply changes:
systemctl restart cpanel.service
Node.js Deployment
Information about Node.js deployment can be found here.
Remote Usage of Node.js Interpreters
Information about Remote usage of Node.js interpreters can be found here.
Node.js Selector UI
Information about working with Node.js Selector via UI can be found here.
FAQ
Q: My CloudLinux Manager-> options menu is empty.
A: You don't have AccelerateWP enabled and PHP X-Ray enabled, so there is nothing to configure. Install and enable any of those features to see settings. This minor UI issue will be fixed in future updates.
Q: Dashboard says both: that data is updated and that I need to refresh it and both panels never disappear.
A: Just click the refresh button and reload the page, data will be loaded soon.
Q: Website monitoring does not appear enabled after clicking the toggle.
A: Just reload the page, the feature will be displayed as active.
Q: Website monitoring proposes me to enable autotracing while I disable it.
A: Issue is known and will be fixed soon.
Known Restrictions and Issues
We do not recommend using disk quota inside of containers - PHP Selector may be not functional for a user when disk quota is exceeded for the user.
The following systemd directives may break CageFS inside containers:
- PrivateDevices
- PrivateMounts
- PrivateTmp
- ProtectSystem
- ReadOnlyDirectories
- ReadWriteDirectories
- InaccessibleDirectories
- ProtectHome
Some servers require increasing
fs.ve-mount-nron the host node. If it wasn't done, then:- CageFS will throw errors related to mounting e.g.
Can't mount jail for user,mount(2) system call failed: Cannot allocate memoryetc. - on a host node (but not in the container!) there will be errors
reached the limit on mountsin/var/log/messagesthrowed by kernel
To increase
fs.ve-mount-nron a host node:- add
fs.ve-mount-nr = 15000to/etc/sysctl.conf; - apply it with the
sysctl -pcommand.
In some very rare cases the value should be increased higher, up to 50000.
- CageFS will throw errors related to mounting e.g.
Virtuozzo 6 and OpenVZ 6
Installation
Note
Make sure all containers are stopped prior to doing this operation. Or reboot the server after the installation.
Note
Please make sure you have vzkernel-headers and vzkernel-devel packages installed.
yum install vzkernel-headers vzkernel-devel

wget -P /etc/yum.repos.d/ https://repo.cloudlinux.com/vzlve/vzlve.repo
yum install lve-kernel-module
This will setup LVE module for VZ kernel, as well as DKMS to update that module each time VZ kernel is updated.
After this is done, you can add LVE support for any container on a node, at any time.
To make CloudLinux OS Shared work inside VZ container, VZ node has to be enabled. This should be done for any container where LVE support needs to be added:
vzctl set CT_ID --devnodes lve:rw --save
To disable LVE support for Container:
vzctl set CT_ID --devnodes lve:none --save
Inside the container, follow standard CloudLinux installation procedures.
CloudLinux OS Shared license is required for each VZ container.
Note
Some servers require increasing fs.ve-mount-nr on host node, otherwise CageFS will throw errors. Look for details here
Available functionality
- CageFS
- PHP Selector
- max entry processes
- mod_lsapi
- MySQL Governor
LILO boot loader
CloudLinux OS can be deployed on servers that don't have grub installed, by installing хороgrub first.
To do that:
Make sure grub and kernel packages are not excluded. Edit file
/etc/yum.confand checkexclude=line for presence ofkernel* grub*.Backup lilo config file:
mv /etc/lilo.conf /etc/lilo.conf.bak
Convert to CloudLinux OS Shared using deploy2cl utility.
Check
grub.conf– it should be configured automatically:
cat /boot/grub/grub.conf
............

default=0
timeout=5
title CloudLinux Server (2.6.18-294.8.1.el5.lve0.7.33)
     kernel /boot/vmlinuz-2.6.18-294.8.1.el5.lve0.7.33 root=/dev/sda1  ro
     root (hd0,0)
     initrd /boot/initrd-2.6.18-294.8.1.el5.lve0.7.33.img
     title linux centos5_64
     kernel /boot/bzImage-2.6.33.5-xxxx-grs-ipv4-64 root=/dev/sda1  ro
     root (hd0,0)
- Install grub to master boot record:
/sbin/grub-install /dev/sda
- Reboot and check that you are running CloudLinux OS Shared.
uname -rshould show something like:2.6.18-294.8.1.el5.lve0.7.33.
Switch license
You can convert your existing CloudLinux OS installation to CloudLinux OS Shared.
- Obtain new key from CLN
- Run
rhnreg_ks --force --activationkey=<new_key>
You can pass --migrate-silently argument to skip confirmation.
Uninstalling
You can always uninstall CloudLinux OS. In this case, the system will be converted back to AlmaLinux or CentOS* (Depends on what system the conversion was done from).
CentOS Linux 8 reached End Of Life (EOL) on December 31st, 2021. You can still uninstall CloudLinux and return to CentOS 8, but we don't guarantee stable operation of the system and its repositories after this action.
The following actions will be taken:
- LVE related packages will be removed.
- CloudLinux OS Shared repositories & yum plugin will be removed.
- AlmaLinux or CentOS* repositories will be set up.
In the end, the script will provide instructions on how to finish the conversion back to AlmaLinux or CentOS*. That will require removal of CloudLinux OS Shared kernel (manual step), and installation of AlmaLinux or CentOS* kernel (if needed).
Do not forget to free up a CloudLinux OS Shared license by removing the server from the Servers section of your CLN account. After that, if you don't intend to use the license anymore, you can remove it to avoid being billed for it.
To uninstall CloudLinux OS, run:
wget -O cldeploy https://repo.cloudlinux.com/cloudlinux/sources/cln/cldeploy
sh cldeploy -c
Now you have converted back to AlmaLinux or CentOS* and it is the time to install kernel.
To delete CloudLinux OS kernel, run (change the kernel package name to the one you've been using):
rpm -e --nodeps $(rpm -qa | grep kernel | grep lve)
To install new AlmaLlinux or CentOS* kernel once you deleted CloudLinux OS Shared kernel, run the following command:
yum install kernel
If yum says that the latest kernel is already installed, it is OK.
Please check your bootloader configuration before rebooting the system.
To remove unused kmods and lve libs, run:
yum remove lve kmod*lve*
Kernel package and related LVE packages should be deleted and the required kernel will be installed.
Before the reboot, the following command should be executed for restoring Apache and httpd.conf without mod_hostinglimits.
For EasyApache 3:
/scripts/easyapache --build
For EasyApache 4:
/usr/local/bin/ea_install_profile --install /etc/cpanel/ea4/profiles/cpanel/default.json
Note
Some of the packages from CloudLinux OS repo will still be present. They are the same as AlmaLinux or CentOS* packages, and don't have to be removed. They will be updated in the future from AlmaLinux or CentOS* repositories, as new versions come out.