Limits
- Understanding limits
- SPEED limit
- Memory limit
- IO
- IOPS
- Entry processes
- Number of processes
- Inodes
- Network traffic bandwidth control and accounting system
- Limits validation
- Compatibility matrix
- Reseller Limits
- WEB interface resource limiting modes
CloudLinux OS Shared has support for the following limits:
| Limits | Units | Default Value | Description | Supported Kernels / OS |
| SPEED | % of a core, or HZ | 100% | CPU speed limit, relative to a single core, or specified in HZ (portable across CPU s) | all |
| CPU [deprecated] | % of CPU | 25% | CPU Limit (smallest of CPU & NCPU is used) | all |
| NCPU [deprecated] | number of cores | 1 CORE | Max number of cores (smallest of CPU & NCPU used) | all |
| PMEM | KB | 1024MB | Physical memory limit (RSS field in ps/RES in top). Also includes shared memory and disk cache | all |
| VMEM | KB | 0 | Virtual memory limit (VSZ field in ps/VIRT in top) | all |
| IO | KB/sec | 1024KB/sec | IO throughput - combines both read & write operations | CL8, CL7, CL6 lve1.1.9+ kernel |
| IOPS [lve1.3+] | Operations per second | 1024 | Restricts total number of read/write operations per second. | all |
| NPROC | number | 100 | Max number of processes within LVE | all |
| EP | number | 20 | Limit on entry processes. Usually represents max number of concurrent connections to apache dynamic scripts as well as SSH and cron jobs running simultaneously. | all |
Note
It is always better to disable VMEM limits (set them to 0) in your system at all because they are deprecated and are causing unexpected issues.
Bellow you can find recommendations for your typical shared hosting setup. The recommendations don't depend on the power of your server. They only depend on how "fast" you want your hosting accounts to be.
Typical Hosting Account
- SPEED=100%
- PMEM=1GB
- VMEM=0
- IO=1024KB/s
- IOPS=1024
- NPROC=100
- EP=20
High End Hosting Account
- SPEED=200%
- PMEM=2GB
- VMEM=0
- IO=4096KB/s
- IOPS=1024
- NPROC=150
- EP=40
Understanding limits
LVE is a kernel level technology developed by the CloudLinux team. The technology has common roots with container based virtualization and uses cgroups in its latest incarnation. It is lightweight and transparent. The goal of LVE is to make sure that no single web site can bring down your web server.
Today, a single site can consume all CPU, IO, Memory resources or Apache processes - and bring the server to a halt. LVE prevents that. It is done via collaboration of Apache module, PAM module and kernel.
mod_hostinglimits is Apache module that:
- detects VirtualHost from which the request came;
- detects if it was meant for CGI or PHP script;
- puts Apache process used to serve that request into LVE for the user determined via SuexecUserGroup directive for that virtual host;
- lets Apache to serve the request;
- removes Apache process from user's LVE.
The kernel makes sure that all LVEs get fair share of the server's resources, and that no customer can use more then the limits set for that customer. Today we can limit CPU , Memory (virtual and physical), IO, number of processes as well as the number of entry processes (concurrent connections to apache).
Each LVE limits amount of entry processes (Apache processes entering into LVE) to prevent single site exhausting all Apache processes. If the limit is reached, then mod_hostinglimits will not be able to place Apache process into LVE, and will return error code 508. This way very heavy site would slow down and start returning 508 errors, without affecting other users.
- If the site is limited by CPU or IO, then the site will start responding slower.
- If the site is limited by memory or number of processes limits, then the user will receive 500 or 503 errors that server cannot execute the script.
Checking if LVE is installed
To use LVE you should have CloudLinux OS Shared kernel installed, and LVE module loaded. You can check the kernel by running the following command:
uname -r
You should see something like 2.6.32-896.16.1.lve1.4.53.el6.x86_64. The kernel should have lve in its name. To see if lve kernel module is loaded run:
lsmod|grep lve

lve                    46496  0
Starting from kernels lve1.4.x iolimits module is a part of kmod-lve and could not be used separately.
You can toggle LVE on/off by editing
/etc/sysconfig/lveand settingLVE_ENABLEvariable toyesorno.Setting it to
yeswill enable LVE, setting it tonowill disable LVE.You can toggle IO limits by editing
/etc/sysconfig/iolimitsand settingIO_LIMITS_ENABLEDvariable toyesorno.
You need to reboot the server, after you set this option to make the changes live.
Controlling LVE limits
The best way to control LVE limits is using LVE Manager in your favorite control panel. Alternatively, you can use command line tool lvectl to control limits. The limits are saved in /etc/container/ve.cfg
Example:
<?xml version="1.0" ?>
<lveconfig>
 <defaults>
         <cpu limit="25"/>
         <ncpu limit="1"/>
         <io limit="1024"/>
         <mem limit="262144"/>
         <other maxentryprocs="200"/>
         <pmem limit="262144"/>
         <nproc limit="0"/>
 </defaults>
 <lve id="532">
         <cpu limit="30"/>
         <ncpu limit="5"/>
 </lve>
</lveconfig>
Sets CPU limit to 25%, IO limit to 1024KB/s, virtual memory limit to 1GB (memory limit is set as a number of 4096 bytes pages), physical memory limit to 1GB, CPU cores per LVE to 1, maximum entry processes to 200 and no limit for number of processes for all LVEs. It also sets the limit of 30% and number of processes limit to 5 for LVE with ID 532.
Checking LVE usage
One of the best way to monitor current usage is lvetop:
lvetop

         ID     EP    PNO    TNO    CPU    MEM    I/O
         test    1     2            2     2%    728     0
You can also check the content of /proc/lve/list file that has all the data about LVE usage for all LVEs:
cat /proc/lve/list

4:LVE        EP        lCPU        lIO        CPU        MEM        IO        lMEM        lEP        nCPU        fMEM        fEP
0        0        75        25        0        0        0        262144        20        2        0        0
500        0        75        25        0        0        0        4294967 20        3        2        1
700        1        75        25        1403247        202        0        262144        20        2        0        0
Additionally, you can use tool lveps to see CPU usage, and processes within LVE.
SPEED limit
Note
lve-utils 1.4+
CPU SPEED limit allows to set CPU limit in terms of % of a single core, or as a fixed number of Hz.
--speed=XX% would set performance relative to one core.
For example:
--speed=50%would mean 1/2 core.--speed=100%would mean 1 core,--speed=150%would mean 1.5 cores
--speed=XXmhz would automatically detect CPU speed of each core, and adjust the CPU scheduler to make sure user cannot go over that limit.
For example, on 1ghz CPU , setting of --speed=2ghz would mean 2 cores, while on 4ghz CPU same setting would mean 1/2 of a core.
This should allow hosting companies to set same approximate performance level limits across different hardware using single setting.
Note
Note. We strongly recommend setting CPU speed limits not less than 100%. As such limits cause CPU context switching which leads to increased %sys.
Memory limit
Memory is controlled using virtual (VMEM) and physical (PMEM) memory limits.
Virtual memory limit
Virtual memory limit corresponds to the amount of memory processes can allocate within LVE. You can see individual process virtual memory usage by monitoring VIRT column in top output for the process.
When process tries to allocate more memory, CloudLinux OS Shared checks if the new total virtual memory used by all processes within LVE is more then a limit set. In such case CloudLinux OS Shared will prevent memory from being allocated and increments fVMEM counter. In most cases, but not all of them - this causes process to fail. For CGI/PHP scripts it will usually cause 500 and 503 error.
Note
It is recommended to disable VMEM limits (set them to 0) in your system at all because they are deprecated in CloudLinux OS Shared 6 and 7 system and can cause unexpected issues.
Physical memory limit
Physical memory limit corresponds to the amount of memory actually used by end customer's processes. You can see individual process physical memory usage by monitoring RES column in top output for the process. Because similar processes (like PHP) share a lot of their memory, physical memory usage is often much lower then virtual memory usage.
Additionally physical memory includes shared memory used by the customer, as well as disk cache (disk cache may not be accounted in the statistics, see Disable Page Cache accounting below). In case of disk cache – if a user is starting to lack physical memory, the memory used for disk cache will be freed up, without causing any memory faults.
When LVE goes over physical memory limit, CloudLinux OS Shared will first free up memory used for disk cache, and if that is not enough, it will kill some of the processes within that LVE, and increment fPMEM counter. This will usually cause web server to serve 500 and 503 errors. Physical memory limit is a much better way to limit memory for shared hosting.
Disable Page Cache accounting
Since kmod-lve 2.0-53 (for CL8) and 2.1-17 (for CL9) we have released the new sysctl param kernel.memstat_nocache.
By default the LVE kernel module includes page cache amount when it accounts a physical memory consumption per-LVE. It can lead to the following case: 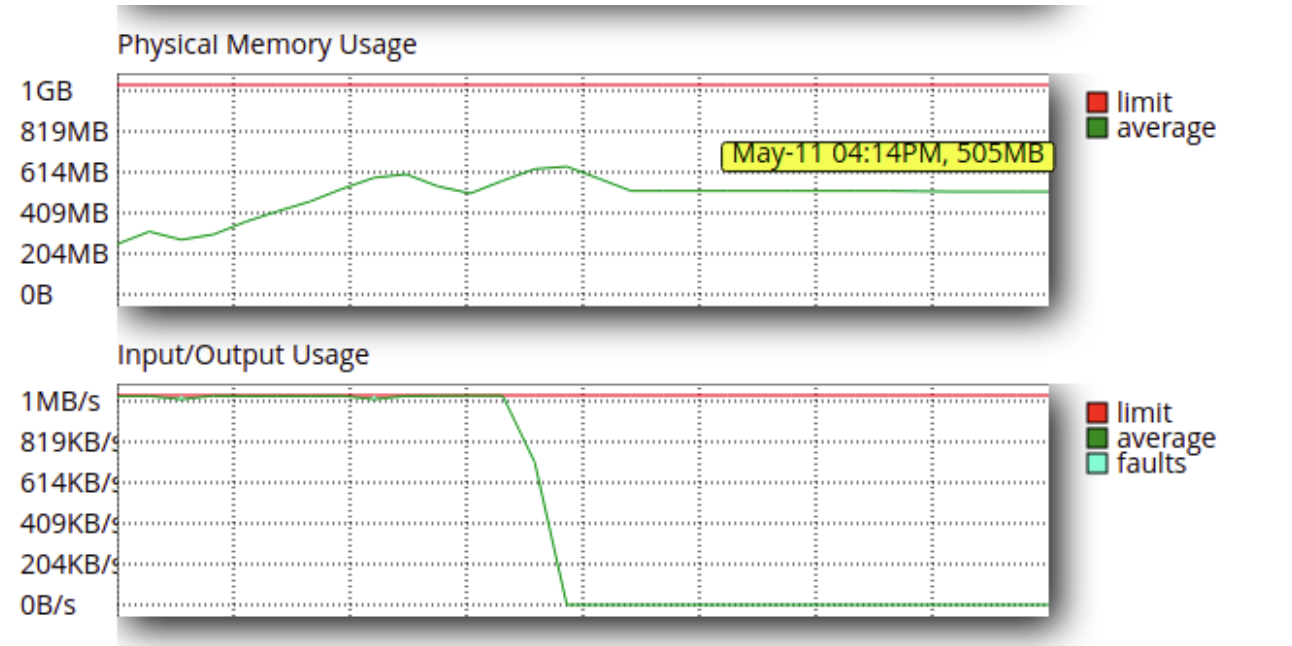
The page cache stays in the memory after the processes that triggered him ended their work. It potentially confuses end customers.
You can check the statistics by the following CLI command:
lveps
or see the statistics in your Hosting Panel web-interface: Cloudlinux manager -> Statistics.
To make the statistics doesn’t count the page cache you could just enable the new sysctl option:
sysctl -w kernel.memstat_nocache=1
Note:
This option is enabled by default for new customers since the release of kmod-lve 2.0-53 (for CL8) and 2.1-17 (for CL9).
Note:
Kernel memory accounting is disabled by default on CloudLinux OS 7/8/9 systems due to incompatibility with the kmodlve kernel module. This feature may trigger long timeouts in the kernel in highly loaded systems that can lead to kernel crashes. CloudLinux OS 7 kernel is compiled without it, while in the 8 and 9 systems we use cgroup.memory=nokmem kernel parameter in the CL’s tuned profiles and you can enable it by changing our profile (may be overwritten after update) or supporting your own one.
Troubleshooting
Checking personal users disk cache (If lveinfo shows memory usage but there are no processes there)
If you see no processes under some user, but lve manager keeps telling it is using some memory, then most probably memory is taken by users disk cache. To check personal users disk cache (if lveinfo shows memory usage but not processes there) for CloudLinux OS Shared 6:
cat /proc/bc/XXX/meminfo
On CloudLinux OS Shared 7 and CloudLinux OS Shared 6 Hybrid systems, the file is different:
cat /proc/bc/lveXXX/meminfo
Look for this line: Cached: 67300 kB
On CloudLinux OS Shared 8 and CloudLinux OS Shared 7 Hybrid systems:
cat /sys/fs/cgroup/memory/lveXXX/memory.stat
Look for this line: cache 1662976
where XXX is a user id, could be found out by:
id username
IO
IO limits restrict the data throughput for the customer. They are in KB/s. When limit is reached, the processes are throttled (put to sleep). This makes sure that processes within LVE cannot go over the limit,. Yet don't stop working, nor getting killed – they just work slower when the limit is reached.
IO limits are available with kernels el6.lve1.x and higher.
The IO limits will only affect DISK IO, and will have no effect on network. It also doesn't take into consideration any disk cache accesses. So, even if file is loaded from disk cache 1000 times – it will not be counted towards IO limits.
IOPS
IOPS limits restrict the total number of read/write operations per second. When the limit is reached the read/write operations stop until current second expires.
Entry processes
Entry processes limit controls the number of entries into LVE. Each time a process 'enters' into LVE, we increment the counter. Each time process exits LVE, we decrement the counter. We don't count processes that are created inside LVE itself. It is also know as 'Apache concurrent connections' limit.
The process enter's into LVE when there is a new HTTP request for CGI/PHP.
This limit was created to prevent DoS attacks against web server. One of the fairly popular attacks is to tie up all the Apache connections by hitting some slow page on a server. Once all Apache slots are used up, no one else will be able to connect to the web server, causing it to appear to be down. The issue is worsened by CPU limits, as once site starts to get slow due to CPU limit – it will respond to requests slower and slower, causing more and more connections to be tied up.
To solve that, we have created entry processes (often called concurrent connections) limit. It will limit the number of concurrent connections to Apache, causing web server to serve error 508 page ( Resource Limit Reached), once there number of concurrent requests for the site goes above the limit.
In the case of working with the LiteSpeed web server, the Entry processes limit implementation differs from the one implemented in Apache.
Therefore, when there is the same load with concurrent requests to Apache and LiteSpeed, the Entry processes limit may differ depending on the web server.
In the case of LiteSpeed the Entry processes limit increases with the number of lsphp master processes, for example in workgroup mode, the web server only starts one lsphp master process, then this process will fork children processes to process requests without increasing the Entry processes limit.
If you'd like to set the concurrent connection limit with LiteSpeed, you can use the standard web server tools like https://docs.litespeedtech.com/cp/cpanel/antiddos/#connection-throttling.
Number of processes
NPROC controls the total number of processes and threads within LVE. Once the limit is reached, no new process can be created (until another one dies). When that happens NPROC counter is incremented. Apache might return 500 or 503 errors in such case.
Inodes
Note
Supported on cPanel, Plesk, and DirectAdmin control panels
LVE Manager inodes limits extension allows setting inode limits for the customers. An inode is a data structure on a file system used to keep information about a file or a folder. The number of inodes indicates the number of files and folders an account has. inodes limits work on the level of disk quota , and will be enabled on /home partition only.
LVE Manager allows to set soft and hard IO limit.
Hard limit prevents a user from writing data to disk.
Soft limit can be exceeded for a period of time. The global grace period can be set using:
edquota -t.You can set inodes limits using LVE Manager , the same way you would set any other LVE Limits:
More about the `edquota` utility usage
The default grace period is seven days. It means a user or a group will be able to use resources (block size or inodes after the soft limit) for seven days. After seven days they will be denied to use of any additional resources.
To set a grace period for a user:
edquota -T [username]
To set a grace period for a group:
edquota -T -g [groupname]
To adjust the global grace period:
edquota -t
You can find a full manual for this tool here.
Note
We do not collect statistical information on the inodes like we do for other LVE limits.
The limits can be set on the level of individual account or package.
Sometimes disk quota breaks, so do inodes limits. You can reset them through the Options tab of LVE Manager:
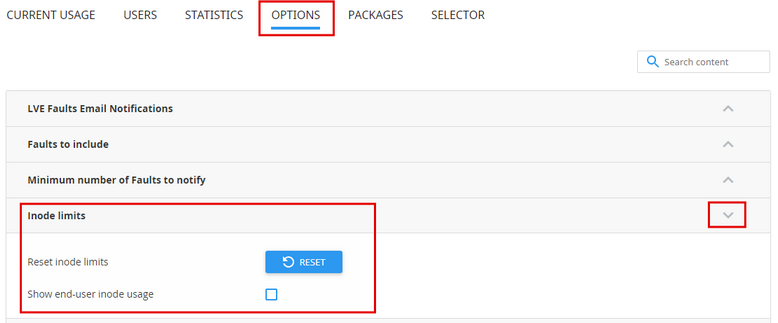
The same can be achieved using cloudlinux-config CLI utility
End users can monitor their inodes usage through cPanel only (not available on Plesk and DirectAdmin):
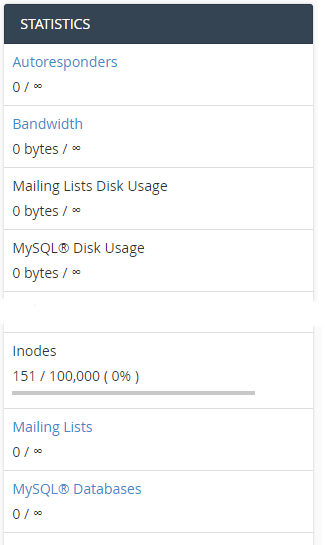
End user can also see the usage inside resource usage menu.
Network traffic bandwidth control and accounting system
Note
Requires kernel lve1.4.4.el6 or higher, or lve1.4.56.el7 or higher
Network traffic bandwidth control and accounting systems in CloudLinux OS Shared 6 allows for each LVE container:
- Limiting outgoing network traffic bandwidth
- Accounting incoming and outgoing network traffic
Note
The system supports IPv4 only protocol.
How to limit outgoing network traffic
All outgoing IP packets generated inside LVE container are marked with LVE identifier. Traffic control utility tc from iproute2 package uses this marker to set required bandwidth.
Note
CloudLinux OS Shared doesn’t limit the network traffic itself, it only marks IP packets with specific LVE id.
Example 1:
- We create class with HTB qdiscs and rate 10kbit :
tc qdisc add dev eth1 root handle 1: htb

tc class add dev eth1 parent 1: classid 1:1 htb rate 10kbit
- All packets marked with LVE id will be processed by class 1:1 (rate 10kbit ).
tc filter add dev eth1 parent 1: handle 2121 fw flowid 1:1
Example 2:
- As an example we create class with HTB qdiscs and rate 100mbit and class 1:10 will be used by default:
tc qdisc add dev eth3 root handle 1: htb default 10

tc class add dev eth3 parent 1: classid 1:1 htb rate 100mbit
- For class 1:1 we create two branches with rate 5 mbit and 10 kbit accordingly, with classid 1:10 and 1:20.
tc class add dev eth3 parent 1:1 classid 1:10 htb rate 5mbit

tc class add dev eth3 parent 1:1 classid 1:20 htb rate 10kbit
- All packets marked with LVE id=2121 are processed by 10 kbit class.
tc filter add dev eth3 protocol ip parent 1: prio 1 handle 2121 fw flowid 1:20
More info about tc and its syntax can be found on the link http://tldp.org/HOWTO/Traffic-Control-HOWTO/index.html
CloudLinux OS 8 specific setup
In order to apply 256 kbit/s limit to LVE 123 (0x7b) through enp0s3, one needs to run the following commands:
tc qdisc add dev enp0s3 root handle 1: htb
tc class add dev enp0s3 parent 1: classid 1:7b htb rate 256kbit
tc filter add dev enp0s3 parent 1: handle 1: cgroup
Traffic accounting
Traffic accounting is performed for each LVE container. Network statistics is collected at /proc/lve/list file. Network-related data found at fields:
lNETO- output traffic limit by volume, equals 0*lNETI- input traffic limit by volume, equals 0*NETO- current outgoing traffic valueNETI- current incoming traffic value
The data is also collected at /proc/lve/per-lve/<id>/net_stat, where id is an LVE container identifier.
net_stat file contains 4 values in one row:
- Outgoing traffic limit by volume, equals 0*
- Incoming traffic limit by volume, equals 0*
- Current outgoing traffic value
- Current incoming traffic value
Note
The current version of CloudLinux OS Shared network control system doesn’t limit network traffic volume for a specific period of time (for example 3GB per day), it limits only network bandwidth.
Network limits are supported only for processes inside LVE. By default it does not limit static content, but only PHP/cgi scripts processed by Apache and processes launched over ssh etc.
Limits validation
Starting from lve-utils version 3.1-1, the validation of EP and NPROC limits is supported. If an administrator sets the NPROC limit less than (EP + 15), the following warning is shown:
error: You're trying to set invalid LVE limits.
NPROC limit must be greater than EP + 15 limit, because number of processes and threads within LVE includes
also Apache processes/threads, SSH sessions and etc, which enter into LVE.
PMEM LVE limit should not be lower than 512 MB.
Validation does not affect limits operation in any way. Even if invalid limits have been set, they will be applied for users/resellers.
Commands that support validation:
lvectl set
This command allows validation of an LVE ID which does not have a corresponding UID in the system. I.e., you can set limits for any LVE ID and they can be validated.
lvectl set-user
This command allows validation when setting limits using a user name instead of LVE ID.
lvectl set-reseller
This command supports limits validation both for inactive reseller and active one.
lvectl set-reseller-default
This command supports validation when setting default limits for a reseller.
lvectl package-set
This command supports limits validation both for packages existing in the system and nonexisting ones.
- The
cloudlinux-packageandcloudlinux-limitscommands support all validation types described above, and support limits validation and exceptions lists as described below.
Exceptions list (validation is not supported)
- a) When EP limit for a package is greater than a custom NPROC limit for a user included in this package.
OR
b) when NPROC limit for a package is less than a custom EP limit for a user included in this package.
- a) When default EP limit for a hoster is greater than a custom NPROC limit for a user/package which inherits the default limit.
OR
b) When default NPROC limit for a hoster is less than a custom EP limit for a user/package which inherits the default limit.
- When using the following commands:
a) lvectl set-reseller --all
b) cloudlinux-limits --json enable-reseller-limits --all
Existing limits validation
The automatic validation using cldiag utility by cron job is enabled on a server by default. You can disable it in the /etc/sysconfig/cloudlinux config file using ENABLE_CLDIAG option (Warning! This option disables all automatic checks using cldiag!) When calling this utility automatically by cron, it checks all limits existing on the server and send an administrator a report with limits check results. You can use the following command to validate existing limits: cldiag --check-lve-limits.
The important difference between checking existing and setting limits is that even if validation fails when setting limits (see exceptions list above), checking existing limits will catch invalid limits in any case. I.e. even if a server administrator set invalid limits, validation of existing limits will catch invalid limit in any case.
Best practice
Set NPROC limit greater than (EP + 15).
Compatibility matrix
| Web Server / PHP | CPU | Virtual & Physical Memory | EP | NPROC | IO | CageFS | PHP Selector |
| Apache / suPHP | Yes | Yes | Yes | Yes | Yes | Yes | Yes |
| Apache / FCGID | Yes | Yes | Yes | Yes | Yes | Yes | Yes |
| Apache / CGI | Yes | Yes | Yes | Yes | Yes | Yes | Yes |
| Apache / PHP-FPM | Yes 2 | Yes | Yes | Yes | Yes | Yes 2 | No |
| Apache / mod_php (DSO) | Yes | No | Yes | Yes | Yes | No | No |
| Apache / mod_ruid2 | Yes | No | Yes | Yes | Yes | No | No |
| Apache / MPM ITK | Yes | No | Yes | Yes | Yes | Yes 1 | No |
| LiteSpeed | Yes | Yes | Yes | Yes | Yes | Yes | Yes |
| NGINX / PHP-FPM | Yes 2 | Yes | No | Yes | Yes | Yes | No |
| SSH | Yes | Yes | Yes | Yes | Yes | Yes 2 | Yes |
| Cron Jobs | Yes | Yes | Yes | Yes | Yes | Yes | Yes |
| Apache / mod_lsapi | Yes | Yes | Yes | Yes | Yes | Yes | Yes |
- Requires patched version of MPM-ITK. CL httpd RPM has ITK worker with the patch. Patch is also available at: https://repo.cloudlinux.com/cloudlinux/sources/da/cl-apache-patches.tar.gz
- PHP binaries from sources other than DirectAdmin/CloudLinux OS require recompile with patches available at: https://repo.cloudlinux.com/cloudlinux/sources/da/cl-apache-patches.tar.gz
Note
Please note that mod_lsapi does not work when php-fpm is enabled because php-fpm is also a PHP Handler just as mod_lsapi.
Note
mod_lsapi is an Apache module whilst LiteSpeed is a standalone solution and does not use any of Apache modules (since it provides its own implementation of these modules). Moreover, it is advised to leave your Apache configuration as is just in case you decide to switch back from LiteSpeed.
Reseller limits
Reseller limits is a feature that allows hosters to limit the resources each reseller can operate. Reseller limits put a restriction on the cumulative resources this reseller and his end-users can use at any given moment in time.
Reseller limits feature also enables hosters to give their resellers controls over the end-user’s resources. Resellers can assign limits to their end-users as they want, even if they are higher than the limits assigned to the reseller. The reseller’s end-users will not be limited by the reseller limits unless their cumulative usage goes above the limits the hoster assigned to their reseller.
Reseller cannot manage INODE or MYSQL limits. Neither his own, nor for his users.
Design
To understand the quirks of how Reseller Limits operate, we need to look more closely into the four types of users that a typical shared hosting server has:
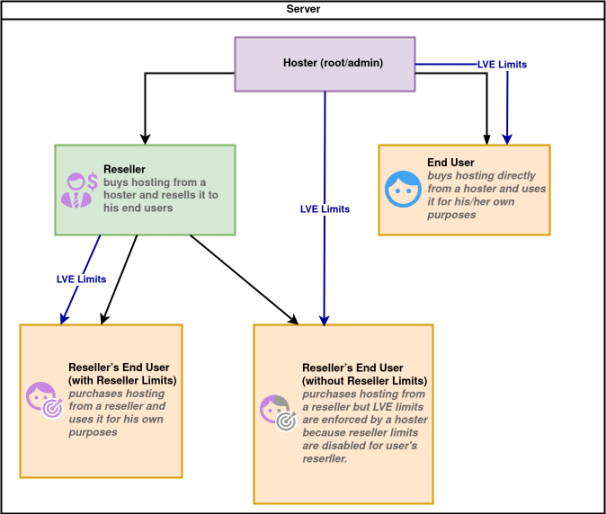
Reseller himself (green box on the scheme) is a virtual entity. When a hoster enables reseller limits, the entity itself cannot hit the limits. There is usually an end-user with the same username as the reseller that acts as a regular reseller’s end-user. When the hoster sets Reseller limits, he limits the group of end-users he owns, including the reseller's end-user with the same username.
Resellers can configure their end-users limits differently. There are several scenarios when Reseller limits will get activated:
- A reseller can assign limits to their end-users that are higher than the limits hoster assigned to this reseller. In this case, the end-user will be limited by reseller limit when he reaches it.
- A reseller can assign limits to their end-users that are lower than the limits hoster assigned to this reseller. In this case, the end-user will be limited by his limit and not by the reseller limits when he reaches it.
- Reseller limits will get activated when all reseller’s resources are consumed by his users at any given moment.
As you probably have already understood, the reseller will technically be able to assign his/her end-users limits higher than his Reseller limits. However, it won’t be possible for the end-users to go over the reseller limits no matter what his individual limit is.
Requirements
- CloudLinux OS Shared should be installed on the server.
- You also need to check that your kernel supports Reseller limits feature
- CloudLinux OS Shared 6 and kernels 2.16+: not supported, you need to migrate to Hybrid.
- CloudLinux OS Shared 6 Hybrid: supported starting from 3.10.0-714.10.2.lve1.5.3.el6h kernel.
- CloudLinux OS Shared 7: supported starting from 3.10.0-714.10.2.lve1.5.3.el7 kernel.
- CloudLinux OS Shared 7 Hybrid: supported
- CloudLinux OS Shared 8: supported
- lvemanager package version 3.0-18+ and later installed. If you don’t have it, update your system
Configuration
Enabling Reseller limits
If you have decided to jump on board and enable Reseller limits for your resellers you should do the following:
- Make sure that you run CloudLinux OS Shared with the kernel and lvemanager that meets the necessary requirements.
- Log in with a hoster access.
- You can create a new reseller account or configure an existing reseller account to have Reseller limits enabled. Consult your control panel documentation on how to do that.
- For cPanel servers when creating an account, make sure to tick two checkboxes Make this account a reseller and Make the account own itself in the Reseller Settings box.
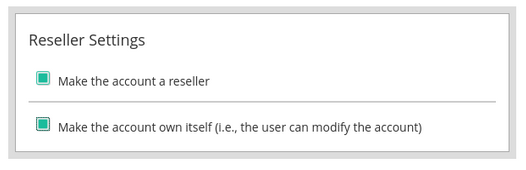
Selecting Make the account own itself makes the reseller full owner of all his accounts, including the end-user account with the same username. This option is integral to making reseller limits work for the reseller account. If you don’t select it, Reseller limits will not be applied. If the reseller account you want to limit with Reseller limits has already existed, you need to make sure it is properly owned. Go to WHM -> Modify account -> find the account with the same username as your reseller -> change the owner to the username of your reseller.
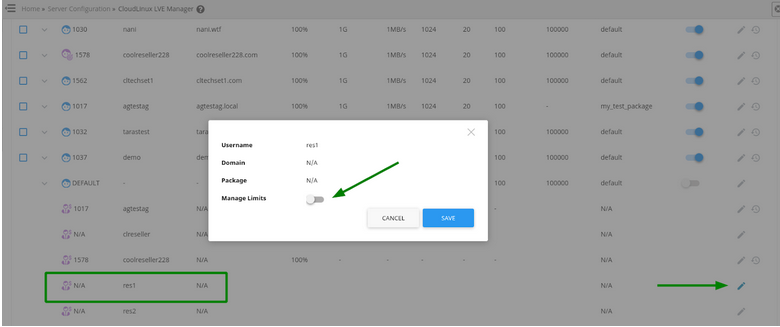
- Now that preparations are done, go to CloudLinux OS Shared LVE Manager -> Users tab, choose a reseller and click on the pencil icon.
- When the pop-up opens, move the slider Manage Limits -> Click AGREE when asked Are you sure you want to enable limits -> assign the limits to that reseller. Finally, click Save.
Note
Managing Reseller limits are not available for Solo and Admin editions. More at Cloudlinux OS editions
When you move a user from one reseller to another on DirectAdmin you need to manually change its package because the packages aren’t moved together with users. If you don’t reassign the package, the limits for the user you have moved will be reset to default.
Note
DirectAdmin only: when Reseller limits are enabled, reseller's enduser's package is replaced with a DEFAULT virtual package that inherits the default user's limits (lve and quotas) .
lve-utils > 6.3.7 provides a new configuration option - cl_quota_inodes_inheritance, which allows to keep the same quotas limits in this case. Add the cl_quota_inodes_inheritance=1 flag to the /etc/sysconfig/cloudlinux configuration file to preserve reseller's enduser's inodes limits when Reseller limits are enabled.
How to disable Reseller limits
- Go to the Users tab, choose a particular reseller and click on the pencil icon.
- In the pop-up move the slider Manage Limits. Click AGREE for the question Are you sure you want to disable limits. Then click Save.
If you disable Reseller limits everything will work the same as before. All the end user limits set by the reseller will be saved. But all custom default reseller limits will be disabled.
More resources
It is possible that you still have some questions left unanswered about Reseller limits. That’s why we have more knowledge sources that you can check out:
WEB interface resource limiting modes
Ability to manage the limiting modes of user processes started from web interface (e.g. Node.JS, Ruby and Python Selectors). The configuration allows to disable LVE limiting for some commands or don't limit web commands at all.
Also, there is a short list of processes, that runs without CageFS in every modes. They are not affecting security, but we are working on removing them from excludes.
To use it, add the web_resource_limit_mode parameter to the /etc/sysconfig/cloudlinux file.
Possible parameter values:
all: the default option. All processes will run inside CageFS and with LVE limits being applied.heavy: there is a list of processes that are considered lightweight. In this mode, they will be executed inside CageFS, but no resource limits: CPU, IO, memory, and NUMPROC. List of ligthweight processes is defined by CloudLinux and it's guarantied that user can't bypass LVE limits for a long-term. For example, this mode allows a user to execute thecloudlinux-selector stopprocess, even if the user hits the NUMPROC limit.unlimited: all processes will run inside CageFS, but ignore CPU, IO, memory, and NUMPROC limits. Not recommended for production usage.
Requirements:
- CloudLinux OS Shared should be installed on the server
- Packages:
- cagefs package installed
- lve-wrappers >= 0.7.2
- lvemanager >= 7.5.9
- kmod-lve >= 2.0.36
- lve >= 2.1.2